Winter Baby Shower – Cute Cable Knit & Buttercream Pine Cone Cookies
It’s winter baby shower season so I found it most appropriate to make these cute cable knit footie and buttercream pine cone cookies.
The cable knit footie onesies are adorable and so easy. I also hadn’t seen a tutorial for pine cone cookies with buttercream icing so I figured I’d create one for you all.
These cookies are perfect for a Winter Wonderland baby shower dessert or a Baby it’s Cold Outside baby shower theme. All you need to do is adjust the colors to your decor and you have a beautiful set of custom cookies.
Follow the beginner-friendly tutorial with step-by-step photos plus a video on how to make winter baby shower cookies.
*This post may contain affiliate links, which means I may receive a commission, at no extra cost to you, if you make a purchase through a link. Please see my full disclosure for further information.*
Skip to
Part 1: Gathering the Supplies for the Winter Baby Shower Cookies
To make these cable knit footie cookies & pine cone cookies for a winter baby shower, you will want to gather:
- 3 Icing bags
- 3 Couplers
- Wilton #1, #3, #5, & #104 tip sizes – buy these individually at a bake supply store or purchase this kit
- Footie cookie cutter, snowflake cookie cutter, and pine cone cookie cutter (I used a grape cookie cutter)
- Wilton brown & green gel food dyes; I’ve found the best price at Walmart
- recommended but not completely necessary – Wilton white liquid food dye, this can help prevent bleed from the green/brown & white touching
- Palette knife – this is my favorite one
- Sanding sugar & white sprinkles for glistening snow
- Ingredients for a crusting buttercream, find my crusting buttercream icing recipe here
- Ingredients for sugar cookie dough, find my no spread sugar cookies recipe here
Part 2: Baking the Cookies and Setting up the Icing Bags
- Roll, cut out, and bake your sugar cookies according to the recipe. For a dozen cookies, I would personally do 3 footie pjs, 3 snowflakes, 3 pine cones, and 3 pine needles. Remember, the pine cone (or grape) cookie cutter will be used for both the pine cones and the pine needles.
- Make your buttercream icing and separate it into three different bowls. Color one bowl brown, one green, and one white if using the white liquid dye.
- Add each bowl of frosting into their own icing bags with couplers.
- If you don’t know how to set up icing bags, just hop over to my Getting Started: Learn How to Decorate Buttercream Cookies page for a detailed explanation.
Part 3: The Tutorial for Winter Baby Shower Cookies
Check out the video here to see how to decorate each cookie design in the winter baby shower set. Then, check out the breakdown step-by-step photo series tutorial for each cookie below.
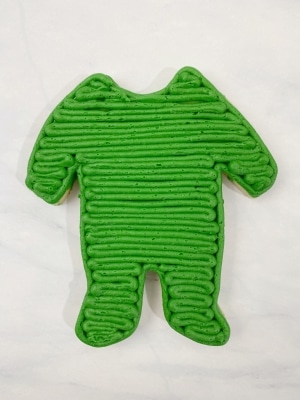
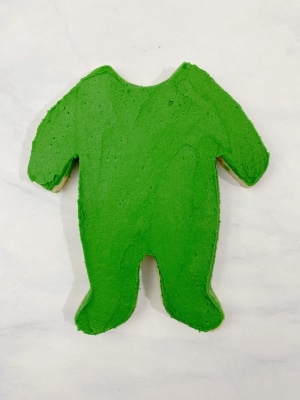
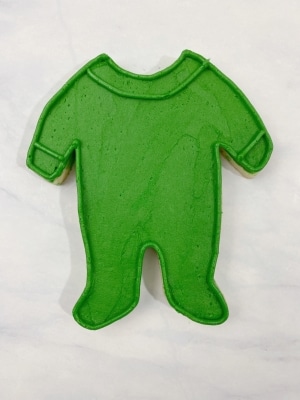
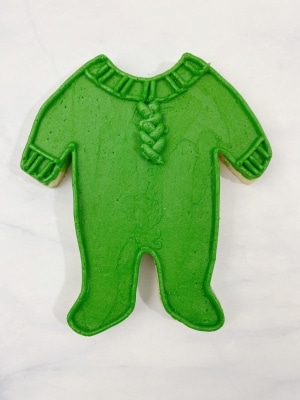
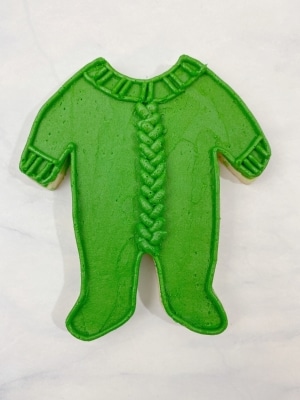
How to Make the Cable Knit Footie Cookies
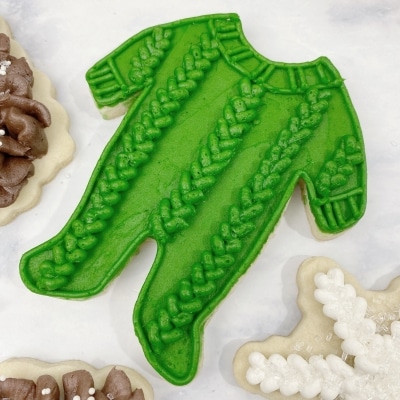
- Attach the tip #5 to the green frosting to outline and fill in the cookie. Then, smooth out the buttercream with the palette knife. Do this step for all of the footie cookies before moving to step 2.

- Replace the tip #5 with the tip #3. Outline the edge of the footie. Next, draw lines for the collar/sleeve cuffs and pipe some lines for a knit look. Complete this step on all the footie cookies before moving to the next step.
- Attach to the tip #5 back to the green icing. Create the buttercream cable knit by drawing a 45 degree line and then a 135 degree line. So, it will look somewhat like an X, but the bottoms of the X don’t need to be so long. Check out the video above to see a slowed down process of the movement.


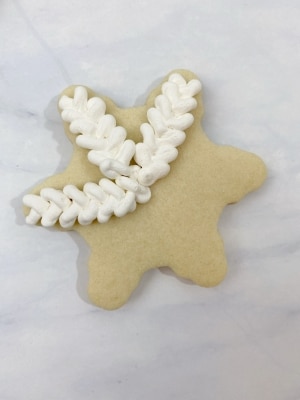
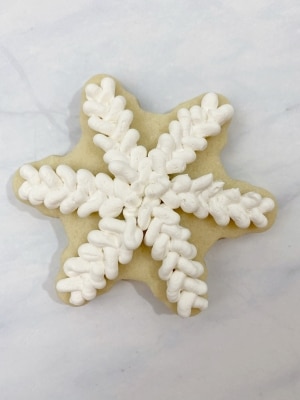
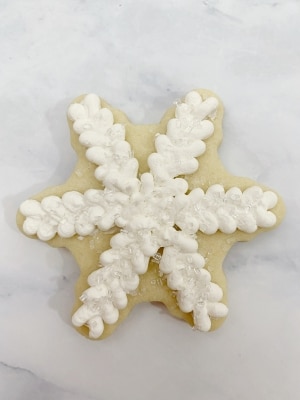
How to Make the Cable Knit Snowflake Cookies
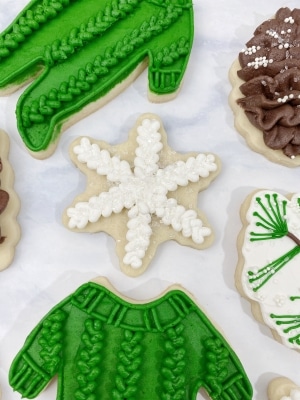
- Attach the tip #5 to the white icing bag, making sure that it was rinsed and dried if used previously with another color. Pipe out the cable knit pattern as explained above and in the video. Pipe to the middle of the cookie, rather than all the way to the other side, so that the knit pattern is in the correct direction no matter which side you view the snowflake.
- Finish the cable knit snowflake cookies with some sanding sugar. I used a spoon to help drop the sugar onto the cookie.
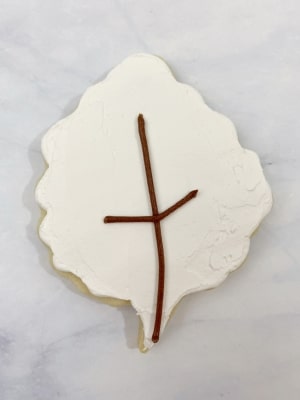
How to Make the Pine Needle Cookies
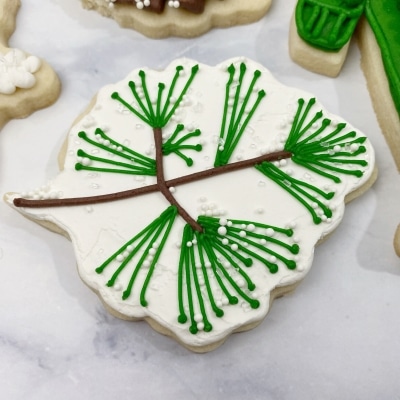
- Attach the tip #5 to the white icing bag and outline/fill in the pine cone (or grape) cookie cutter. Smooth the frosting with the palette knife.
- Attach the rinsed & dried tip #3 to the brown frosting and pipe out the pine needle stem.
- Attach the tip #1 to the green frosting and pipe out the pine needles. You can choose to fill the whole stem with needles, but since it can be quite time consuming to do so, you can pipe just some like I did. This still gives the intended look but saves some time. Pro tip – end each pine needle with a small ball of icing to give it a more finished/cleaner appearance.
- Spoon on some white sprinkles and sanding sugar for a snowy look.
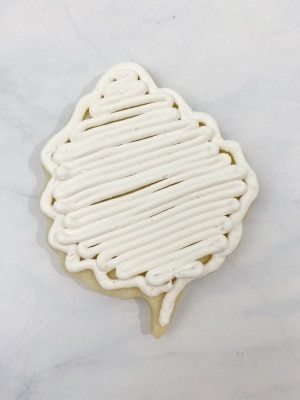


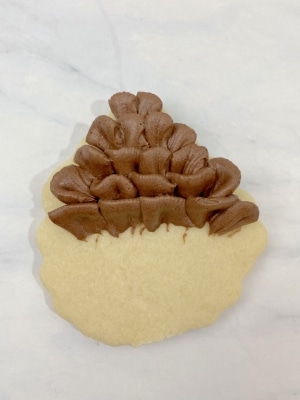
How to Make the Buttercream Pine Cone Cookies

- Use the tip #104 with the brown icing to pipe the first row of pine cone scales, typically this will be one or two scales. Throughout the whole buttercream pine cone making, you will want to hold the icing bag so that the fat side of the tip #104 is up and the skinny side is on the cookie.
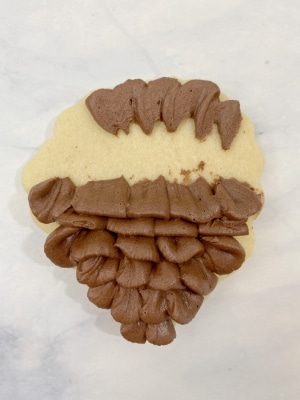
- Continue building more layers of scales until you get about halfway down the cookie. As you pipe each layer, you will bring the scales more perpendicular than the last row. You’ll see in the photo just below that the 5th row is almost completely perpendicular to the cookie.
- Flip the cookie upside down and pipe out a ruffle for the top (but really the bottom) of the pine cone. This ruffle layer should be flat on the cookie, with the fat side away from you and the skinny side toward you.
- For the remaining rows, pipe the pine cone scales as you did in steps 1 & 2, allowing them to become more perpendicular as you get to the middle of the pine cone. The last layer will likely be completely vertical/perpendicular, or close to it.
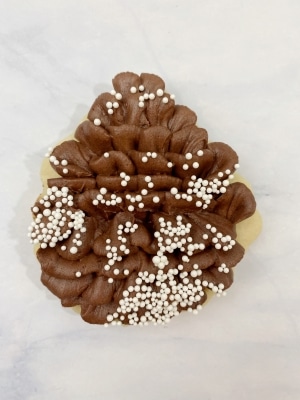
When the cookie is flipped back upright, it resembles a pine cone! - Carefully pick up the pine cone and flip it upside down into a bowl of white sprinkles. You will want to very lightly push the scales into the sprinkles, being careful not to smoosh them. You can use a spoon to add the sprinkles if you don’t want to dip upside down. I liked how the flip-upside-down-method allows the snow to just be on the tips of the pine cone and not on the inside of them.
- Use a spoon to place some of the sanding sugar sprinkles onto the pine cone cookies for a glistening effect.


I hope you enjoyed the tutorial for cable knit buttercream and pine cone cookies. If you are expecting a new baby in the family, congratulations!

As always, thank you for supporting my blog by reading these tutorials. I’d love to see your recreations so make sure to tag me, @buttercreamparties, on Instagram so I can see how awesome yours turned out!
Save the Tutorial for How to Winter Baby Shower Cookies
Use the image below to pin this decorating tutorial to your baby shower board on Pinterest. Alternatively, use any of the social share icons on the top of the page to share it to your favorite social media site.