How to Decorate Fun Llama Birthday Cookies
A fun party theme I’ve seen lately is a llama and cactus party. I love this party theme because it’s both original and can be appropriate for any time of the year.
I’ve seen fun llama birthday party and cactus baby shower themes on Pinterest.
Therefore, I thought it would be appropriate to create an easy to follow tutorial for how to decorate sugar cookies with this party theme in mind.
*This post may contain affiliate links, which means I may receive a commission, at no extra cost to you, if you make a purchase through a link. Please see my full disclosure for further information.*
Skip to
Part 1: Gathering your Supplies for your Llama Birthday or Cactus Baby Shower Cookies
To create these llama and cactus cookies for your party, you will want to gather:
- 4 Icing bags
- 2 Couplers
- One of each Wilton tip #1, #2, #4, #18, and #32 – buy these individually at a craft store or purchase this kit that I use all the time if you become addicted to decorating cookies regularly like me
- Llama and cactus cookie cutters – You can find the same cutters I used in this cute set by Ann Clark Cookie Cutters that my sister gifted me, thanks Linds!
- Green, pink, black, and white buttercream frosting*
- Pointed knife – optional, to fix any piping mistakes
- Your favorite sugar cookie dough recipe – if you don’t have a favorite, I recommend Katrina’s Best Sugar Cookie Recipe
Prefer grocery delivery during the pandemic? Check out Shipt! Order from your local store and get your groceries delivered right to your door!

 *Your buttercream frosting should, ideally, be a frosting that “crusts.” This means that the frosting will form an outer crust to protect it while traveling. Check out my recipe for crusting buttercream if you don’t already have a favorite. I prefer to use the Wilton gel food dye since gel is more vibrant (i.e. more cost effective because you use less) than liquid and doesn’t change the consistency of your frosting. You can get that here: Wilton Gel Coloring 12 Count.
You may be asking, “What are couplers?” Couplers allow you to change your tips on your icing bags. Check out my page, Getting Started: Learn How to Decorate Buttercream Cookies, to learn how to do this. Essentially, you will attach a coupler to each icing bag. When you need to attach a tip, just make sure to rinse out the previous color from the tip with hot water. Purchasing a set of couplers is pretty affordable on Amazon: 4 Count Wilton Coupler Set.
Part 2: Baking the Cookies and Setting up Your Icing Bags
- Roll, cut out, and bake your sugar cookies according to your cookie dough recipe.
- Make your buttercream icing and separate it into four bowls. You won’t need much black frosting at all but go ahead and mix that up first so that the black has time to deepen in color. Then, mix your green and pink frosting colors. Remember that the color will still deepen as it sets.
- Set up your icing bags as follows: Place the white frosting into a bag with the tip #4 in it and the black frosting into a bag with the tip #1 in it. Place the pink and green frostings into their own bags, each with a coupler in it. If you don’t know how to do this, just hop over to my Getting Started: Learn How to Decorate Buttercream Cookies page. Go ahead and attach the tip #32 to the green icing and the tip #18 to the pink frosting.
Part 3: How to Decorate the Sugar Cookies for Your Baby Shower or Birthday Party
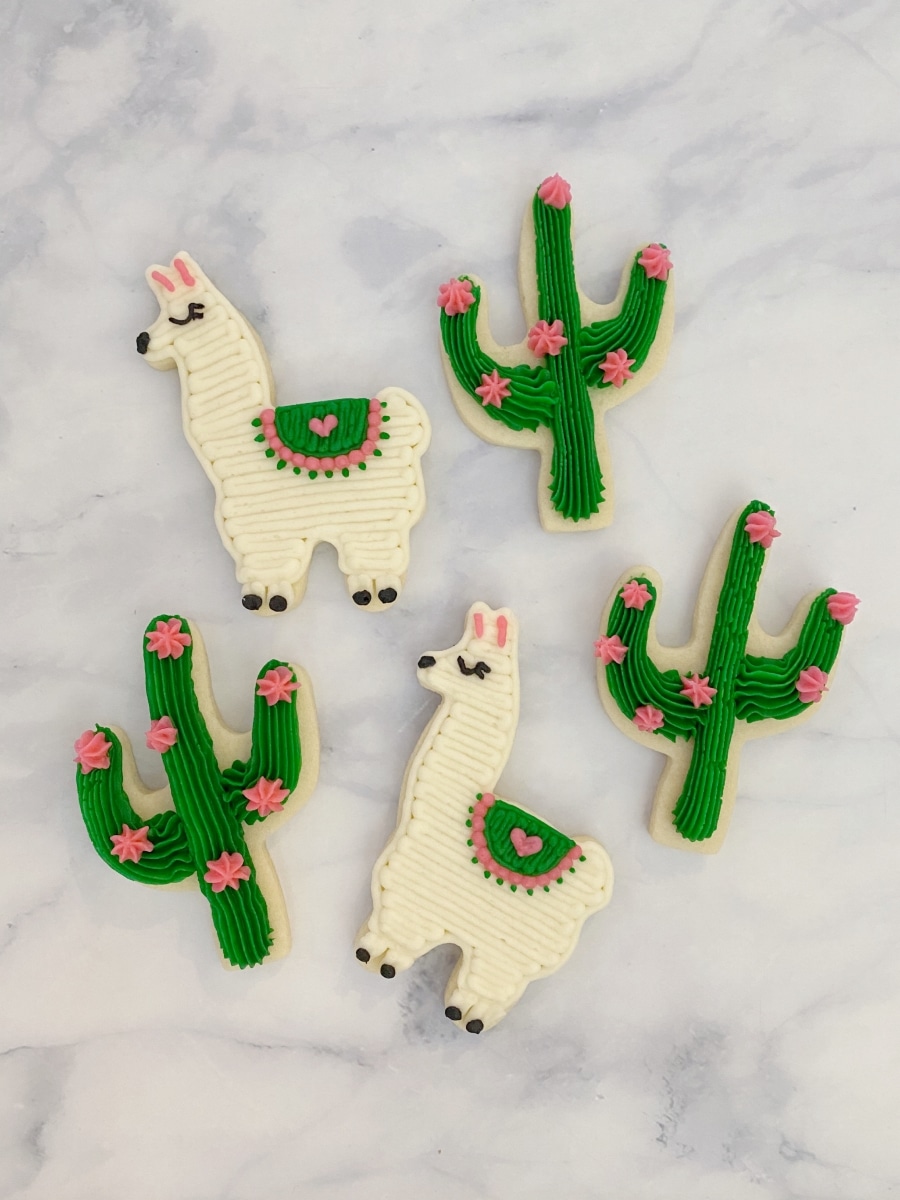
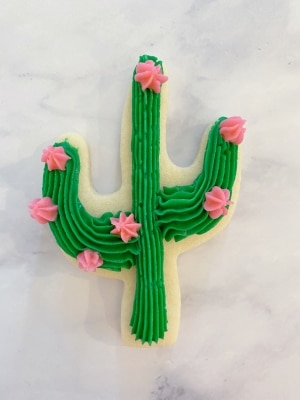
Cactus Buttercream Cookies
First up are these super easy cactus decorated sugar cookies. Check out the video tutorial below to see how these buttercream cookies are truly beginner-friendly. Then, check out the step-by-step photo series for all of the details.
- The first step for creating our cactus cookies is to pipe out the middle cactus branch. Is it a branch? Is it a trunk? I don’t know what it’s called but do that first. To do the middle branch, use the green frosting with tip #32 attached. Keep the same pressure as you pipe the whole length of the middle branch. Start at the bottom of the cookie with the tip straight up and down. When you get to the top of the cookie, stop putting any pressure on the bag. If the top looks really funky, you can use a pointed knife to round it out a bit.

- Next is to pipe out the side branches. You will want to start in the middle of the cookie and work your way to the tip of the branch. I found that I preferred the look of making the start of the branch thicker than the tip. To do this, keep the piping bag in the same spot while you squeeze until the desired width. Then you can start moving your hand out along the rest of the branch.
- Lastly, use the pink frosting with tip #18 attached to squeeze out small flowers wherever you see fit. That’s it!


Llama Buttercream Cookies
Check out the video cookie tutorial first to see how these llama cookies come together. This one seems more advanced but if you follow the exact steps, you will have a cute little llama cookie too!
- First, outline and fill in the shape of the llama with the white frosting. Remember that this bag of icing should have the tip #4 attached to it. When you get to the llama’s legs, don’t go all the way down to the bottom of the cookie. Llamas have skinny legs so we will do that part next.

- Next, use the same white frosting to draw the legs of the llama.
- Now, use the black frosting to squeeze out hooves, an eye (with eyelashes if you want a glam llama like I did!), and a nose. Remember, the black frosting has the tip #1 attached.
- To create the details on our llama cookies, first switch the green frosting over to the tip #2. Use this frosting to draw and fill in the half circle for the blanket. Do this step for all of the llama cookies before proceeding to the next step.
- Remove the tip #2 from the green frosting and rinse it out with hot water. Dry the tip and then attach it to the pink frosting. Squeeze out dots along the edge of the blanket, create a heart on the blanket, and draw two lines for ears. You will notice that these dots/lines seem to be thicker than the green lines were using the same tip. All you need to do is squeeze out more frosting, just like you did for the cactus cookies in step two. This is a nice trick for when you don’t have a ton of tip sizes available.
- Once you’ve completed step 5 on all of your llama buttercream cookies, remove/rinse/dry the tip #2 from the pink frosting and place it back onto the green frosting for our last step. Squeeze out small dots or lines onto the pink dots to finish the blanket.


Storing & Freezing Decorated Sugar Cookies
A question I get asked often is if buttercream sugar cookies can be decorated ahead of time. The answer is, yes, you just want to make sure you are freezing decorated sugar cookies if you make them too far in advance. Go ahead and store these in the freezer for up to a week (you could probably get away with two weeks) in an airtight container. Something like this works great because it’s shallow. I’d recommend getting two of the containers. You will use them for other things, just like all storage containers!
I don’t like to stack the cookies in the freezer in case the frosting sticks together. That is why I recommend the shallow but long Tupperware storage containers. You can fit a lot of cookies in one single layer. However, I have stacked cookies before, and, as long as you wait until the cookies come to room temp after removal, you can unstick them. But it’s best to be safe than sorry!
How to Package Buttercream Cookies
To transport your buttercream sugar cookies, you can use the same airtight containers that you would use to freeze them. If you want to individually package your cookies for an event, I’d recommend packaging them with self sealing bags and putting them in a box, such as a pizza box. For extra safety, you can line the bottom of your pizza box with a paper towel. For more information on how to package buttercream sugar cookies, check out my blog post here: How to Package Buttercream Cookies

Once you have arrived at the party location, you can plate them and stack them as you wish. Remember, they will crust over so they can still be stacked. Of course, you probably want to stagger them a bit so you can still show off your decorating skills! Decorated cookies are basically edible party decorations.
Part 4: Decorating the Llama Birthday Party
It’s so fun to decorate a llama birthday party. Grab some balloons, streamers, tabletop confetti, and a backdrop and you’re good to go!


Save The Tutorial for These Cactus and Llama Cookies for Later
To save the tutorial for these buttercream sugar cookies for later, simply click on any of the social share icons on the top or side of this page. Alternatively, hover over the image below to pin the image to your Pinterest page!


These are so great, and now I want to organize a llama party just so I can make some! Maybe the cactus ones for Cinco de Mayo? hmmm
Yes, these are perfect for Cinco de Mayo!
Omg my daughter would absolutely love these. She’s crazy about llamas and cacti. I need to look for cookie cutters!!
I love the Ann Clark ones I linked above! You can also find them on the Ann Clark website if you don’t need prime shipping, assuming you have Amazon Prime of course.
All of your cookie decorating tutorials are seriously the cutest! Llamas are the best and the cactus is perfect since I’m from AZ! I can’t wait to make these.
Thanks so much Emily! Have fun decorating!
These are so cute. I like the way you packaged them to transport from one location to another.
Thank you! People often wonder how to package buttercream cookies but it is totally do-able with crusting buttercream.