Cute Peach Decorated Cookies for a Sweet as a Peach Baby Shower
I am loving all of the fruit themed baby showers I have seen popping up on Instagram and Pinterest! They are so cute and perfect for spring. Here is a tutorial for peach decorated cookies to compliment a Sweet as a Peach baby shower theme!
*This post may contain affiliate links, which means I may receive a commission, at no extra cost to you, if you make a purchase through a link. Please see my full disclosure for further information.*
Skip to
Part 1: Gathering Your Supplies For Your Peach Decorated Cookies
To create these simple peach decorated cookies using buttercream frosting, you will want to gather:
- 3 Icing bags
- A Wilton #2, #5, #12, and #69 tip – I love this set of tips because it contains all the tips I use for my tutorials but you can also go to Michaels and purchase each tip on it’s own
- 3 Couplers
- Bottle and onesie cookie cutters, both of which can be found in this set: Ann Clark 7 Piece Baby Shower Cookie Cutter Set
- Peach cookie cutter – I used the one in this set
- Wilton gel coloring to obtain peach, green, and white buttercream frosting, here’s my crusting buttercream recipe
- Your favorite sugar cookie dough recipe – if you don’t have a favorite, here’s mine
- Angled flat spatula
- Parchment paper, optional
Part 2: Baking the Cookies & Setting up Your Icing Bags
- Roll, cut out, and bake your sugar cookies according to your cookie dough recipe. You should be able to make at least 4 of each cookie shape if you used the recipe I linked above with your dough.
- Make your buttercream icing and separate it into three bowls. You will be using much less green frosting, so adjust your amounts accordingly. I never measure anything but you can roughly judge the amount needed for the leaves. Mix up your green frosting first, as the color will deepen as it sets. Then, mix together Wilton yellow and Wilton pink until you obtain a shade of peach.
- Set up your icing bags as follows: Place each color of icing into it’s own icing bag, each with a coupler in the bag. If you aren’t sure how to do this, no worries, just hop over to my Getting Started: Learn How to Decorate Buttercream Cookies page. You don’t need to worry about adding the tips yet.
Part 3: The Fun Part! Frosting Your Peach Decorated Cookies!
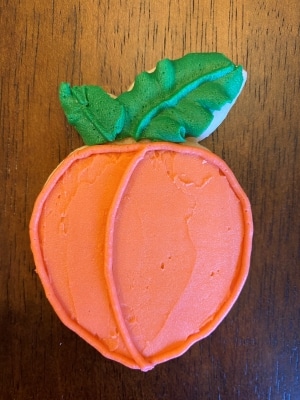
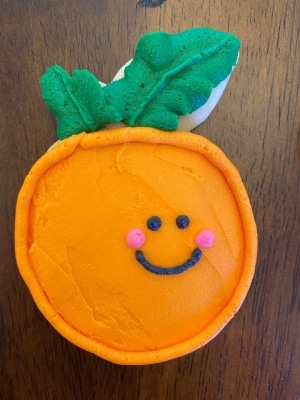
I. Sweet as a Peach Baby Shower Peach Cookies
- Our first step is to outline and fill in the shape of the peach. To do this step, attach tip #12 to the peach frosting. It’s okay if it is a bit sloppy, as you will be cleaning it up as you smooth it out in the next step.

- Next, smooth out your peach frosting. I have two favorite ways to do this. The first way involves placing all of your cookies (with step 1 completed) into the freezer for at least 10 minutes. Make sure that they aren’t stacked on top of each other. Then, use a flat spatula to smooth out the lines. If you don’t have the freezer space, my other favorite way to smooth frosting is to use parchment paper. Cut a piece of parchment paper out just larger than the cookie, lay it on top, and gently press down to remove the lines on the peach. Carefully remove the parchment paper away from the peach, making sure to not pick up any frosting. Doing this always reminds me of those temporary tattoos. Then, use the flat spatula to perfect it a bit more.
Using the parchment paper method Use the flat spatula to finish smoothing & to clean up the edges - Remove tip #12 from the peach frosting and attach a tip #5 to it. Outline your peach again. Then, draw a curved line down the middle.
- Next, attach tip #69 to your green frosting to create a large leaf. In the photo, you can see how I position the tip in order to get the right shape. Often times, your leaf will not want to let go of the tip. Use a flat spatula, or just your fingers, to pinch together the frosting at the end of the leaf to create a nice point. Repeat the same steps for the smaller leaf.


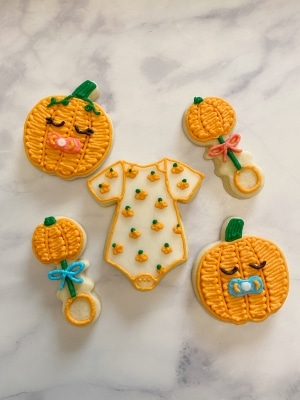
II. Sweet as a Peach Baby Shower Bottle Cookies
- To create your bottles, attach tip #5 to the white frosting. Make sure that you have rinsed and dried the tip if you just used it to create your peach cookies. Outline the edges of the bottle, fill them in with horizontal lines, and outline/fill the nipple.
- Switch your peach frosting to a tip #2 and draw the measuring guide.
- Outline and fill in the cap as well. Use vertical lines to represent the texture in a bottle cap.


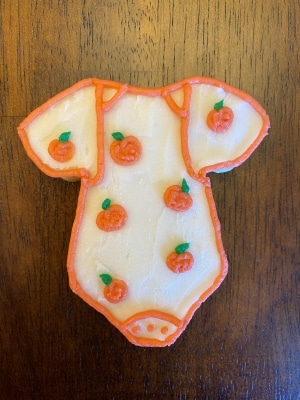
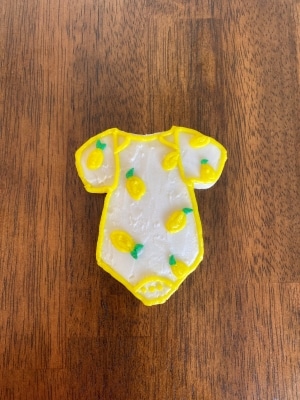
III. Sweet as a Peach Baby Shower Onesie Cookies
- To create the onesies, outline the edges of the onesie with your white frosting, with tip #5 attached, and fill it in.
- Use the same smoothing technique that was used for the peaches to create a smooth surface.
- Take your peach frosting, with tip #2 still attached, and outline the edges of the onesie. Add in all of the sewn details of the onesie as well.
- To create the mini peaches, draw a mini circle/heart shape. Reference the photo for the specific shape. Then, fill in the small holes left behind. Repeat this process to fill in the whole onesie with peaches.
- Switch your green frosting over to a tip #2 and create small leaves on the peaches. To create the leaves, squeeze out a small dot and then use the tip of the flat spatula, toothpick, or a knife to pull the frosting out to create a nice pointed tip.


Aren’t these peach decorated cookies just the sweetest? I’d love to know in the comments below if you’ve ever attended a Sweet as a Peach baby shower or any other fruit themed shower! They are just so fun.
Save the Tutorial for These Peach Decorated Cookies for Later
Save the tutorial for these buttercream iced cookies for later by pinning one of the images below. You can also use any of the social share icons on this page to share it to your favorite social media site.


How cute are these?! I love the idea of a “cute as a peach baby shower!”
Oh my God these are just so stinking cute. I love how detailed you are and how wonderfully decorated to perfection the cookies are. The addition of the parchment paper here is just such a wonderful tip.