
How to Decorate Harry Potter Gender Reveal Cookies with Buttercream
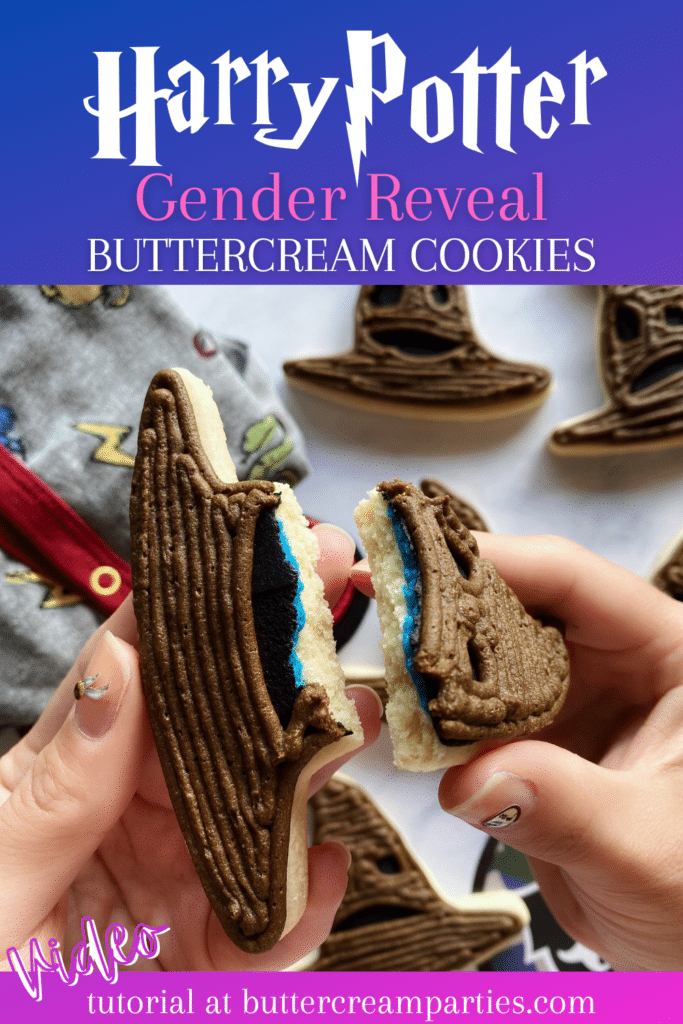
I I think it’s about time for another Harry Potter cookie decorating tutorial! After seeing these fun Harry Potter gender reveal party themes, I knew that I needed to create some Harry Potter gender reveal cookies. It didn’t take much imagination to come up with the perfect cookie, a Sorting Hat cookie! These Sorting Hat cookies are the perfect way to announce to your guests the gender of the baby! Bite into these delicious buttercream iced cookies and let the excitement begin!

Follow along for a beginner-friendly, step-by-step tutorial for these Harry Potter gender reveal sugar cookies. I have also included a video detailing the whole entire process so make sure to check that out below!
*This post may contain affiliate links, which means I may receive a commission, at no extra cost to you, if you make a purchase through a link. Please see my full disclosure for further information.*
Skip to
- Part 1: Gathering the Supplies for the Harry Potter Gender Reveal Cookies
- Part 2: Baking the Cookies and Setting up Your Icing Bags
- Easy No Chill No Spread Sugar Cookie Dough
- All American Crusting Buttercream Frosting Recipe
- Part 3: Decorating the Sorting Hat Gender Reveal Cookies
- Storing & Freezing Decorated Sugar Cookies
- How to Package these Buttercream Cookies for a Harry Potter Gender Reveal Party
- Don’t Forget Your Harry Potter Gender Reveal Decorations!
- Save The Tutorial for These Sorting Hat Cookies for Later
Part 1: Gathering the Supplies for the Harry Potter Gender Reveal Cookies
To create these buttercream sugar cookies for your gender reveal party, you will want to gather:
- 2 Icing bags
- A Wilton tip #2 and a Wilton tip #4
- Sorting Hat cookie cutter
- Brown, black, AND pink or blue Wilton gel color
- 9″ Angled flat spatula and/or a butter knife
- Pizza cutter or sharp knife
- No chill, no spread sugar cookie dough – see recipe below
- Crusting buttercream – see recipe and notes below
Part 2: Baking the Cookies and Setting up Your Icing Bags
How to Make Gender Reveal Cookies
Remember to check out the video above to see the full process. Here are all of the steps below.
- Using the recipe below, follow the instructions through step 5. Once you have your ball of dough formed, pull out about 1/4 of a cup of the dough and set it aside.
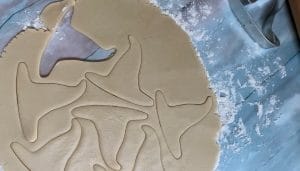
- On a floured surface, roll out the larger ball of dough to about 1/4″ thick and cut out your Sorting Hat cookies. Place these cookies onto a lined baking sheet. I like to use this silicone mat. Don’t bake them yet!

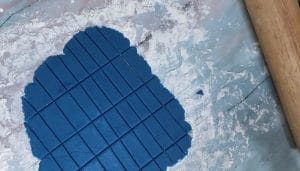
- Place the reserved 1/4 of a cup of dough back into your stand mixer. Use a fork to pull out some of the blue or pink gel food coloring and wipe it onto the dough. Mix up your colored dough in the mixer.
- On a floured surface, roll out the dough to about an 1/8th of an inch thick. Using the cookie cutter as a guide, cut strips of the colored dough such that they will fit onto the cookie without getting near the edges. We don’t want any sneak peeks before the big reveal!

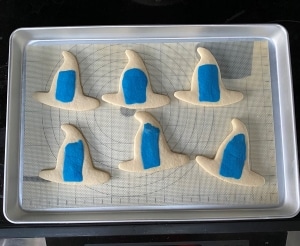
- Place the strips onto the prepared sorting hat cookies. If they don’t want to stick, you can slightly wet the colored dough with water or just place the non floured side down onto the Sorting Hats. Then, press the colored dough further into the Sorting Hat cookies using a spoon or your fingers.
- Bake for about 9 minutes or until the edges are slightly golden. Since you pushed the colored dough into the cookies, you shouldn’t need to adjust your cooking time by more than a minute or so.

Here they are baked and ready to decorate!

Easy No Chill No Spread Sugar Cookie Dough
Equipment
- Stand Mixer with Paddle Attachment
- Measuring Bowls & Spoons
Ingredients
- 1 cup cold salted butter cut into cubes
- 1 cup granulated white sugar
- 1 egg
- 3 cups all purpose flour
- 2 tsp baking powder
- 1.5 tsp vanilla extract
Instructions
- Preheat your oven to 350 degrees.
- In a large bowl, mix your flour and baking powder together. When measuring the flour, make sure to scoop up the flour with a spoon and add it to your measuring cup, one spoonful at a time. This helps obtain the correct amount of flour without needing to weigh it. Once you have a cup, level it out by running a knife across the top of the measuring cup. Then, add it to the large mixing bowl and repeat for the remaining flour. Set the mixture of flour and baking powder aside for a minute.
- In your electric mixer, combine the sugar and butter using the paddle attachment until they are creamed together.
- Add in your egg and vanilla extract and mix to combine.
- Slowly add in one cup (or whatever your mixer can handle) at a time of the flour mixture to the wet ingredients. The mixture should be slightly sticky but still form a nice ball.
- On a floured surface, roll out the dough to about a 1/4 of an inch thick & cut out your cookies. A great tip is to flour your rolling pin and any cookie cutters you may be using. Transfer the cut out cookies to a baking sheet lined with a silicone mat using a large flat spatula.
- Bake for about 10 minutes and let cool on the baking sheet. The dough will be done when the center of the dough doesn’t look wet and the edges are golden.
Notes
How to Set up the Buttercream Icing Bags
- Make your buttercream icing using the recipe below and separate it into two bowls. You will only need about 1 cup for the black buttercream so your amounts in each bowl will be different. Mix in your black and brown gel colors. To create a deep shade, mix in just enough to get about 3/4 of the way to your desired shade. Then, place a piece of plastic wrap over the frosting and allow it to sit on the counter for a few hours to deepen. If you don’t have the time to do this, then just add more gel color. Remember that the color will still deepen as it sets.
- Set up your icing bags as follows: Place the black frosting into an icing bag with the Wilton tip #2 in it. Place the brown frosting into an icing bag with the Wilton tip #4 in it. If you don’t know how to do this, just hop over to my Getting Started: Learn How to Decorate Buttercream Cookies page.

All American Crusting Buttercream Frosting Recipe
Equipment
- Stand Mixer with Paddle Attachment
- Measuring Spoons & Bowls
Ingredients
- 1 cup room temperature unsalted butter
- 1 cup vegetable shortening such as Crisco OR butter, see note
- 2 lbs. plus 1 cup powdered sugar
- 2 tsp. clear vanilla extract I use artificial
- 2-4 tbsp. give or take room temperature whole milk
Instructions
- In your electric mixer, use the paddle attachment to mix the butter and vegetable shortening together.
- Slowly mix in the powdered sugar, only adding as much as your electric mixer can handle at a time.
- Mix in the vanilla extract and 2 tbsp. of milk. If the mixture is too stiff, add more milk. I prefer a consistency of smooth peanut butter for cookies that have a lot of line work and a slightly stiffer consistency for piping flowers.
Notes
Part 3: Decorating the Sorting Hat Gender Reveal Cookies
- The first step is to use the black frosting with tip #2 to cover part of the cookie area. This will become the Sorting Hat’s eyes and mouth.

- Using the angled flat spatula or a butter knife, smooth out the frosting so that it is thin and covering up the whole to-be-eyes-and-mouth area.
- Use the brown frosting with tip #4 to outline the edge of the cookie. Then, outline the eyes and the mouth. When creating outlines, remember that the shape on the inside of the outline is what matters. In other words, make sure the eyes and mouth are as large as you want them from the inside view.
- Fill in the Sorting Hat using the brown icing. I decided to keep the classic buttercream lines since the Sorting Hat is quite wrinkly!


The buttercream decorating is so easy for these Harry Potter gender reveal cookies! Now all that’s left to do is allow these cookies to crust on the counter overnight before the day of the big reveal.

Storing & Freezing Decorated Sugar Cookies
Buttercream sugar cookies can be decorated ahead of time. Store these in the freezer for up to two weeks in an airtight container. Something like this works great because it’s shallow. Just make sure not to stack the cookies in the freezer, they should all be in a single row.
How to Package these Buttercream Cookies for a Harry Potter Gender Reveal Party
If you want to individually package these decorated Sorting Hat cookies, check out my post here: How to Package Buttercream Sugar Cookies. In the post, I go over tips on how to use crusting buttercream to get stackable and transportable decorated cookies.
Don’t Forget Your Harry Potter Gender Reveal Decorations!
Amazon has a lot of really cute Harry Potter party decorations for cheap. I did some browsing and found some fun stuff that would pair perfectly with these cookies.


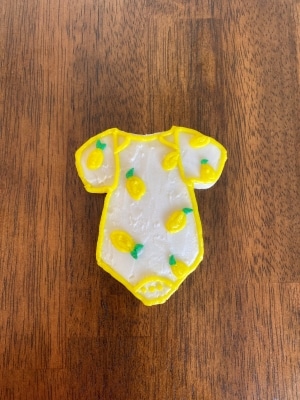
I also had to purchase my four month old baby girl a Harry Potter pajama while making these cookies! You can see part of the pj in the photo at the top of the page. Here is the one I bought for her:

I think it would make a great gift for the baby shower!
Save The Tutorial for These Sorting Hat Cookies for Later
To save the tutorial for these Harry Potter cookies for later, simply click on any of the social share icons on the top of this page. Alternatively, hover over the image below to pin the image to your Pinterest page!
This is so clever and creative!
Thank you!
Such a cute idea! I am a huge Harry Potter nerd and love the sorting hat design and the other decor!
I’m a Harry Potter nerd as well! Thank you Kalin!
I love your creativity and the fact that you always bring up new ideas for any occasion! This is so incredibly cute and such a unique way to reveal a baby’s gender! I’m in awe. Sometimes I think you might have a magic wand for all these ideas!:)
Well thank you Mihaela! I would love to go to a Harry Potter gender reveal some day!
The creativity and level of skill you have is amazing. I love it here.
Thank you so much!
Superb Leah, you’re so creative!