
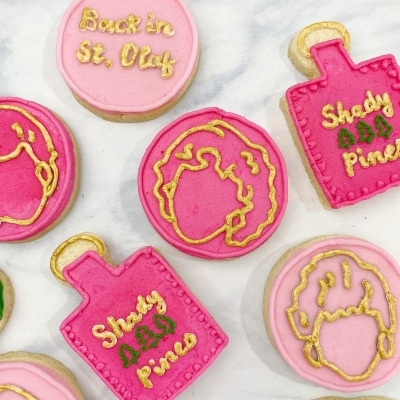
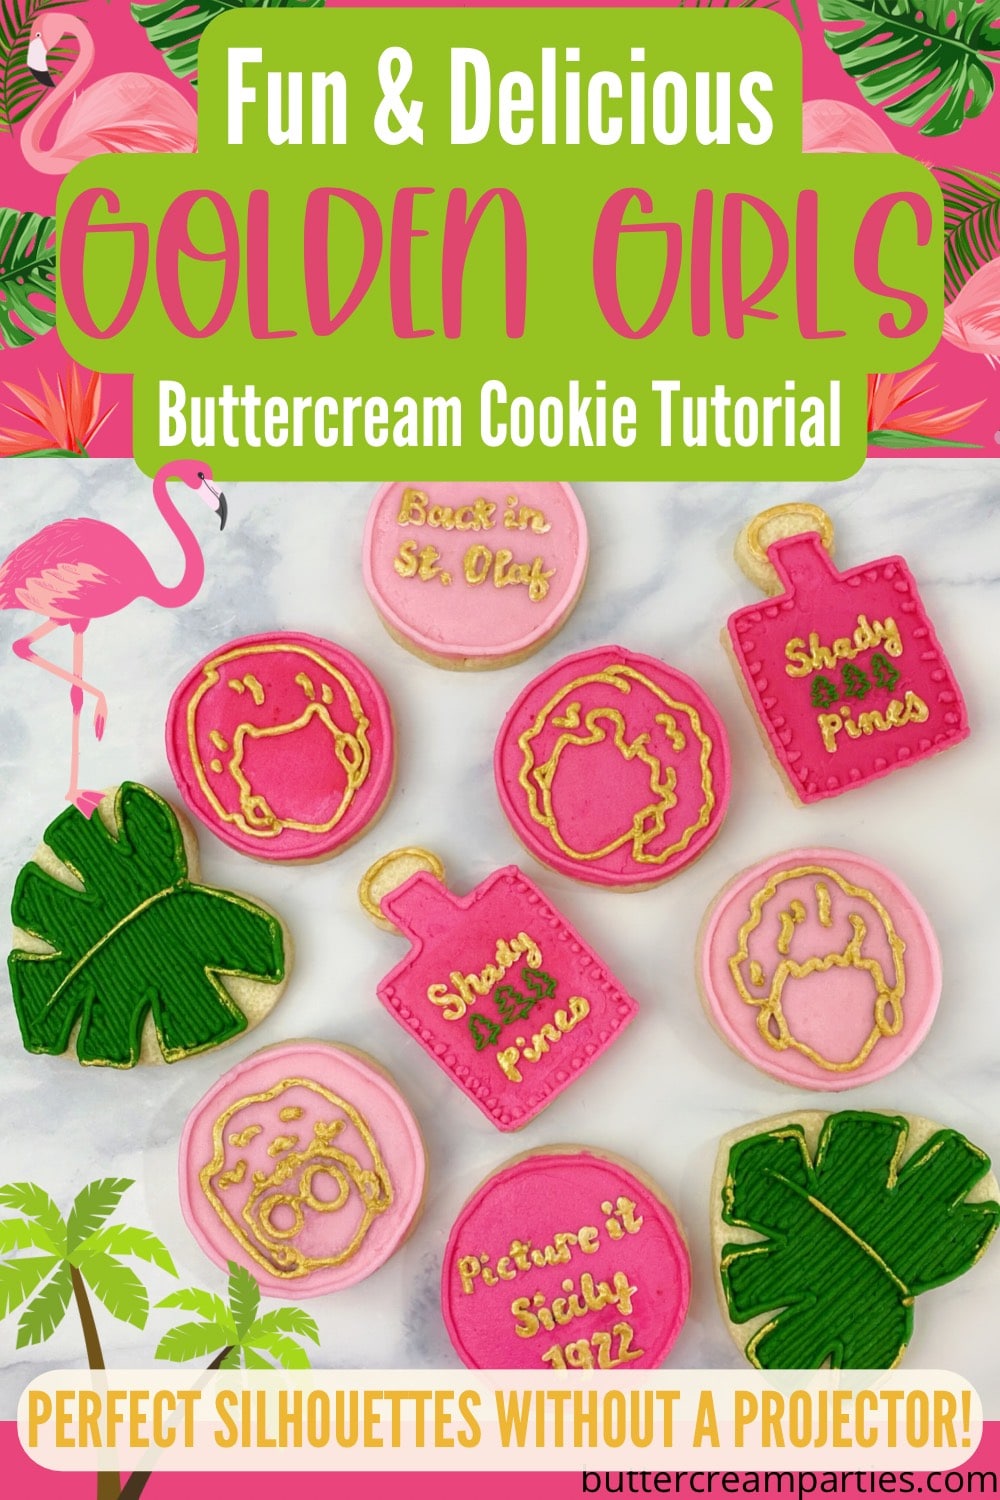
How to Decorate Golden Girls Party Cookies with Buttercream
Who doesn’t love the Golden Girls? Rose, Blanche, Sophia, and Dorothy were arguably one of the best sets of friends on TV, no matter the decade. Fans of the series will love these Golden Girls party cookies. I could see these shown off at a birthday party, bachelorette party, bridal shower, girl’s night in, Galentine’s Day party, and a just-because party.
I’ve included a full step-by-step tutorial with plenty of tips for drawing on buttercream cookies without a projector. All you need is a few supplies and you are good to go. Don’t worry, you won’t be required to hand-draw! We will be creating our own stencils.
To create the stencil, I like to use SVG files (well the PNG version) from Etsy sellers. You can find the specific file that I used here, created by Avocado Digitals. So cute! *Make sure you read the seller’s license of use for the files. Many of them won’t allow you to use the images for a profit. If you are my typical reader though, you’ll likely be using the files to create cookies for your own party which is perfect. No money transactions there!
I’ve also included a tutorial for how to cut your own cookie cutters. You can follow the tutorial to create all of the cookies in the set or just the key tag as I did. It’s all up to you.
Follow along for the full tutorial on how to decorate Golden Girls themed party sugar cookies.
*This post may contain affiliate links, which means I may receive a commission, at no extra cost to you, if you make a purchase through a link. Please see my full disclosure for further information.*
Skip to
- Part 1: Gathering the Supplies for the Golden Girls Party Cookies
- Part 2: How to Make Your Own Cookie Cutters
- Part 3: Baking the Cookies and Setting up Your Icing Bags
- Part 4: The Tutorial for How to Decorate Golden Girls Themed Party Cookies
- Part 5: Decorating the Golden Girls Birthday Party
- Save the Tutorial for How to Decorate Golden Girls Themed Party Cookies for Later
Part 1: Gathering the Supplies for the Golden Girls Party Cookies
The list for these decorated cookies looks a little intimidating, I know. If you’ve used my tutorials before to decorate sugar cookies, then rest assured, you likely have the majority of these items already. To make these Golden Girls cookies, you will want to gather:
- 4 Icing bags
- Wilton #1, 2, and #3 tip sizes – buy these individually at a bake supply store or purchase this kit
- 4 Couplers
- Circle cookie cutter & heart cookie cutter, I used the middle sized ones in this set – p.s. I use this set all the time, totally worth the purchase!
- Luster powder paint ingredients/supplies – small paint brush, Fancy Sprinkles Luster Powder in Gold, small dish of vodka or vanilla extract, and measuring spoons
- Gel food dye for buttercream frosting in pink, teal (used to create the fuchsia), and green
- Purchased PNG or SVG image files for each girl’s silhouette – I purchased this one file from Avocado Digitals and then cut each face out individually
- Parchment paper, printer, computer paper, scissors, permanent marker, and edible ink pen
- Ingredients for a crusting buttercream, find my crusting buttercream icing recipe here
- Ingredients for sugar cookie dough, find my no spread sugar cookies recipe here
- *Optional – Palette knife
Part 2: How to Make Your Own Cookie Cutters
In these Golden Girls party cookies, I wanted to create a unique cookie to represent Shady Pines, which resulted in a key tag.
You are more than welcome to purchase a key tag cookie cutter, but I like to save money where I can. I also wasn’t sure how often I’d make a key tag for future tutorials.
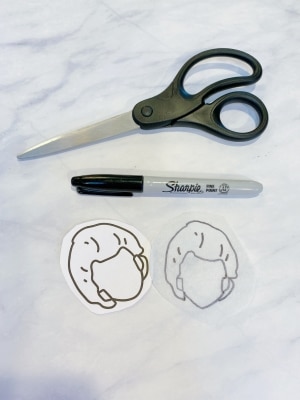
All you need to do to create your own cutter is simply draw the design onto parchment paper with a permanent marker. Once happy with the design, cut it out.
When you go to cut out the cookies with it, lay it over the dough. If your dough isn’t sticky enough to keep the parchment paper there, you can glue it with a bit of water.
Use a non serrated knife and cut in up & down motions, rather than pulling the knife through the dough. This will help prevent the dough from pulling. You can smooth out any notches from the up & down motions with the knife once on the cookie sheet.
Part 3: Baking the Cookies and Setting up Your Icing Bags
- Roll, cut out, and bake your sugar cookies according to the recipe. You will be able to make about 18-24 sugar cookies with the recipes linked above. I made more circles than hearts and key tags, as I wanted circles for each of the girls and for some fun quotes.
- Make your buttercream icing and separate it into four bowls:
- One bowl will only contain about a 1/2 of a cup of frosting. Keep that bowl undyed.
- The three remaining bowls will be equal in amount. One bowl will be dyed a light pink, another a fuchsia, and another a green.
- To create fuchsia buttercream frosting, color the frosting pink first. Once it is a bright pink, add in just a toothpick amount of teal food coloring and mix together. If you want a more purple-y fuchsia than pink, use royal blue food coloring instead of teal. Continue adding blue tones until the desired shade. If you go too far, simply add more pink.
- Set up your icing bags as follows:
- Place each color of frosting into its own icing bag set up with a coupler. If you don’t know how to do this, just hop over to my Getting Started: Learn How to Decorate Buttercream Cookies page for a detailed explanation.
- Prepare the luster powder paint by mixing equal parts of luster powder with vodka or extract. Start with just a half teaspoon of each. If the paint seems like it has too much liquid, add more luster powder, up to another half teaspoon. I like the paint to have the consistency of an acrylic paint.
Part 4: The Tutorial for How to Decorate Golden Girls Themed Party Cookies
Check out the step-by-step photo series here to see how to make these decorated Golden Girls cookies. I include how to write on buttercream cookies without a projector, both images and words. I also include the tutorial for decorating each cookie outside of the images.
*Note – when switching tip sizes between different icing bag colors, make sure to rinse and dry the tip before placing onto a different icing bag color.
How to Draw on Buttercream Cookies Without a Projector
All of these themed cookies besides the palm leaves will use this technique. To get started, make sure you have parchment paper (white is better than tan for this), your PNG/SVG files purchased, a printer with regular computer paper, a permanent marker, scissors, and the edible marker. It’s also a good idea to have your cookie cutters with you.
- Purchase and download your Golden Girls SVG (make sure it has PNG as a download option when you purchase) to your computer. If you don’t have a computer, make sure your phone connects to your printer.
- Open the PNG file in Microsoft Word. If using your phone skip to step 4.
- Take a guess at the size you want the PNG to be in the document. Then, do a print preview at 100%. Use your cookie cutter and hold it up to the computer screen to see how the images will size up to the cookie. If you used my sugar cookie recipe, the cookies won’t spread so it will be an exact match up.
- If making some cookies with quotes like I did, pick a fun font and write out the quotes. Again, make sure the quote will fit onto the cookie.
- Print the PNG image onto regular computer paper.
- Use your scissors to cut around each image you want on a cookie. Leave a small border around the image so you don’t accidently cut some of the design.
- Place your cut outs under the parchment paper. If the image is really detailed, you may want to use tape. I just used my hand which is another good reason to leave a border around the image. Trace the image onto the parchment paper with the permanent marker.
- Cut out the parchment paper designs and set aside for now.

How to Decorate the Golden Girls Silhouette Cookies
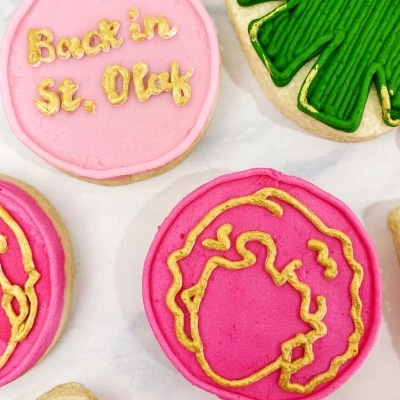
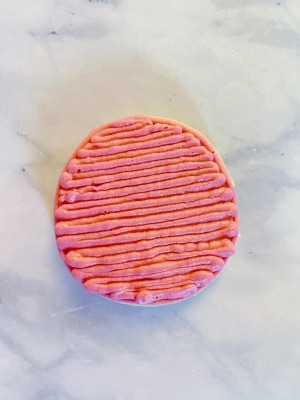
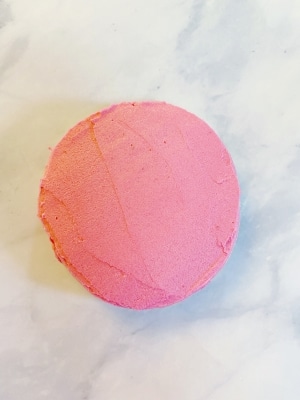
- Outline and fill in the circle cookies using a tip #3 in the desired icing bag colors. For the silhouettes, I did a mix of pink and fuchsia cookies.
- Smooth out the frosting using the palette knife. If you don’t have a palette knife, check out my page here for my trick with using parchment paper. I wouldn’t use the freezer method for these ones as it may cause bleed.
- Allow these cookies to crust for about 30 minutes before going to step 4. In the meantime, work on the “Shady Pines” tag cookies.
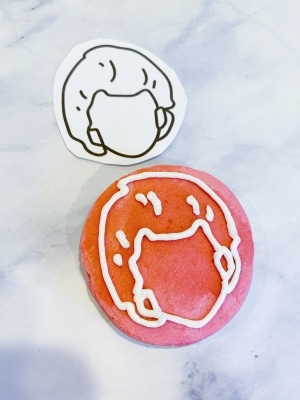
- Once the surface of the cookies is slightly hard to the touch, it’s time to place our silhouettes. Turn the desired parchment paper image upside down and then trace over the backside of the image with the edible pen. Work as quickly as you can to prevent the pen from drying. Then, flip the image over and carefully place the parchment paper onto the desired cookie.
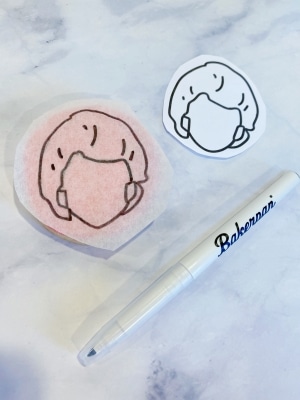
Make sure the parchment paper cut out is flipped upside down. You want to draw the image upside down with the edible marker so that it is right-side-up on the cookie. Here is the parchment paper flipped back over and placed onto the buttercream cookie. - Press the parchment paper into the cookie just enough so that the ink is transferred but not so much that you dig your fingers into the frosting. Carefully peel up part of the image and see if the design is transferring. If it isn’t lay it back down and press again. Pull the parchment paper off once the design has transferred.
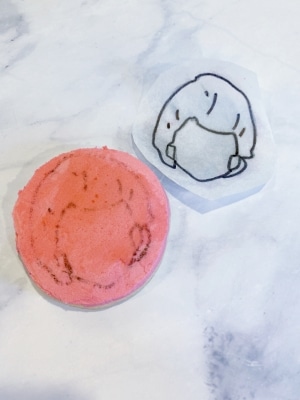
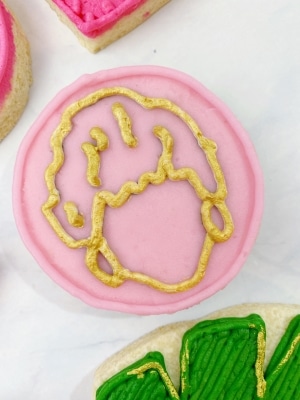
Peel part of the parchment paper up to see if the edible marker transferred onto the buttercream before fully removing the parchment paper. - Repeat steps 4 & 5 for each girl’s silhouette. Then, attach tip #3 to the white icing bag and trace over the edible marker.
I like to keep the original permanent marker version nearby so I can reference in spots that the edible marker didn’t transfer as perfectly. - Paint over the white frosting with the gold luster powder paint mixture.
- Outline the edge of the cookie with the tip #3 attached to the icing bag that is the same as the cookie’s background color.
 Allow these cookies to crust for about 30 minutes before going to step 4. In the meantime, work on the “Shady Pines” tag cookies.
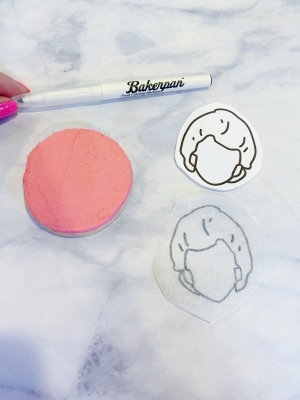

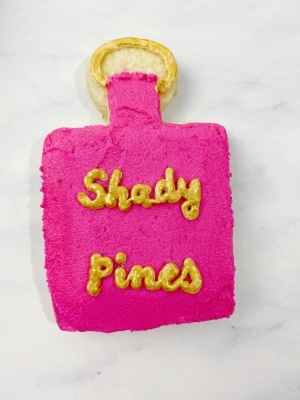
How to Decorate the Golden Girls “Shady Pines” Key Tag Cookies
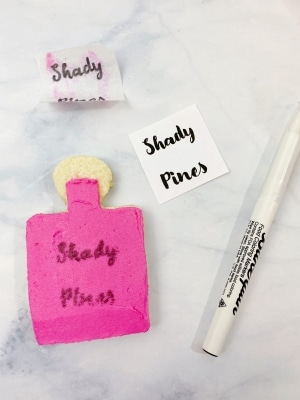
- Outline and fill in the tag portion of the cookie with the fuchsia icing bag, tip #5 attached. Then, smooth out the icing with the palette knife or parchment paper.
- Reference steps 3-5 above in the silhouette directions for the “Shady Pines” writing. Of course, you can free hand the writing if you choose.
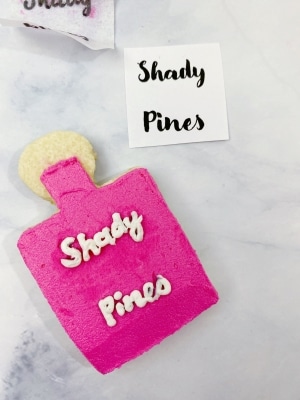
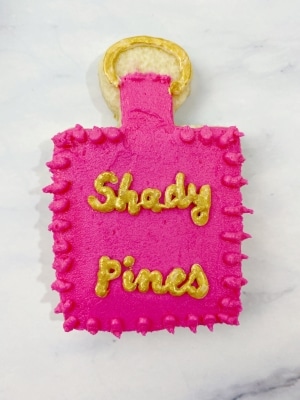
- Attach the tip #2 to the white frosting and pipe over the letters. If you mess up, use the palette knife to erase the letter(s) and try again. Then, attach the tip #3 to the white frosting to draw a key ring circle at the top of the tag.
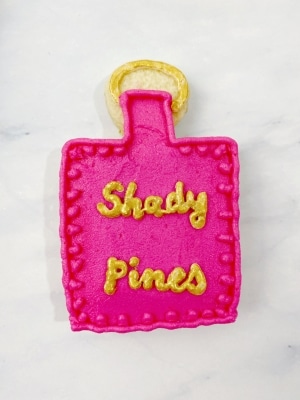
- Paint the white frosting with the gold luster powder paint.
- Use the tip #3 attached to the fuchsia icing bag to outline the tag’s edges. I went with an easy stitching look for mine.
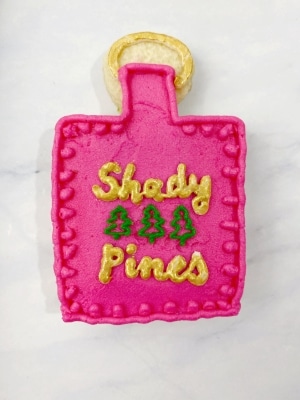
- Attach the tip #1 to the green icing bag and draw a few pine trees between the words.

How to Decorate the Golden Girls Famous Quotes Cookies
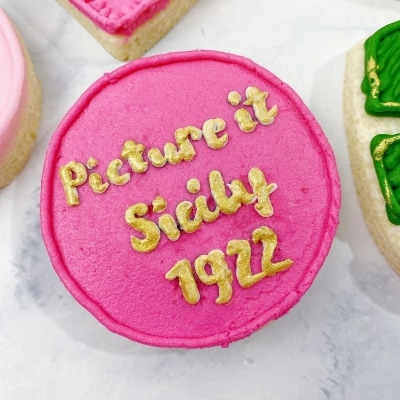
- Outline and fill in the remaining circle cookies with your choice of pink frosting, using the tip #3.
- Smooth out the frosting using the palette knife or parchment paper.
- Repeat steps 3-5 in the silhouette directions for each quote cookie you want.
- Attach tip #2 to the white frosting and pipe over the quotes.
- Paint the white frosting with the gold luster powder paint mixture.
- Outline the cookie edge with the tip #3 still attached to the chosen pink icing bag.
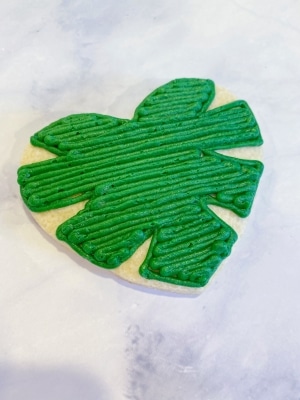
How to Decorate the Golden Girls Palm Leaves Cookies
- Attach the tip #3 to the green icing bag. Outline and fill in a palm leaf design onto the heart cookie. Try to keep each side of the leaf symmetrical, but it’s okay to not be perfect.
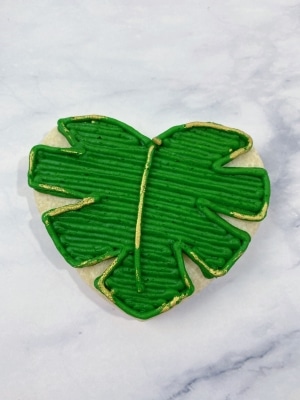
- Draw a line down the middle of the leaf, almost from top to bottom but not quite all the way.
- Outline the edges of the leaf again so that it is the same height as the line you created in step 2.
- Use the gold luster paint mixture to paint over a few spots of the outline, including the line down the middle of the leaf.

As you can see, these are just the cutest Golden Girls themed cookies for your upcoming party. And while the tutorial was quite lengthy, you now have two new skills – making your own cookie cutters and writing on buttercream frosting without a projector.
Since we are still in COVID times, you may be interested in individually packaging these cookies for your party. If so, check out my post here. I’ve also included recommended packaging and storing products on the post.
Part 5: Decorating the Golden Girls Birthday Party
It’s so fun to decorate a Golden Girls birthday party. Grab some balloons, streamers, tabletop confetti, and a backdrop and you’re good to go!


Save the Tutorial for How to Decorate Golden Girls Themed Party Cookies for Later
This tutorial was jam packed with techniques for how to decorate buttercream sugar cookies. Make sure to save this cookie tutorial as a fun party idea! Use the image below to pin it to your party board on Pinterest. Alternatively, use any of the social share icons on the top of the page to share it to your favorite social media site.
Ok so these are truly adorable and I love that you are celebrating the Golden Girls! And I especially appreciate the tip on how to transfer that pattern onto the cookie frosting – genius!
Thanks Sue! These were so fun to make and I’m glad you found the technique helpful!
All your posts have excellent tips that come with your creative ideas for decorated cookies, and I love it! Trying to make a few as beautiful as yours is just perfect for celebrating Galentine’s Day today! Thanks for this cute idea!
These cookies just made me simile! I love to watch the Golden Girls. “Picture Sicily made me laugh out loud! These are so cute!
! i never watched golden girls but i love the mostera leaf cookies