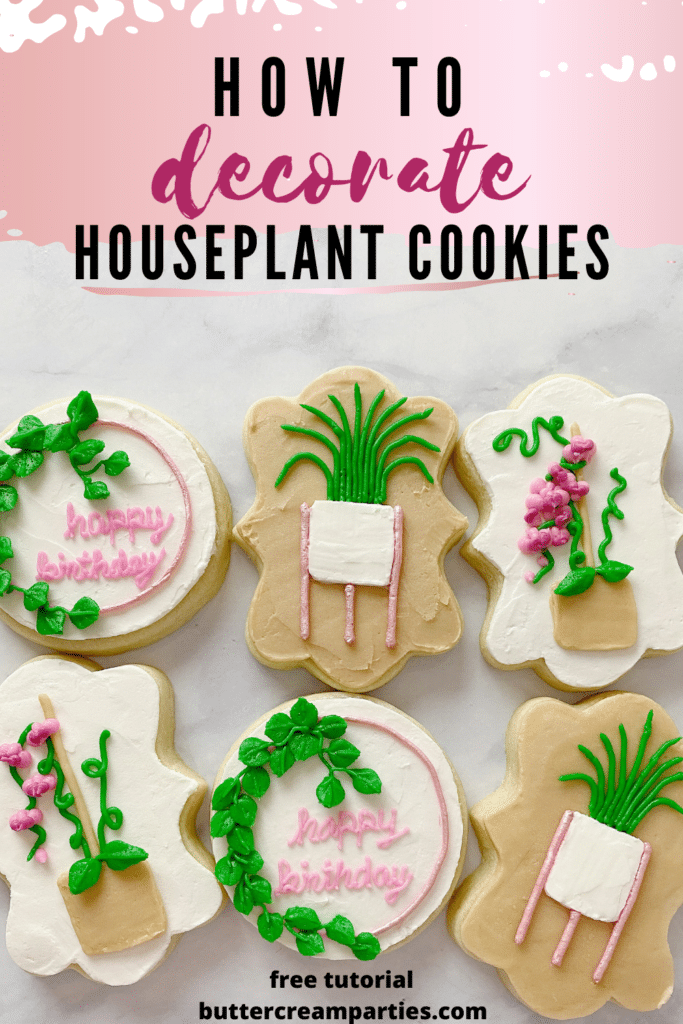
How to Decorate Buttercream Orchid & Houseplant Sugar Cookies
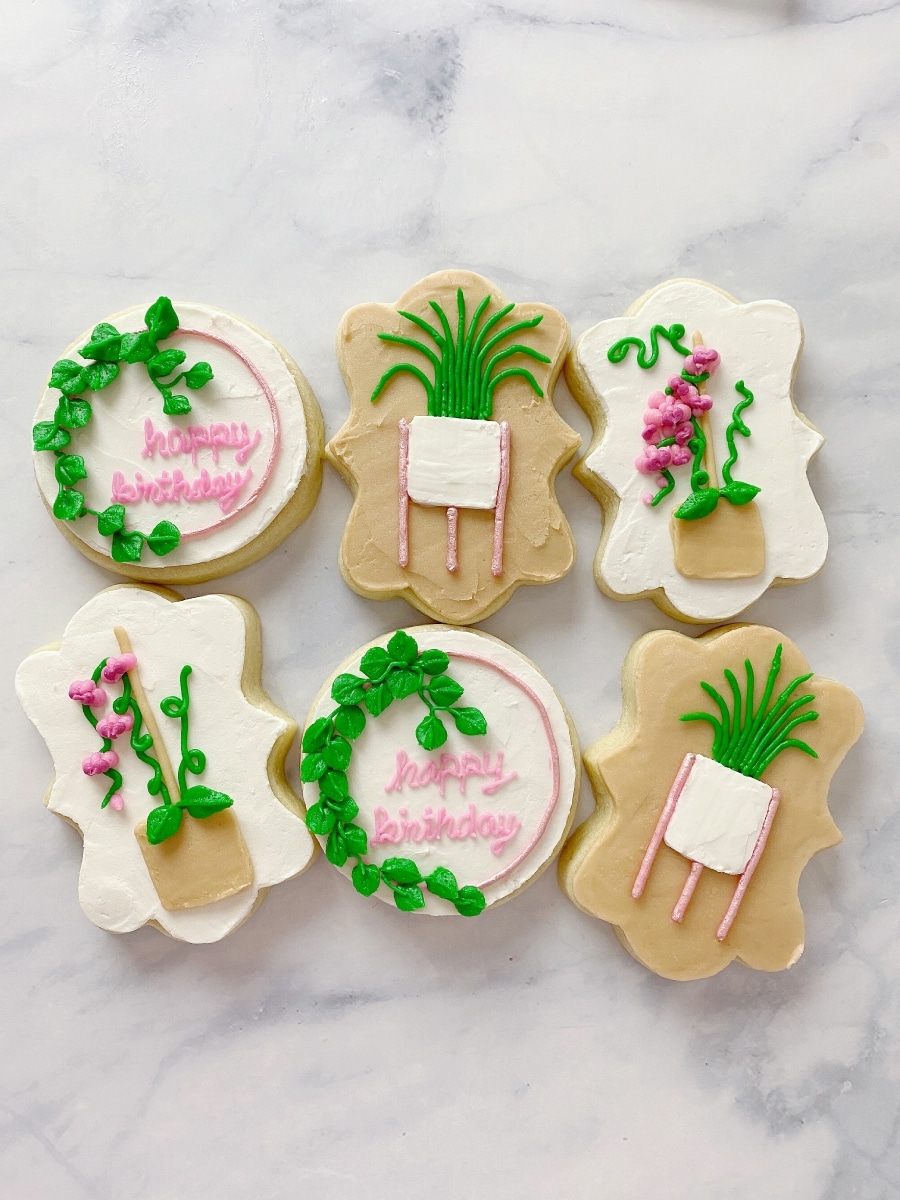
My best friend turned 31 this year. We’ve been friends since the second grade when she asked me to meet her on the playground at recess. She loves houseplants so I decided to make these buttercream orchid & houseplant sugar cookies as a tasty gift.
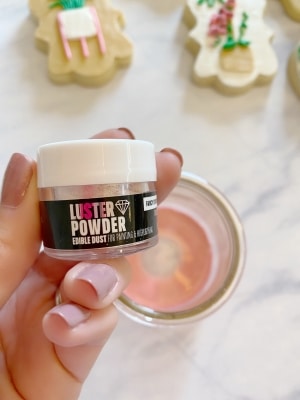
I also wanted to try out my Fancy Sprinkles rose gold luster powder, so I painted on some rose gold touches. This really elevates the prettiness of the sugar cookies.
Follow along for the full tutorial on how to decorate buttercream orchid & houseplant sugar cookies. I’ve included both a step-by-step photo series tutorial as well as a video.
*This post may contain affiliate links, which means I may receive a commission, at no extra cost to you, if you make a purchase through a link. Please see my full disclosure for further information.*
Skip to
Part 1: Gathering the Supplies for the Orchid & Houseplant Sugar Cookies
The list for these decorated cookies looks a little intimidating, I know. If you’ve used my tutorials before to decorate sugar cookies, then rest assured, you likely have the majority of these items already. To make these decorated buttercream orchid & houseplant sugar cookies, you will want to gather:
- 5 Icing bags
- Wilton #1, #2, #5, and #352 tip sizes – buy these individually at a bake supply store or purchase this kit
- 5 Couplers
- Circle cookie cutter, I used the middle sized one in this set – p.s. I use this set all the time, totally worth the purchase!
- Plaque cookie cutter
- Luster powder paint ingredients/supplies – small paint brush, Fancy Sprinkles Luster Powder in Rose Gold, small dish of vodka, and measuring spoons
- Butter knife or palette knife
- Gel food dye for buttercream frosting in pink, teal, green, and brown
- Ingredients for a crusting buttercream, find my crusting buttercream icing recipe here
- Ingredients for sugar cookie dough, find my no spread sugar cookies recipe here
Part 2: Baking the Cookies and Setting up Your Icing Bags
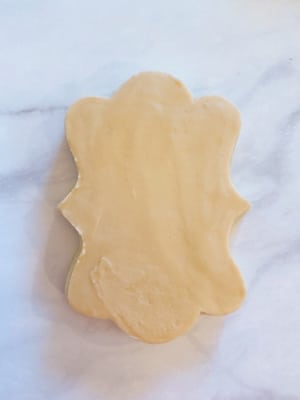
- Roll, cut out, and bake your sugar cookies according to the recipe. You will be able to make about 18-24 sugar cookies with the recipes linked above. You will use 1 circle for every 2 plaque cookies for each set of 3 cookie designs.
- Make your buttercream icing and separate it into five bowls:
- One bowl will only contain about a 1/3 of a cup of frosting. Color that smaller bowl of frosting the fuchsia shade by first making pink frosting and then adding in just the smallest amount of teal. Allow the color to sit while mixing the rest of the shades to saturate.
- The four remaining bowls will be equal in amount. One bowl is left white, another bowl is tan, one pink, and then one green.
- Set up your icing bags as follows:
- Place each color of frosting into its own icing bag set up with a coupler. If you don’t know how to do this, just hop over to my Getting Started: Learn How to Decorate Buttercream Cookies page for a detailed explanation.
- Prepare the luster powder paint by mixing equal parts of luster powder with vodka. Start with just a half teaspoon of each. If the paint seems like it has too much liquid, add more luster powder, up to another half teaspoon. I like the paint to have the consistency of an acrylic paint.
Part 3: The Tutorial for How to Decorate Buttercream Orchid & Houseplant Sugar Cookies
Check out the video here to see how to make these decorated buttercream sugar cookies. Then, check out the breakdown step-by-step photo series tutorial for each of the cookies below.
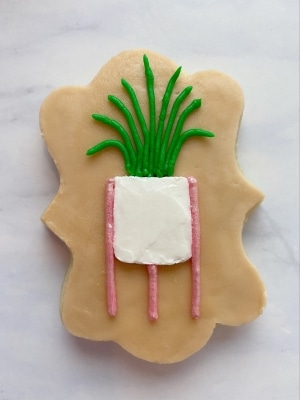
How to Frost the Tall Grass Planter Cookies Using Buttercream Icing
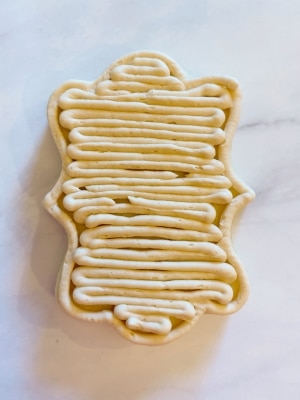
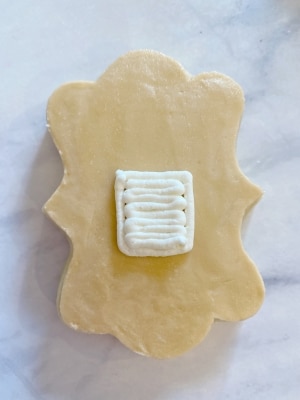
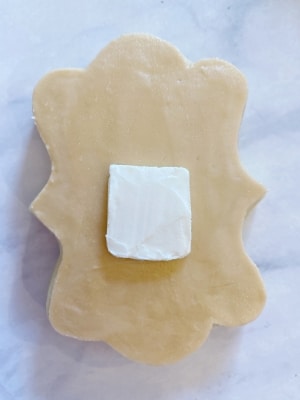
- Attach the tip #5 to the tan bag of icing and outline/fill in a plaque shaped cookie.

- Use the palette knife, a butter knife, or an angled flat spatula to smooth the frosting. If you struggle with smoothing buttercream frosting, check out my guide to smoothing buttercream for cookies.
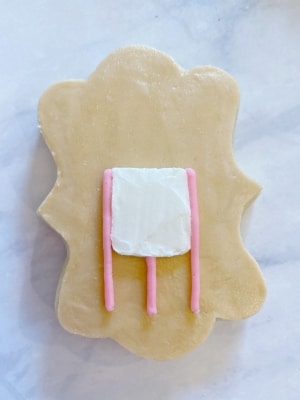
- Once you complete steps 1 & 2 on all of the tall grass planter cookies, remove the tip #5 from the tan frosting. Rinse the tip with hot water and dry it. Attach the tip to the white bag of frosting and outline & fill in a square.
- Smooth the square.
- Once you’ve completed steps 3 & 4, remove/rinse/dry the tip #5 and attach it to the pink frosting. Draw three lines for the legs of the planter.
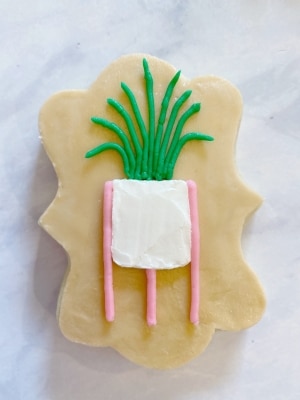
- Attach the tip #2 to the green frosting and pipe out long blades of grass.
- Allow these cookies to crust for about 10 minutes. Then, paint the rose gold luster paint onto the legs of the planter.

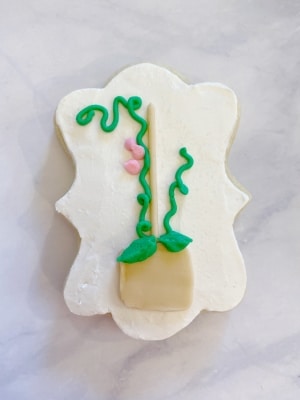
How to Decorate the Buttercream Orchid Cookies
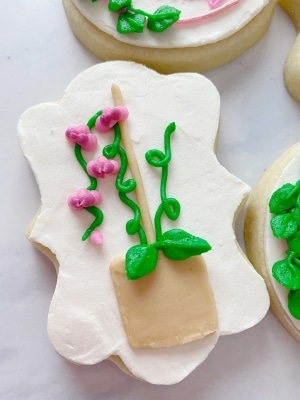
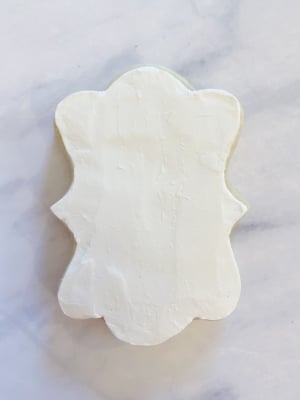
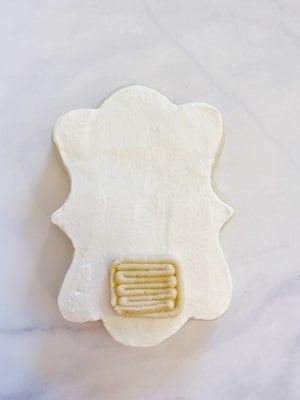
- Attach the tip #5 to the white bag of icing and outline/fill in a plaque shaped cookie. Then, smooth out the surface.
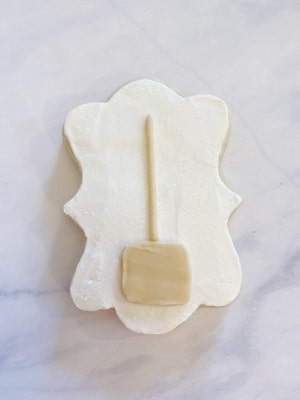
- Attach the tip #5 to the tan frosting (make sure to rinse the white frosting from the tip) and outline and fill in a square.
- Smooth the tan frosting and draw a vertical line for the stick that the buttercream orchid will grow on.
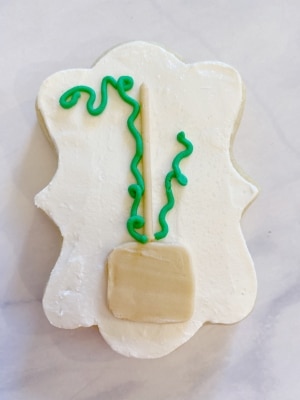
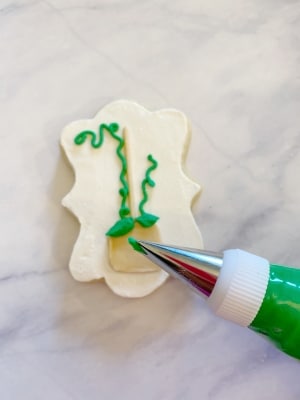
- Attach the tip #2 to the green frosting and draw the vines. I forgot to draw a vine going up and then back down for the orchids to grow on so you’ll see me add that in after I start putting in some flowers. You can reference the video above to see how to draw it before the flowers if you’d like.
- Remove the tip #2 from the green frosting and attach the tip #352 to the green frosting. Squeeze out two leaves at the bottom of the plant. You want the “V” shape of the tip to be sideways along the cookie, as opposed to an upright or upside down “V.”
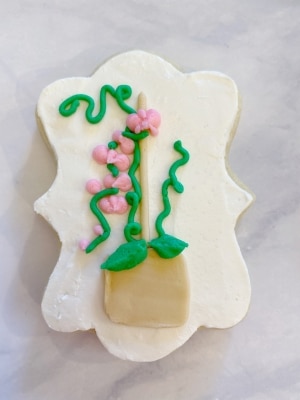
Notice that the piping bag is held so that the “v” shape is like this “>” in order to pipe out the leaves correctly. - Attach the tip #3 to the pink frosting and pipe out the first layer of petals for the buttercream orchids. You will make two dots that pull in toward each other.
- Continue building petals down the side of the cookie. Remember, if you drew the vine going down already, like shown in the video, you will add the flowers on top of the vine. Since I forgot to do this step for the photo series, just pretend there is a line there.
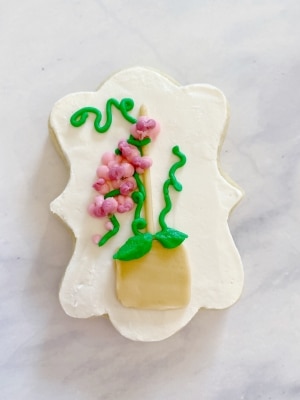
You can see that I’ve added some more petals to some of the buttercream orchids on the top and bottom sides. I wanted some of the orchids to have more orchid-like dimension but I didn’t want to go overboard with the texture. - Attach the tip #2 (after rinsing and drying the tip that had green frosting in it) to the fuchsia frosting. Pipe out two smaller dots, each pulled toward each other, on top of the pink petals.
This cookie is more full with petals than the one shown before the photo series of steps. I like having a mix so it’s a bit more realistic. It’s up to you if you want to do them all the same or have some variation, though.
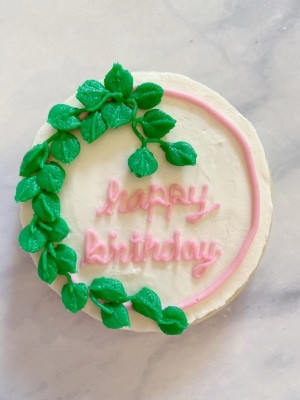
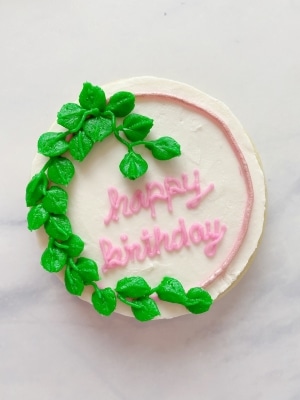
How to Decorate the Happy Birthday Wreath Cookies
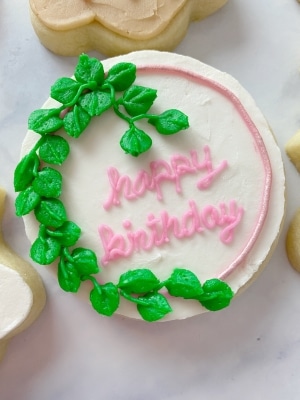
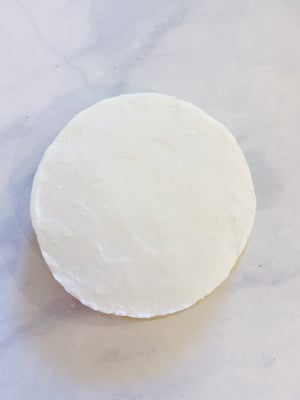
- Outline and fill in the white circles using the white frosting with tip #5 attached. Smooth out the surface.
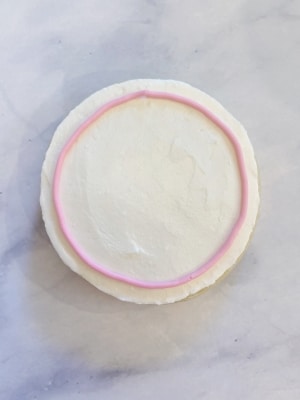
- Attach the rinsed & dried tip #2 to the pink frosting and draw a circle just inside of the cookie. If it’s not a perfect circle, you can use the butter knife or palette knife to roll the frosting into a better shape. I do this in the video if you want to check that out above.
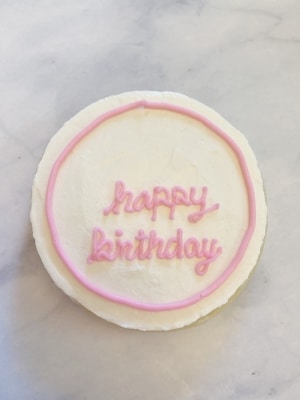
- Attach the tip #1 to the pink frosting and write out “happy birthday.” I did a script font because I find it is more forgiving, but do whatever you are comfortable with. If you mess up, use the knife to pull the frosting up and “erase” it. If writing is too intimidating, you can also skip the writing step and go to step 4. The cookies will still be pretty!
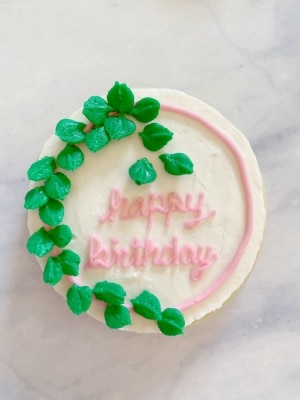
- Attach the tip #352 to the green frosting and pipe out leaves around the pink circle and a few coming down from the top. Remember to hold the frosting bag so that the “v” is sideways to the cookie like this “>.” If the frosting isn’t coming to a nice point at the end of the leaf, use the knife to pinch it together.
- Remove/rinse/dry the tip #1 from the pink frosting and attach it to the green frosting after removing tip #352 from the green. Connect the leaves together with the green frosting. I drew over the tops of some of the leaves with the green frosting as well for more texture.
- Lastly, use the luster powder paint to paint over the pink circle that is still visible. This allows the cookie to have a rose gold metal ring, elevating the prettiness and making it a bit more realistic.
Allow the buttercream decorated cookies to sit out for about eight hours to “crust” if you want to stack them or package them. I like to put them into the box I’m delivering them in (with a paper towel on the bottom) and then close the top, but not seal it, to keep any dust particles out while they dry. 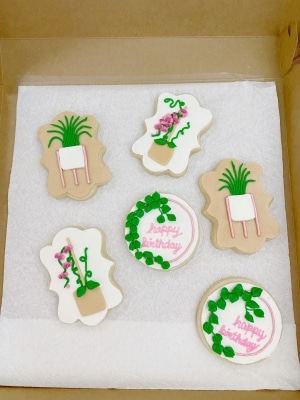
I actually transported these cookies three hours over a mountain pass and they survived beautifully. For more information on how to package, store, and transport buttercream decorated cookies, check out my post here. I’ve also included recommended packaging and storing products on the post.
Save the Tutorial for Buttercream Orchid & Houseplant Sugar Cookies
If you also have a friend who loves houseplants and gardening, make sure to save this cookie tutorial as a fun DIY birthday gift! Use the image below to pin it to your birthday party board on Pinterest. Alternatively, use any of the social share icons on the top of the page to share it to your favorite social media site.


These houseplant cookies are so beautiful! The perfect cookie for a girls day!
Thank you Kayla!
They are so beautiful. Thanks for sharing the detailed steps…
You are welcome and thank you!
Could these cookies possibly be any prettier? I think not! So sweet!
Thank you so much Connie! I really enjoyed decorating them.