Fun Gender Reveal Cookies
I’ve been browsing through Pinterest a lot during this pandemic, anyone else? I’ve found lots of recipes, dream house makeovers, perfect gardens, beautiful tropical vacation getaways, and lots & lots of party ideas. I’m glad to see that we are still dreaming up fun parties to have once we are out of quarantine. It gives me hope!
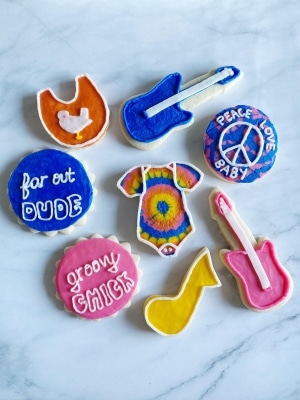
While browsing, I’ve noticed this cute trend of hippie/Woodstock/boho/tie-dye baby shower/gender reveal parties & I knew that I needed to create some gender reveal cookies to go along with the celebrations. Even though I am a child of the 90’s, I LOVE LOVE LOVE the music from the 60’s & 70’s so I was definitely excited for these gender reveal cookies.
Continue reading to learn how to decorate these hippie gender reveal buttercream sugar cookies!
Skip to
- Part 1: Preparing Your Gender Reveal Cookies
- Step 1: Mixing/Rolling/Cutting/Baking the Cookie Dough for the Gender Reveal Cookies
- Step 2: Setting up the Icing Bags for the Gender Reveal Cookies
- Step 3: Decorating the Gender Reveal Cookies! The fun part!
- Part 2: Decorations to Compliment Your Gender Reveal Cookies
Part 1: Preparing Your Gender Reveal Cookies

To create these fun gender reveal cookies, you will want to gather:
- 5 icing bags
- 5 Wilton #3 tips
- 3 Wilton #2 tips
- 1 Wilton #47 tip
- 3 couplers
- circle cookie cutter
- scalloped edge cookie cutter
- onesie cookie cutter
- music note cookie cutter
- electric guitar cookie cutter
- baby bib cookie cutter
- Wilton gel coloring to obtain pink, yellow, orange, and blue buttercream frosting, here’s my crusting buttercream recipe, PLUS pink or blue gel dye to dye some of the cookie dough
- Angled flat spatula and/or butter knife
- Your favorite sugar cookie dough recipe – if you don’t have a favorite, here’s mine
- parchment paper, toothpick, and paper towel
Step 1: Mixing/Rolling/Cutting/Baking the Cookie Dough for the Gender Reveal Cookies
Mix up your cookie dough recipe and set it aside. Pull out about a 2″ ball of cookie dough and return it to your stand mixer. Add in a couple drops of food dye, blue or pink depending on if the baby will be a boy or a girl. This will be how you create your gender reveal cookies.
Roll out the colored dough really thin, aim for 1/16 of an inch to 1/8 of an inch. Divide your non-colored dough into two equal piles & roll them each out to half the width you would typically do for your recipe. My recipe suggests rolling the dough out to 1/4 of an inch normally, so I rolled each half of the dough out to an 1/8 of an inch.
Cut your colored dough into small pieces. Then, gently place your cookie cutters on top of one of your rolled out non-colored slabs of dough. Using your cutters as a boundary line, place the colored dough in the center of each cookie.
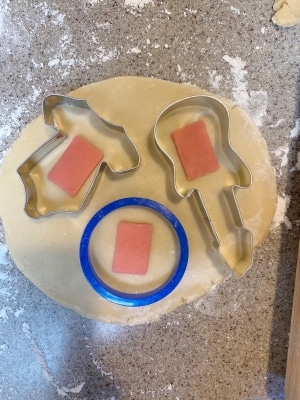
*In the photo, you can see that I used a small cookie cutter to create little rectangles of color. I regretted making my cuts so large, so I ended up making them about half of that size.
Take a mental photo of where you placed your cookie cutters (I suggest only doing 2-3 at a time) and set them aside. Lay the second slab of rolled out non-colored dough over the top. Carefully cut out the cookies, being careful to not get any of the colored dough on the edge, as it will not be hidden.

Bake your cookies as usual. They should not require any additional baking time since you rolled out the dough to be half the normal width and the colored dough in the center is very thin. *If you struggle with your cookies spreading, a tip is to place your cut out cookies onto your baking sheet, pop them in the freezer, and then preheat the oven. Having them a bit frozen can help the cookies not lose their shape.
Step 2: Setting up the Icing Bags for the Gender Reveal Cookies
To set up your icing bags, you will place your white frosting into a bag with a coupler, attaching a tip #3 first. You will also be placing your pink & yellow frostings into their own respective bags, each with a coupler, and each with a tip #3 attached first. Place your blue frosting into a bag with a tip #3 attached. Place your orange frosting into a bag with a tip #3 attached. For more detailed directions, including photos, for how to set up icing bags with and without a coupler, check out this page on my blog: Getting Started: Learn How to Decorate Buttercream Cookies.
Step 3: Decorating the Gender Reveal Cookies! The fun part!
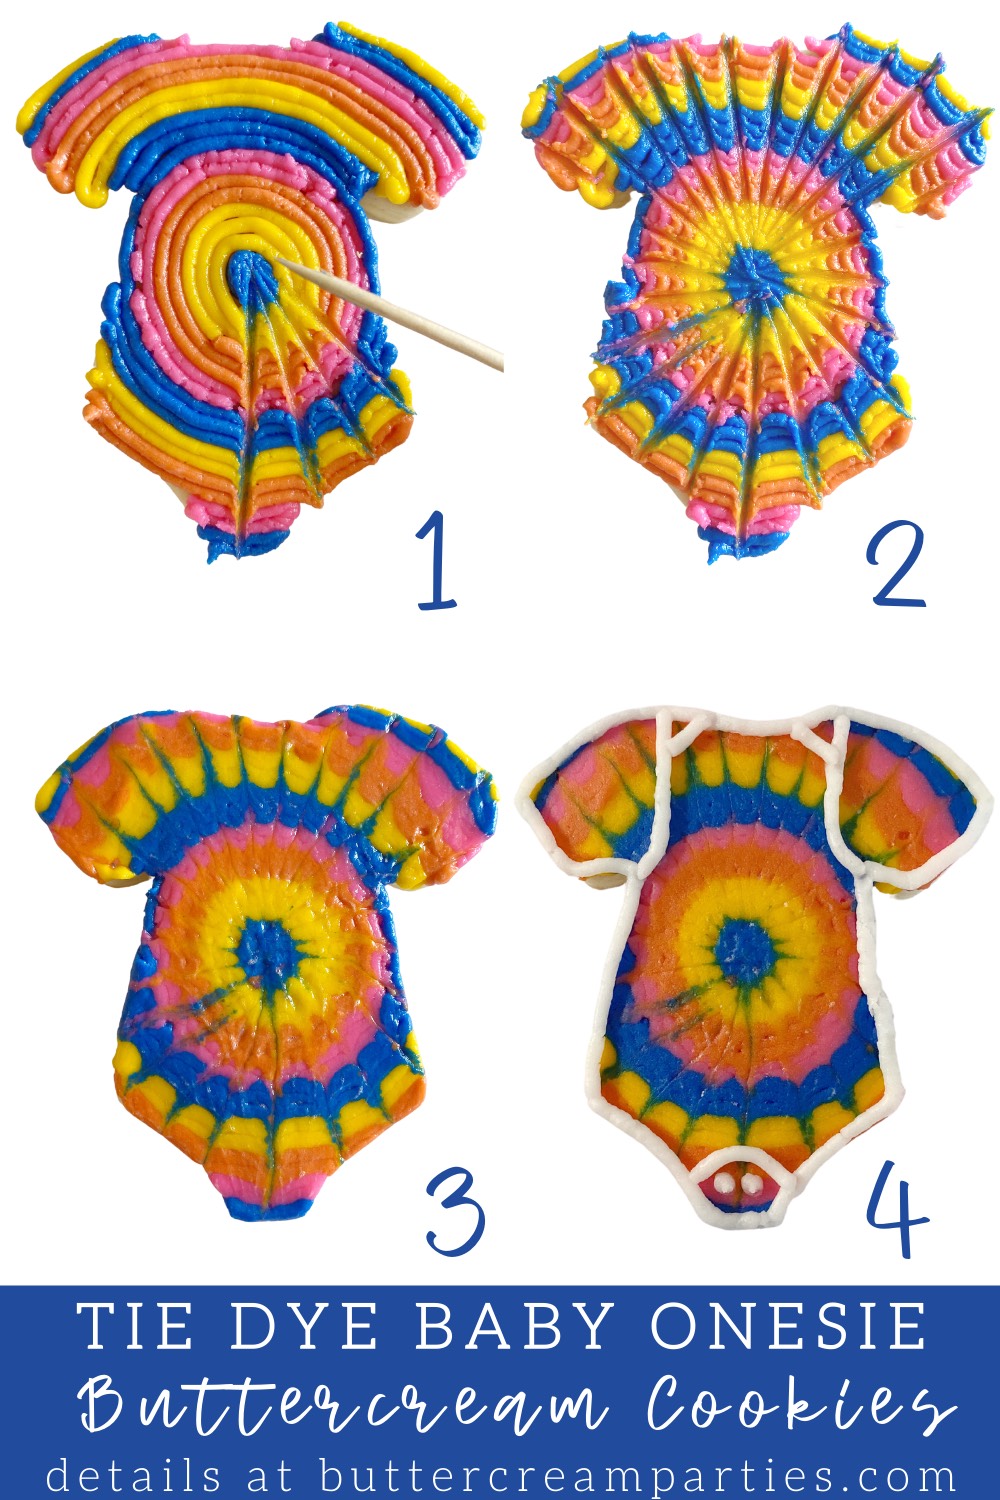
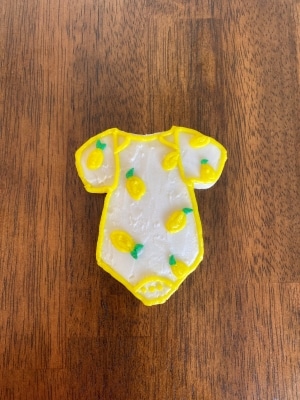
First, let’s create the tie dye baby onesie since this one will be the foundation to show the techniques you will be using throughout. Start by taking your blue frosting and making a dot in the middle of the cookie. Then, take your yellow frosting and draw around the blue dot a few times. Repeat this process with the orange, then pink, then blue, then yellow… you get idea.

Take your toothpick and, holding it parallel to your cookie, drag the center blue dot out toward the edges. Holding it parallel will allow for more color to be dragged across the cookie. You can go over each line several times to get more “drag” if you would like. If your toothpick is getting too much frosting on it, wipe it off on the paper towel after every few line you create.

Repeat this process until your cookie looks something like this:

Now, take a piece of parchment paper and lay it over the top of your cookie. Use the warmth of your fingers to press out the lines as much as you can/want.

Carefully peel the parchment paper off. If you aren’t happy with the results, you can repeat this process several times until all or most of the lines are gone. If your frosting spilled over the edge of the cookie, you can either take a butter knife or flat spatula and “cut” it away or push it back onto the cookie, whichever is appropriate.

Take your white frosting, with tip #3 attached, and outline the edges of the cookie.

Now, draw in the details of the onesie with the same white frosting & tip #3.

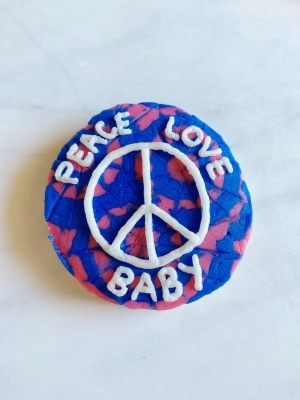
We will be using the same technique for the “Peace, Love, Baby” cookie so let’s do that one next.
Create three pink dots in your cookie with tip #3 attached to your frosting bag. Outline the dots in blue a few times and then alternate between blue and pink frostings.


Use the same technique with the toothpick that you used for the onesie:

Take your parchment paper and flatten out the lines as much as possible/to your liking again. I don’t mind having the lines because it looked more realistic to me.
Next, take your white frosting, still with tip #3 attached, and draw a circle in the center of your cookie. I attached two photos for this so you can see how it’s not necessary to be able to draw a perfect circle. If it’s too wonky, simply take a pointed knife and roll/push/pick up the frosting until it resembles a circle.


Draw in the details of the peace sign.

Now, switch your white frosting over to a tip #2. You will be writing “Peace, Love, Baby” on the outer edges of the peace sign. Again, if you mess up the letters (I do each and every time!) use a knife to manipulate them until they look good. Or, just pick up the letter(s) with your knife and remove them to restart.
The music note is fast and easy. Take your yellow frosting with tip #3 attached and outline/fill in the music note. Then, use the parchment paper to smooth it out. You can also use your flat spatula or butter knife to smooth it over as well.

Take your white frosting, with tip #3 attached, and outline the edges of the note.

For your “groovy girl” and “far out dude” cookies, outline and fill in a circle on each cookie.

Smooth with parchment paper and/or a butter knife or flat spatula.

I decided to go with a mix of fonts for fun. The first one is just my typical cursive writing but the second I looked up on dafont.com and picked out a retro style. In the font preview, you can type in the word(s) you are looking for and then use that as a guide to write it on the cookie.


To do your guitar cookies, outline and fill in the body & neck of the guitar. I decided to do one pink guitar and one blue guitar to balance out the two genders, really playing up that gender reveal cookie suspense! I’ll show you the process for the blue guitar, just repeat for the pink one as well. Once you have outlined/filled in your guitar shape, use the same parchment paper technique to smooth it out. You can take a knife to clean up the edges if the frosting “smushed” out too much.

Take your white frosting and switch it out for the tip #47. Hold the tip to the cookie so that the wavy side is up toward you. You will be starting at the top of the neck and drawing a straight line down toward the middle of the guitar body.

This is such an easier way to draw guitar lines than trying to draw a bunch of straight, skinny lines! Next, we will be creating the triangle-like shape at the top of the strings, where they would connect to the guitar. To do this, I held the tip perpendicular to the top of the cookie and at a 45 degree angle. Squeeze out a bit and then rotate the tip so it is again parallel to the cookie and connect the lines to the lines you already created. I realize that this sounds extremely confusing, but take a look at the picture to see what I did.

Now, take your blue frosting and draw a line at the bottom of the strings (in the middle of the guitar) and the outline the body of the guitar again. Switch your white frosting over to a tip #2 and place a few dots at the top of the guitar.


For the cute Woodstock-inspired bib, take your orange frosting and outline/fill in the bib. Smooth it out with parchment paper. Take your white frosting and switch it back to a tip #3 to outline the edges of the bib. Switch the white frosting back over to a tip #2 and outline the shape of the Woodstock bird. Again, if you mess up, just push the frosting around or pick it up to erase it and start over.

Use your white frosting with tip #2 to fill in the bird. Take your butter knife or flat spatula and carefully smooth out the bird as best as possible. Again, if it messes up the shape of your bird, fix it up with your knife.


Now, take your pink frosting and switch it out for a tip #2. Squeeze out a small dot for the beak. Take your toothpick (make sure it’s been wiped off of any previous frosting) and create a pointed tip to mimic a small triangle for the beak. I find it easiest to just start from the center of the dot and drag the toothpick out to create a point. Take your yellow frosting and switch that over to a tip #2 and draw in a leg for the bird.

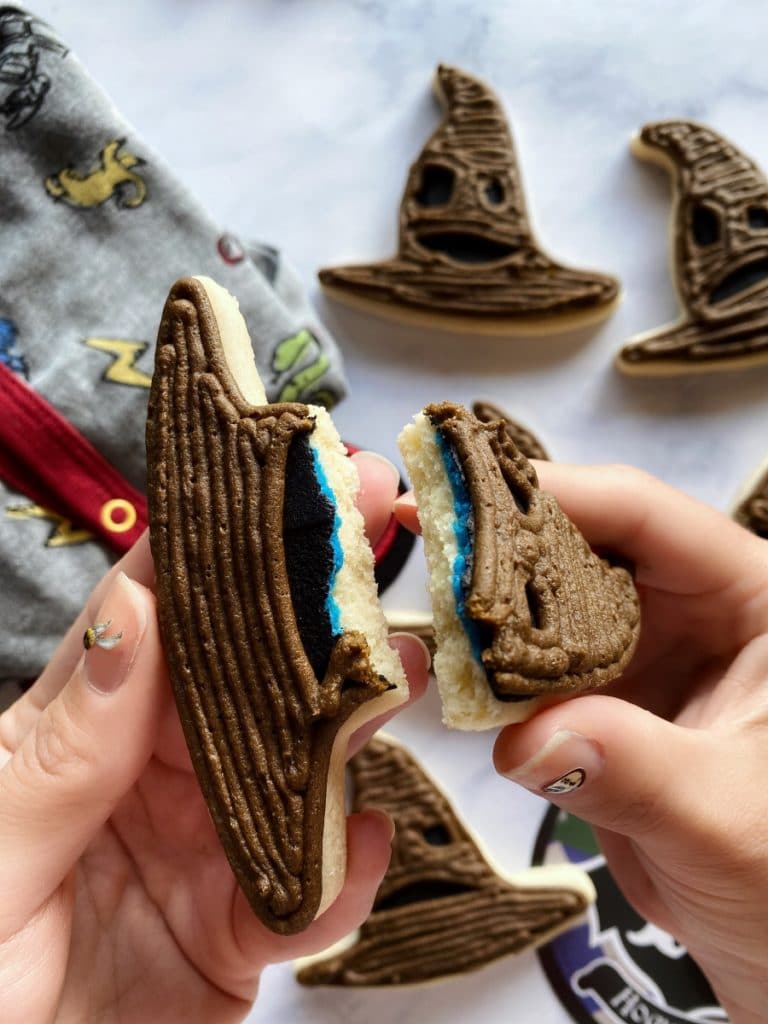
And that’s it for the cookies! Here’s a photo of a cookie broken in half to showcase how these gender reveal cookies work:

Part 2: Decorations to Compliment Your Gender Reveal Cookies

The decorations for this theme can go so many ways, so don’t feel like you need to replicate everything exactly as-is. Most of these items were laying around my sister’s house, and since it is a boho-ish theme, things don’t need to match perfectly! The point is to have fun with it and keep things cheap but still super cute.
This is what we used:
- a blue tablecloth from the Dollar Store
- yellow table napkins – these are my sister’s everyday napkins, but feel free to pick up some paper ones!
- 3 small brown bottles, two to fill with baby’s breath and one to fill with the
- baby’s breath flowers
- a cake stand to hold the cookies
- yellow shredded paper from the dollar store for the cookies to lay on
- some crafts my creative sister put together
- prize gifts & drinks were also included in the decorations
These are the crafts my sister created:
- 3 chalkboard signs – one tiny, one small, and one large – the large board was for a game in which mom-to-be informs the guests of common wives tales associated with gender and the small board was used as a decoration saying, “peace, love, baby” just like the cookie. The tiny board was used to write “groovy baby” on, which she taped to a skewer and placed inside one of the brown bottles holding the baby’s breath flowers.
- peace sign sticks for voting – she used different shades of pink and blue scrap-booking paper to cut out peace signs, outline them in black sharpie, and tape them onto skewers. She also taped some onto the wives tale board to carry the theme. These sticks were used as a prop to take a photo of all the guests & their guesses for boy or girl before the big cookie reveal.


If you created these gender reveal sugar cookies or used these decoration tips, let me know! Tag me on Instagram @buttercreamparties and follow me there for updates on new content! As always, thank you for reading my blog and I hope you enjoy the rest of summer!