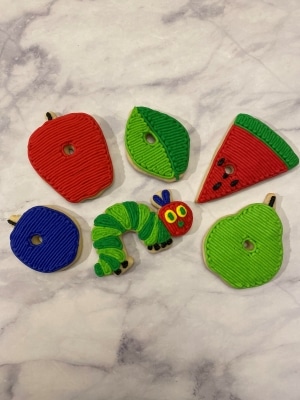
A Very Hungry Caterpillar Cookies & Smash Cake
My baby turned one on May 26th and I still can’t believe it! I mean, I guess he has been acting a bit of a toddler these days, but still. The year went so fast. I am especially excited to share these A Very Hungry Caterpillar cookies with you guys.
This is the first “party” (I say party because we are still under stay-at-home orders by the governor) I have thrown myself for the blog, rather than just providing a cookie tutorial for YOUR party. Both are fun to me, but my baby turning one was a great first party to share on the blog with you guys.
We had the party on Memorial Day because my husband and I work opposite shifts and both had the day off. Due to the stay-at-home order, we elected to throw a virtual party via Zoom at the last minute. Some family were able to attend with a moment’s notice, and it was a lot of fun!
I am going to divide this post into three sections: the cookie tutorial, the cake & cupcake tutorial, and the decoration tutorial.
*This post may contain affiliate links, which means I may receive a commission, at no extra cost to you, if you make a purchase through a link. Please see my full disclosure for further information.*
Skip to
Part 1: How to Decorate A Very Hungry Caterpillar Cookies

You will want to gather:
- 6 icing bags
- 5 Wilton #4 tips and 1 Wilton #2 tip
- leaf, plum, apple, and pear cookie cutters
- Wilton gel coloring to obtain red, yellow, light green, dark green, bluish purple (just mix some red into blue icing), black, and white buttercream frosting, here’s my crusting buttercream recipe
- Your favorite sugar cookie dough recipe – if you don’t have a favorite, here’s mine
- something to cut a small hole into your cookies – I used a cap to a Betty Crocker gel icing tube
- parchment paper, scissors, a pen, and a sharp, non-serrated knife
How to do Cookie Cutter Flips to Make Your Own Cookie Cutters
First, I want to show you how I altered and created my own cookie designs. The fruit set that I have at home is a staple of mine. Not only because fruit is a common cookie to create, but also because I can alter the designs to my liking. In case you’re wondering, this is the set I have and I highly recommend it: 9 Piece Fruit Stand.
In The Very Hungry Caterpillar, most of the fruits don’t have any leaves on them. They also have a small hole in them where the caterpillar has taken a bite. To replicate this storybook, without buying custom cutters, you just need a few supplies: a sharp knife & something to create a small hole in your cookie. Search your kitchen and you are bound to find the right sized circle.
For the apple, I have simply cut off the leaf, carefully pushed the stem so it was vertical, and cut out my caterpillar bite-sized hole:


Do this same technique for any of your fruit pieces that need altering a bit. For the plum, all I did was cut off the pointed bottom of the fruit & the leaf. For my watermelon, I simply rolled out some dough, and, with a sharp knife, cut out a slice, as if to cut a slice of cake from a round cake.
Now I want to show you how to make your caterpillar. Of course, you can always purchase a caterpillar cookie cutter. But, I am both cheap and inpatient. All you will need is your sharp knife, a pair of scissors, a pen, and some parchment paper.
First, I drew a sketch (okay more like 5 because I am a terrible drawer and couldn’t get it right) onto a piece of paper. I referenced the book a lot while doing this. Once you are happy with the size and shape of your caterpillar, trace it onto your parchment paper.

Cut it out and lay it onto your very cold, rolled out cookie dough. You can wet your cookie dough a bit with some water on your finger before laying the parchment paper on it to help it from sliding around. Hold your knife vertically and do up & down motions all around the edge of the parchment paper to cut it out. You don’t want to slide the knife through, as your dough will be pulled. Once your caterpillar seems to be cut out all the way, carefully pull the excess dough away from your caterpillar and place the caterpillar onto your baking sheet. Repeat as many times as you want for as many caterpillars you would like in your set.


Don’t forget to cut your leaves out (with their holes) as well. If you don’t have a leaf cookie cutter, just use one of the techniques mentioned above – either altering a similar shape (like a lemon or a football) or make your own with parchment paper.
Setting up the Icing Bags for the Hungry Caterpillar Cookies
Okay, let’s get to frosting these cookies. To set up your icing bags, you will place the red, blueish purple, yellow, light green, and dark green frostings each into their own respective icing bags, with a tip #4 in each bag. For your brown frosting (or in my case, black) place it into a bag with a tip #2 in it. For complete instructions with photos, check out my page Getting Started: Learn How to Decorate Buttercream Cookies.
Frosting the Decorated Hungry Caterpillar Sugar Cookies with Buttercream Icing
For your plums, take your bluish purple frosting and outline the edges of the plum, as well as the hole.

Fill in the plum using horizontal lines.


Take your brown frosting and draw a thin line to represent the stem.

Do this same technique with your apple cookies and your pear cookies. For the pear, use the light green, rather than the dark green, frosting.


For the watermelon cookie, take your light green frosting and outline the rind.

Take the red frosting and outline the flesh of the watermelon. You can also outline the hole at this point. I forgot, but simply just outlined it once I got to that point in filling it in.

Fill in your rind with vertical lines and your watermelon slice with horizontal lines. For the seeds, take your brown frosting and create little tear drop shapes. If they aren’t as pointed as you would like, take your knife and pull some of the brown frosting to create a point.

To create your leaves, you will need both your light green and dark green frostings. Outline one half of the leaf in light green and one half in dark green. I made a slight curve down the center.

Fill in the leaf, one shade of green at a time.

Now for the most time consuming, but definitely worth it, hungry caterpillars. Take your red frosting and outline the caterpillar’s head & then fill it in.

Take your bluish purple frosting and outline and fill in the antennae. Take both your light and dark green frostings and outline the body of the caterpillar. You will be alternating shades of green as you do this. Here is the photo series:


Take your yellow frosting and outline and fill in two ovals to represent the caterpillar’s eyes.

Take your light green frosting and squeeze out a bit of frosting into the center of each yellow circle. Create a small triangle to represent the caterpillar’s mouth right below the eyes.

Draw in your feet with your brown frosting.

Isn’t he (she?) so cute!
Part 2: The Very Hungry Caterpillar Smash Cake & Cupcakes


You will want to gather:
- 8 icing bags
- 2 Wilton #1M tips and 1 Wilton #12 tip
- decorated hungry caterpillar cookie and leaf cookie from the directions above
- Wilton gel coloring to obtain red, yellow, light green, dark green, blue, and white buttercream frosting, here’s my crusting buttercream recipe
- cake mix (or bake your own from scratch if you want)
- 4″ cake pans – I used two of these and they were perfect 4 Inch Cake Pan Set of 3
- parchment paper, plastic wrap, scissors
- butter for coating the cake pans
- cupcake liners, cupcake pan, serrated knife, and an angled flat spatula
First, you will want to whip up your cake mix and get those baked. Make sure to place parchment paper on the bottom of your cake pans and butter the sides of the pan. Use your leftover cake mix for the cupcakes. I used a Betty Crocker cake mix and followed the baking instructions for shiny metal pans. It ended up baking for about 30 minutes. Of course, insert a toothpick and when it comes out clean, you know it’s done.
While your cake and cupcakes are baking, whip up your frosting recipe. To set up your icing bags, place your white frosting into a bag with a tip #12 in it. The red, yellow, light green*, dark green*, and blue frostings will each go into their own icing bags (without tips). *NOTE: Keep about a quarter of a cup of the light green and a quarter of a cup of the dark green frosting outside of the icing bags. You will place these reserved amounts into a shared bag with a tip #1M in it – put the light green up one side of a bag and the dark green up the other. We will be using this bag at the very end, so you can set it aside for now.

Next, take your individual colored frostings (not the white or the mixed bag of greens) and cut off the tips. The larger the better, really. I was being conservative here in the photo but you can cut it closer to the start of the frosting.

Lay a large piece of plastic wrap on your counter or table. Then, squeeze out the frosting from the individual colors onto the plastic wrap in lines. Next, roll it up into a sausage-like shape. I grabbed one side of the plastic wrap and rolled it onto itself. I imagine this is what it may feel like to roll out sushi, but having never done that, I don’t know. Here is the photo series:


Stand the roll up vertically and cut off the top end of the parchment paper, as close to the frosting as possible.

Now, take an icing bag and fit it with the other 1M tip. Place your rolled up frostings into the icing bag, with the cut open side in first. Squeeze the icing down to the start of the tip. The plastic wrap shouldn’t get in the way. Now, you have your rainbow bag of frosting.


The cupcakes are so easy, so let’s start with those. Make sure your cupcakes have completely cooled before frosting them.
Hold your rainbow bag of icing vertically, with the tip just above the center of the cupcake. Squeeze some of the frosting out while you move your bag down, toward you. Then, without lifting your frosting, squeeze out more frosting as you move counter-clockwise around the edge of the cupcake. This will fill in the bottom layer of frosting. Again, without lifting your frosting, continue this counter-clockwise spiral as you pull the frosting up toward you. Note that the icing bag is always being held vertically.


Your end result should look like this. If you messed up, just take it off with a knife and try it again.
Once your cakes have been pulled out of the oven and fully cooled, we can start to decorate them. First, we want to cut the top of the cake off so that the layers will lay even. Take a large serrated knife and use the top of the cake pan as a level of sorts. Quick shoutout to my mom, who gifted me this knife. A little back story, she came over to my house when my son (who is now one!) was a few weeks old to help out. She was doing some of the cooking and noticed that my knives were horrible. After her visit, she ended up mailing me (she lives about 3 hours away) this knife. Thanks mom! I use it pretty much every day now.


Do this to both of your cakes and then flip the pans over to remove the cakes. They should slide out effortlessly if you used parchment paper and buttered the sides. Make sure you remove the parchment paper before the next step.
I placed my cake onto a piece of cardboard wrapped with foil, as I don’t have a cake stand. This made it easy to transport and decorate.
For the frosting that will be in the middle of the two cakes, you will use a similar technique that was used on the cupcakes. You will hold your rainbow frosting vertically and will start in the center of the cake. You will then squeeze out the frosting as you move the frosting counter-clockwise around the bottom of the cake so it creates a swirl. Don’t go all the way to the edge, as you don’t want it to seep out of the sides when you place the other half of the cake on it.

Alright, now, place the other half of the cake over this beautiful rainbow swirl. Don’t really, if your baby is into the cake smash, the colors will be shown off then!
Now, take your white frosting, with tip #12 attached, and frost the whole outside of the cake.


I was kind of sloppy. This actually looks like a roll of toilet paper to me now, but maybe it’s from all the images of toilet paper hoarding in the news lately.
If you have one of those fancy cake smoother things, use one of those here. As for me, and this being my first cake, I went the route that I do when I smooth out buttercream cookies. Take a piece of parchment paper roughly the height of your cake and lay it onto the side of the cake. Place your finger over the parchment paper and smooth the frosting out. Keep repeating this step as you find necessary. You can also take a flat spatula, dip it into a cup of really hot water, wipe it off, and smooth out the edges of the cake that way. I did a mix of both.


Once you are pleased with the smoothness of your cake, take your rainbow frosting and do the same technique you did for the middle layer of frosting. However, this time, bring the icing all the way to the edge.


Take your flat spatula and carefully blend the colors together. I say carefully because you don’t want to over mix the colors and end up with muted, dark colors. I was perfectly okay with some dark colors showing up, like some brown, because that color is present in the book.

Remember that bag of the two shades of green I asked you to set aside? You will want to grab that now. With this bag, you will be creating small upside-down “U” shapes on the bottom of cake. I would make one upside-down “U” shape, pull the frosting bag away, and then create the next. In other words, I didn’t want it to be one continuous flow of icing. Do this all the way around the bottom of the cake.

For the next step, you will want to grab your caterpillar cookie and your leaf cookie. Make sure these cookies have sat out for a few hours and have crusted. Take your white frosting and squeeze a small amount onto the cake where you want to “glue” your caterpillar.

Gently push your caterpillar cookie into the frosting. The green frosting around the bottom of the cake will also help hold the cookie place.

Now, mark a spot that you would like your leaf to sit on the top of your cake. Dig out a small amount of frosting so that you can set your cookie into this spot. I chose the upper left hand side of the cake.

Place your leaf cookie in the dug-out spot and use your white frosting to squeeze out some icing onto the backside of your leaf cookie. This will eventually crust and create a support for the cookie.


On the front side, take your icing bag of the two green colors and squeeze out some icing on the bottom front of the leaf for additional support.

Now all that’s left is to place the candle in your cake. I pulled the cookies off before we lit it and sang Happy Birthday because I didn’t want my baby potentially choking on a cookie.

Part 3: The Decorations for The Very Hungry Caterpillar Party
It seems everyone is doing full on photo shoots with their babies, which is totally cool with me. Here, I want to show you how you can create a cute, versatile, and cheap background!
You will need:
- computer paper
- watercolor paint set
- small circle cookie cutter or one of those circle paper punches
- scissors
- a pen
- a red tablecloth from the dollar store
- green balloons – I purchased this set because I liked the mix of light and dark green AnnoDeel 50 Pcs 12 Inch Green
- red ribbon
- helium
- scotch tape and masking tape
- A Very Hungry Caterpillar balloon – I found this one for $6! The Very Hungry Caterpillar 43″ Balloon
- A Very Hungry Caterpillar book
First, figure out where you want your photo shoot background to take place. Ideally, this place will have natural light and a blank wall behind it. I moved my highchair to this space so that I could see about how large the background needed to be and to help visualize things.
Once you’ve determined your space, it’s time to get working on the colorful dots for the background. For this, you will need to paint various colors onto your computer paper. I chose to do this in blocks. I found it to be helpful to look at the book while doing this so I could make the colors and designs to my best ability. Make sure to combine some colors as well. For instance, I did some green blocks with yellow streaks in it and some red blocks with purple streaks in it.

This part is somewhat tedious, but I actually found it to be kind of therapeutic. If you have one of those circle paper punchers, now is the time to use one of those. I think I have one somewhere, but honestly, I wanted to cut them out myself. In the book, I noticed that the circles were not perfect circles. I also knew exactly where my small circle cookie cutter was, so it was easier to use that than tear up the house looking for a circle punch.
What you will want to do, if you go the cookie cutter route, is flip your painted paper over (once dry, of course) and start drawing circles with your cookie cutter.

Once you have all of your circles, cut them out. Again, since the book didn’t have perfect circles, I didn’t spend too much time cutting these out perfectly.

To set up the circles on the wall, I first taped my caterpillar balloon on the wall so I could see what space was left to fill with circles. I just used a bit of rolled up scotch tape on the back of each circle and taped it to the wall. It sounds like a lot of tape, but it really wasn’t.

I played around with the circles a bit and ended up making a few more. The next step I did was to tape my red table cloth onto the wall and onto the floor. The purpose of this was to create a background for photos, but also, to have easy clean up after the cake smash. And my baby made a mess, so I was very thankful for this at the end of the party. All that’s left after that is to blow up some balloons. I only used helium for the one tied to the high chair. All of other balloons were filled up without helium, with some taped to the wall. I used masking tape for the caterpillar and scotch tape for the green balloons. Here is the finished project! He was gifted a table and chairs for his birthday, so I included that into the photos as well! Make sure to include The Very Hungry Caterpillar book somewhere, too!


And that’s everything! If you created these cookies, the cake, or used any of the decoration items, send a photo to my e-mail [email protected] or tag me on Instagram at buttercreamparties for your chance to be featured on the blog! Thank you so much for reading!
What a fun, original party!
Thank you! My son had such a good time and I enjoyed setting everything up. Thanks for reading!
This is so cute! I love it!
Thank you!
Oh wow so much detailed work and most gorgeous and well done. I am sure that your son must have had a feast that day and happy birthday (belated) to you and may you have many many more lovely years to enjoy and create plenty awesome birthday parties for him. Well done.
Thank you so much and yes, he looooved the cake! We had to pull it away because we were pretty sure he’d eat the whole thing if we let him!
Oh my gosh this is so so cute! My daughter will be turning 2 in May and I’ve been looking for some birthday ideas. She loves this book. And the step by step directions are so great.
My son will be turning 2 this May as well! How fun!
Wow!
I love The Hungry Caterpillar(anything Eric Carle really).
You did an amazing job!
Everything looks just perfect and I bet your son was thrilled!
Thank you so much! He had a great day!
So cute and creative. Currently planning my second born son’s first birthday and cake smash.
How fun! The first birthday is such a special day.
What a cute idea! My kiddos loved A Very Hungry Caterpillar when they were babies! What a fun little party you were able to throw you son during quarantine!
Thank you so much, Arica! We made the best of the situation!
Im jealous of this cute boy having all the cake, such a beautiful work of art! Very detailed
He certainly enjoyed his cake! Thank you!
Such a fun and colorful birthday party idea! I love that you include everything from the cookies to the cake and decor. Wonderful post, thanks for sharing!
You are welcome, Stacy!
Oh my goodness, these are so stinkin’ cute! Any kid would love to have one if not all of these fun treats. You are so creative!
Yes, since it was during the stay-at-home orders, we had lots of leftovers! And thank you so much!
Your cookies look exactly like the pictures from the book! Yours and is even better! You have such a steady hand. I will mess up so much if I try to decorate cookies and cakes like this 😂.
Happy birthday to your son. First birthdays are always so exciting. I remember when my first baby turned one, I made her a cake too.
I am pinning this post so I can make it with my daughters, they’re older now, and they love to bake. Thanks for sharing your son’s special day with us!
Thank you so much, Colette! We had so much fun. I’m glad your daughters enjoy baking! It’s a great hobby.