How to Decorate Lisa Frank Cookies for a 30th Birthday Idea
Today is the last day of my 20’s, as I turn the big 3-0 tomorrow! I’m actually not that sad about it, as I think a lot of women my age could be. Instead I’ve been feeling pretty nostalgic lately and I was thinking of all the fun I had as a 90’s kid.
I loved back to school shopping in elementary school because that meant getting to pick out alllll of the Lisa Frank pee-chees (I always called them these, anyone else?), pencil pouches, stickers, erasers, binders… anything my mom would allow me to get.
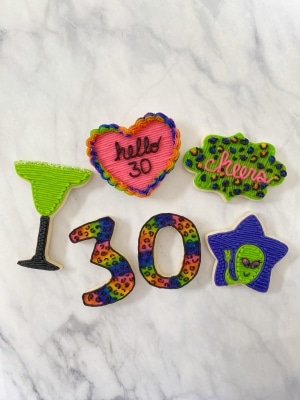
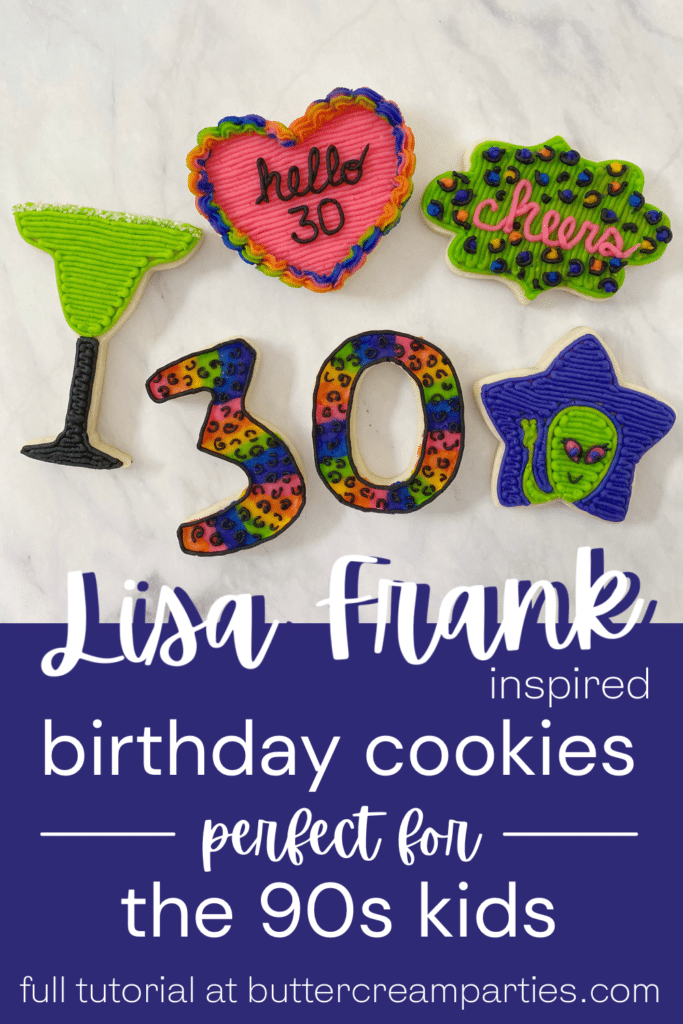
If you need 30th birthday ideas, Lisa Frank cookies would be perfect for fellow 90’s kids. I included my favorite drink, a lime margarita, and my favorite Lisa Frank character, the alien showing the peace sign.
These Lisa Frank cookies are easy to create once you have your supplies. Follow along for the step-by-step photo series tutorial below!
*This post may contain affiliate links, which means I may receive a commission, at no extra cost to you, if you make a purchase through a link. Please see my full disclosure for further information.*
Skip to
Part 1: Gathering your Supplies for your Lisa Frank Cookies
To make your own 30th birthday Lisa Frank cookies, you will need:
- 8 Icing bags
- 6 Wilton #3 tips, 2 Wilton #2 tips, 1 Wilton #1 tip, and 1 Wilton #18 tip – purchase these here for cheap
- 2 Couplers
- margarita cookie cutter
- Heart and star cookie cutters – I used the medium sized ones from this favorite set of mine
- Plaque cookie cutter
- Birthday number cookie cutters
- Wilton gel coloring to obtain pink, orange, yellow, lime green, blue, purple, and black buttercream frosting, here’s my crusting buttercream recipe
- Angled flat spatula and/or pointed knife
- Your favorite sugar cookie dough recipe – if you don’t have a favorite, here’s mine
- Clear sprinkles to mimic salt or you can use sanding sugar
- Parchment paper, plastic wrap, and scissors
Part 2: Baking the 90s Cookies and Setting Up the Icing Bags
- Roll, cut out, and bake your sugar cookies. I created 6 designs, so if you want to do a dozen cookies, cut out two of each cookie.
- While the cookies are cooling, whip up your frosting. Divide the frosting into 6 small bowls to create your frosting colors. You will want to set aside about a tablespoon of each of the frosting colors (besides the black frosting) to be used in our rainbow frosting bag.
- To set up your frosting bags, you will place your black frosting into a bag with a coupler, attaching a tip #2 first. Place your pink frosting in a bag with a coupler, attaching tip #2 to it first as well. The orange, yellow, lime green, blue, and purple frostings will each go into their own bags, each with a tip #3 attached. If you are unsure how to do this, no worries, check out my post here.
- To set up your rainbow piping bag, you will want to lay out a piece of plastic wrap onto your counter top. Spread each of the colored icings that you set aside in straight, vertical lines next to each other. You will want to follow the pink, orange, yellow, green, blue, purple pattern of a rainbow. It’s more than okay if they are messy looking.
 Next, roll your icing into a log and twist each end of the log so that the frosting all comes together. You will then cut off one end of the rolled plastic wrap, all the way to where the frosting is. Go ahead and set up your icing bag with the tip #18 attached. See the photo series below.
 Now, take the log of icing and place it into the icing bag, with the cut open side toward the tip of the icing bag. I picked up the icing bag so that the rolled log of icing went as deep as possible into the bag. All you need to do now is squeeze the icing bag from the top of the icing so that it fills up the portion between the log of icing and the tip.

Part 3: How to Decorate the Lisa Frank Cookies
First, we will be making our margarita sugar cookies. Take out a small plate and pour some of your sprinkles onto it.  Take your margarita cookies and draw a line across the top of the cookie with your lime green frosting. Then, dip the line of frosting into the sprinkles to mimic our salted rim. Be careful to do this gently, as you don’t want to press too hard and break the stem off of your margarita glass. I am definitely speaking from experience here.
 Next, outline/fill your margarita cup with the green frosting.
 Take your black frosting, with the tip #2 attached, and outline/fill in the stem of the glass.
 Once all of your margarita cookies are complete, set aside the plate of sprinkles to free up your work space.
How to Write on Cookies – Cheers Cookie
To create our “cheers” cookie to go along with our margarita glass, outline/fill in your plaque cookie with the green frosting.  Take your pink frosting, which has tip #2 attached, and write the word “cheers” on it. I like to do cursive because I find it to be more forgiving. A trick to getting the writing right is to use a pointed knife and pick up any frosting letters that don’t look that great, and either manipulate them a bit so they look better, or remove them all together and start the letter over.
You are then going to take your purple, blue, orange, and yellow frostings and create small polka dots around the word “cheers.”  Take your black frosting, still with tip #2 attached, and outline the colored polka dots to mimic cheetah print – in true Lisa Frank inspired cookie fashion! I typically didn’t outline a full circle, but rather chose to do a half circle. You can mix and match your shapes. It helped me to Google a cheetah print pattern. I also created some small black polka dots and half-circles here and there.
Alien Decorated Cookies
Next, we can do my favorite Lisa Frank character, the alien giving a peace sign. For this Lisa Frank inspired cookie, you will be outlining/filling in the head, arm, hand, and fingers of the alien in green frosting. Follow the photo series below for how I did this. I also Googled the alien character for reference. 

 Now, create two small tear drop shapes with your pink frosting to represent the eyes. Again, if the eyes aren’t perfect, you can take a pointed knife and gently manipulate the frosting until it looks how you want.
  Take your purple frosting and squeeze out two small dots for the pupils.
  We are now going to want to change our black frosting out to the tip #1. You will be outlining the pink teardrop eyes with the black frosting. I also decided to draw the girl alien so I added two small lines off each eye to mimic eyelashes. Then, draw in the smile. Again, use your pointed knife to perfect things as you go.
  Take your purple frosting again and outline the alien and the star. Then, fill in the background with the purple frosting.

Rainbow Heart Cookies
For our heart cookie, go ahead and grab your pink frosting and change the tip to a tip #3 again. Outline/fill in the heart. 
 Take your black frosting and switch that back to a tip #2. You can leave a tip #1 on if you want a smaller print, but I wanted it to be bold, just like Lisa Frank. You will be writing “hello 30.” I mimicked the font of the numbers to the cookie cutter numbers but you don’t have to do that.
  Now we are going to take that fun bag of rainbow frosting and draw a rainbow border around the edge. To do this, you will squeeze out a bit of frosting and pull it up and then down, kind of like creating a little hill of frosting. See the photo below:
  Continue doing this all around the edge of the cookie, rotating the bag of frosting ever so slightly between each small “hill” so that all of the rainbow colors will be represented at the top of this Lisa Frank inspired cookie.

Rainbow Cheetah Print Cookies
Now for our numbers. Of course, you can do any age for a Lisa Frank birthday theme, but I, of course, wanted it for my 30th birthday. Get your pink, orange, yellow, green, blue, and purple frostings and make sure the pink frosting has a tip #3 attached. You will be creating little blocks of each color onto your number cookies. See the photo series: 
 Take your piece of parchment paper, cut slightly larger than your cookies, and place that over the top of the frosting. You will be pressing the frosting down with your finger to try to get rid of any lines.
  Once you pull the parchment paper off (carefully! think of those temporary tattoos we used to put on!) it will look something like this:
  You can keep repeating the process of flattening out any lines with the parchment paper until you like the result. It doesn’t need to be perfect, but the less lines, the better. When I do this, I like to work in smaller sections at a time. You can even place some of the parchment paper down and then carefully pull the parchment paper in the direction of the frosting, away from the cookie, to flatten out the lines even more. It sounds complicated, but it would be the same process if you were trying to flatten with a flat spatula, which you are welcome to use as well.
  You can then take a flat spatula or a butter knife and fix up the edges so that the frosting looks more symmetrical.
  Repeat this process for the “3” cookies as well.
  Next, take your black frosting and switch it back over to a tip #1. You will be drawing small cheetah print shapes, again, in true Lisa Frank inspired cookie fashion, onto the numbered cookies.
  Continue filling in the whole number and then outline the border of the letters with the same black frosting.
 And there you have it! Some fun Lisa Frank cookies for a 30th birthday theme!
These decorated cookies are just perfect for 90s kids as we reach our 30s. However, I think anyone would love these cookies.
Make sure to check out my Ultimate 90s Party post for more tutorials, recipes, games, decorations, and music playlists.
Part 4: Decorating the Lisa Frank Birthday Party
It’s so fun to decorate a Lisa Frank birthday party. Grab some balloons, streamers, tabletop confetti, and a backdrop and you’re good to go!


Save the Tutorial for These 90s Theme Party Cookies
Do you have a friend who is a 90s kid? Or maybe you want to make these for your own 30th birthday like I did? Make sure to save the tutorial so you can easily access it. Either pin the image below or use the social share icons to share it to your favorite social media site.
Let me know if you decide to make these in the comments below and don’t forget to tag me on instagram @buttercreamparties! Thank you so much for reading and happy decorating!