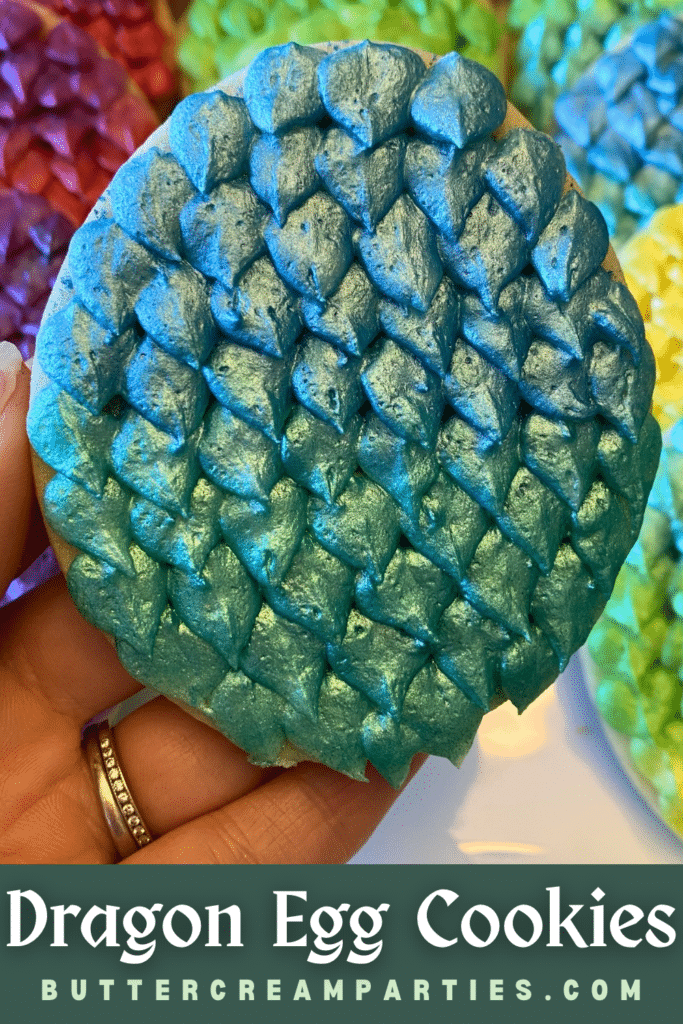
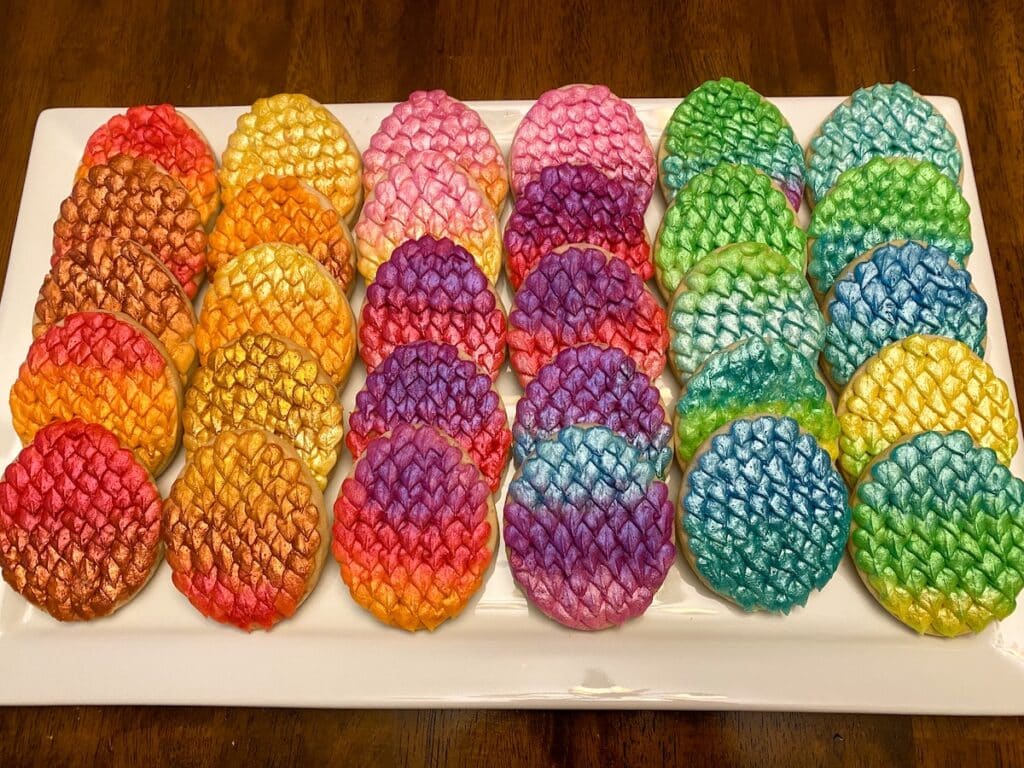
How to Decorate Dragon Egg Cookies with Buttercream Frosting
There’s something magical about a dessert table filled with treats that look like they came straight from a medieval feast!
These dragon egg cookies are the perfect centerpiece for a fantasy-themed birthday party, Renaissance gathering, or cozy movie night inspired by castles and dragons.
With their metallic buttercream shell, these cookies look impressively detailed but are surprisingly simple to make at home.
Whether you’re planning a whimsical celebration or just want a fun baking project with the kids, these dragon egg cookies are guaranteed to bring a little fire-breathing fun to your dessert spread.
Follow along for the full step-by-step photo series tutorial PLUS the recipes!
Let’s get started! This post may contain affiliate links to Amazon and Etsy, which means I may receive a commission, at no extra cost to you, if you make a purchase through a link. Please see my full disclosure for further information.*
Part 1: Gathering the Supplies for the Dragon Egg Cookies
To decorate these sun sugar cookies, you will want to gather:
- 1 Icing bag
- One leaf tip – I used the Wilton 352
- Easter egg cookie cutter
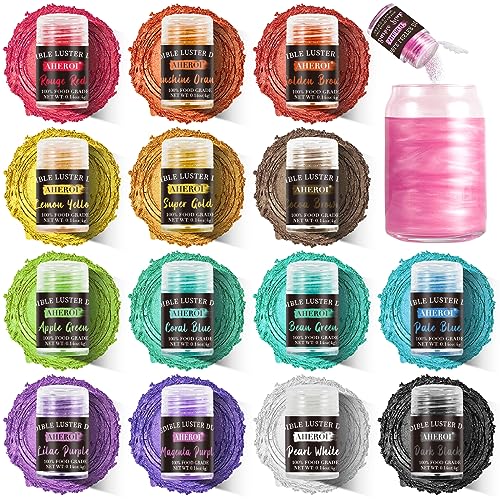
- Luster powder in various colors
- Food safe paintbrushes
- Ingredients for a crusting buttercream & sugar cookie dough – found below in recipe card

Part 2: Baking the Dragon Egg Cookies and Setting up the Icing Bags
Use the recipe card below for the sugar cookie and buttercream frosting recipes.

Dragon Egg Cookies with Buttercream Frosting
Equipment
- Stand Mixer with Paddle Attachment
- Rubber Spatula
- Measuring cups and spoons
- Medium Sized Mixing Bowl
- Lined aluminum cookie sheet parchment paper or silicone lined baking sheet
- Rolling Pin
- Cookie cutters and tools see part 1 on this post for the specific tools needed
Ingredients
Buttercream Frosting
- ¼ cup room temperature unsalted butter
- ¼ cup room temperature salted butter
- 2 cups powdered sugar
- ½ tbsp. vanilla extract
- 1 tbsp. whole milk
Sugar Cookies
- 1 cup cold salted butter cubed
- 1 cup granulated sugar
- 3 cups all purpose flour measured with the scoop & level method
- 2 tsp. baking powder
- 1 egg if egg free, substitute with 1/4 cup vanilla greek yogurt
- 1.5 tsp. vanilla extract
Instructions
- Remove all of the butter from the refrigerator. You will make the sugar cookies first but the butter for the frosting needs to come to room temperature before mixing.
Sugar Cookies
- Preheat the oven to 350℉ and prepare an aluminum cookie sheet by placing either parchment paper or a silicone baking mat on it.
- In a medium sized mixing bowl, combine the flour and baking powder and mix together. Set this aside.
- Cube a cup of salted butter and then, in a stand mixer with the paddle attachment, combine the cubed butter with the granulated sugar. Mix until creamed together well.
- To the stand mixer, add in the egg and vanilla extract and mix until combined.
- Slowly add in the dry ingredients in the mixing bowl to the stand mixer.
- Roll the dough out to 3/8" thick and use the cookie cutter to cut out the cookies. Place the cookies onto the prepared baking sheet and bake for 9-11 minutes or until the tops of the cookies no longer look wet. When baking the cookies, only bake 6-8 cookies at a time to leave proper space between each cookie to cook without spreading. Overcrowding the cookie sheet will cause spread.
Buttercream Frosting
- In a stand mixer with the paddle attachment, add the room temperature salted and unsalted butter and mix on high until light and fluffy.
- Mix in the powdered sugar little by little. Add in the vanilla extract and milk about halfway through adding the sugar to help the frosting come together. Start with one tablespoon of milk and work up to three if needed, depending on the consistency you want. For these, you will want them to be a smooth peanut butter consistency.
- Follow the directions in Part 2 for the specific way you will divide the buttercream and set up the icing bags.
How to Decorate the Dragon Egg Cookies
- Please refer to Part 3 of this blog post for the tutorial.
Notes
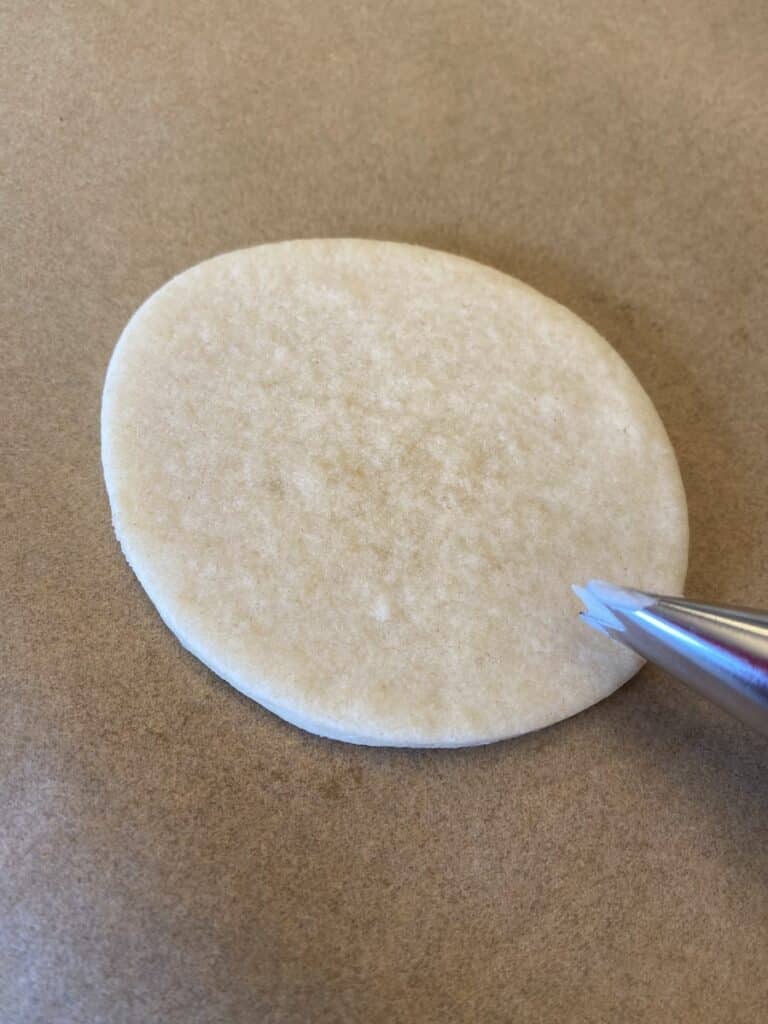
Make your buttercream icing according to the recipe. Then, set up your piping bag.
To set up the piping bag, place the leaf tip into the piping bag. Then, cut a small hole for the piping tip to fit into the bag.
For more instructions on this, see my post for beginner cookie decorators for a full tutorial.
Fill the bag up about halfway with frosting. If you put too much, it will be hard to pipe. Plus, the buttercream will melt in your hand as you pipe so it is best to only put a little in at a time.
You will have more buttercream than can fit in an icing bag, so once you fill one icing/piping bag about halfway full, cover the rest with plastic wrap to prevent it from forming a crust.
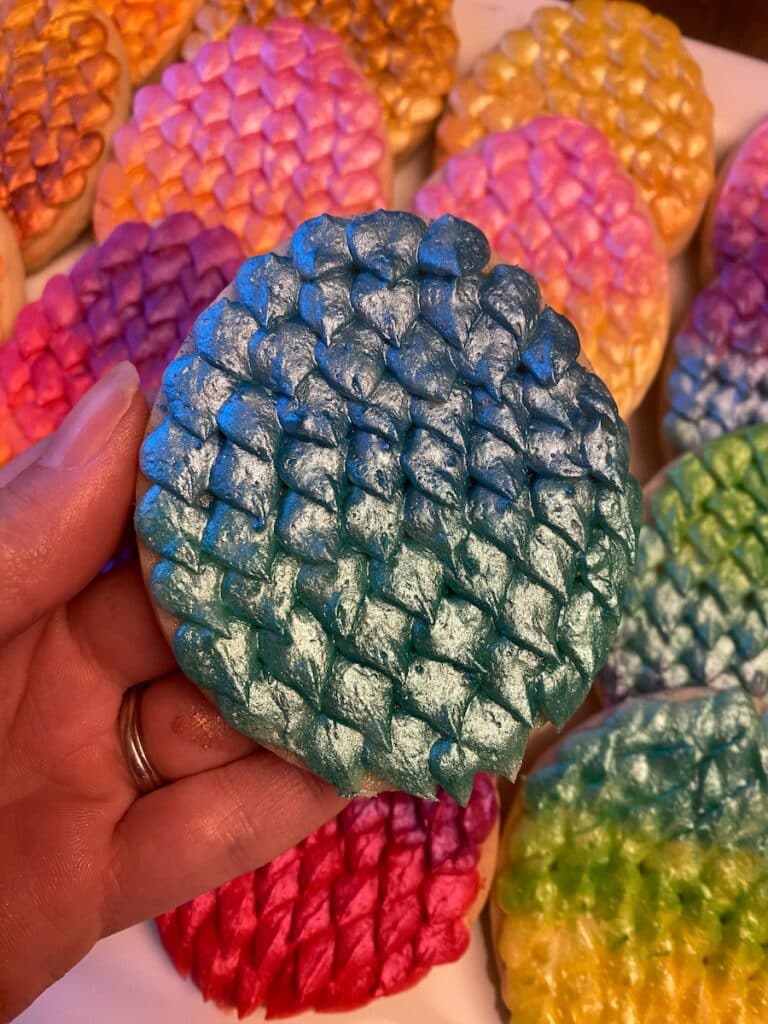
Part 3: Decorating the Dragon Egg Cookies with Buttercream Frosting
Here is the the step-by-step photo series tutorial for creating these fun dragon egg cookies. It’s super easy but does take two days to fully complete – or an early morning and a late night!
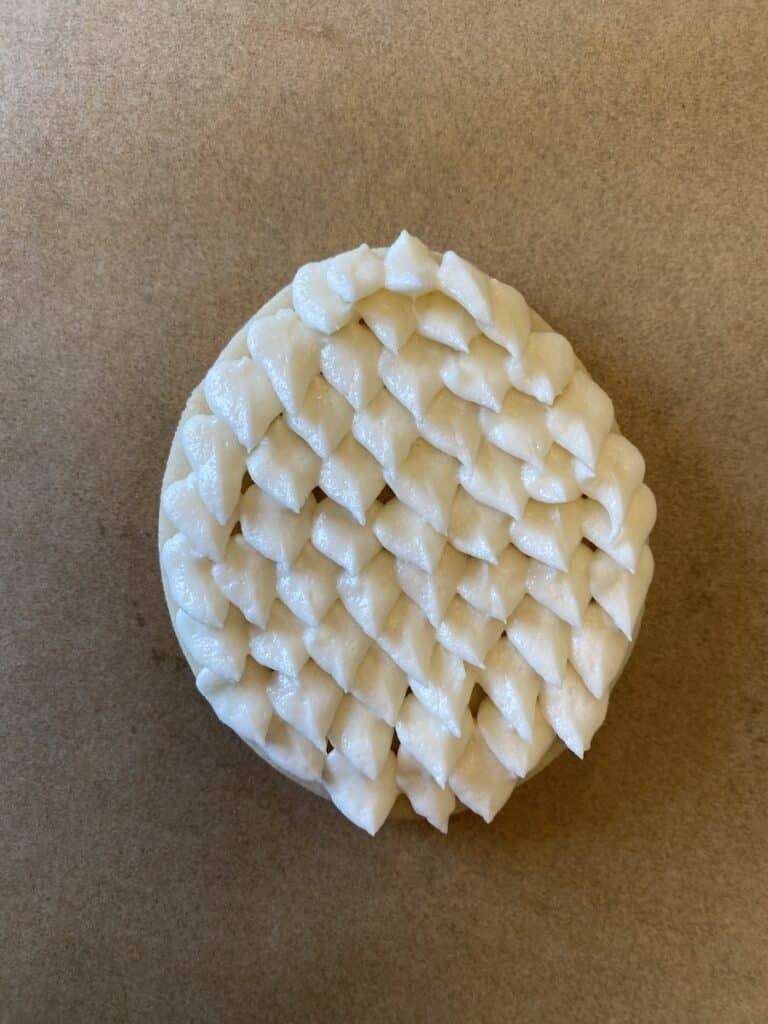
- Hold your piping bag so that you can’t see the “V” opening when you look above it straight on. Here is a photo for how it should look, with the “V” visible on the side.

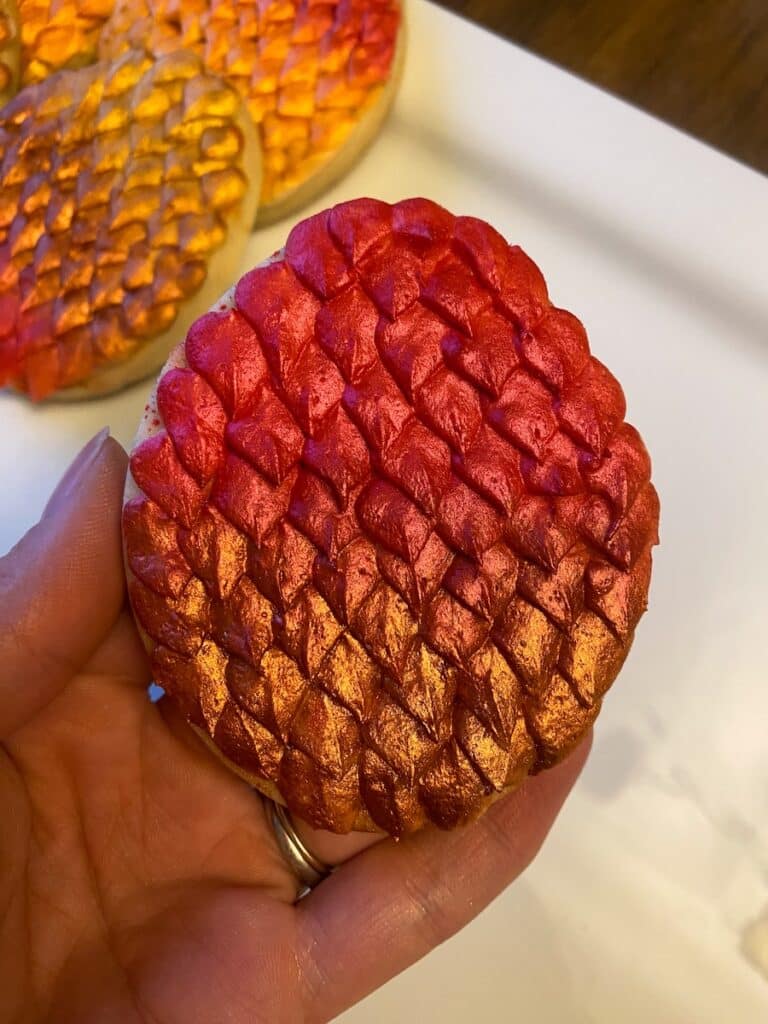
- Start on the bottom of the dragon egg cookie and pipe leaf shapes by squeezing frosting out, just a little bit is needed, and then pulling the bag away. If your frosting is too cold or too thick, the “leaves,” or scales, won’t come to a point. You can use your fingers to pinch it together. Eventually, the buttercream will warm in your hand and the points will come together better.
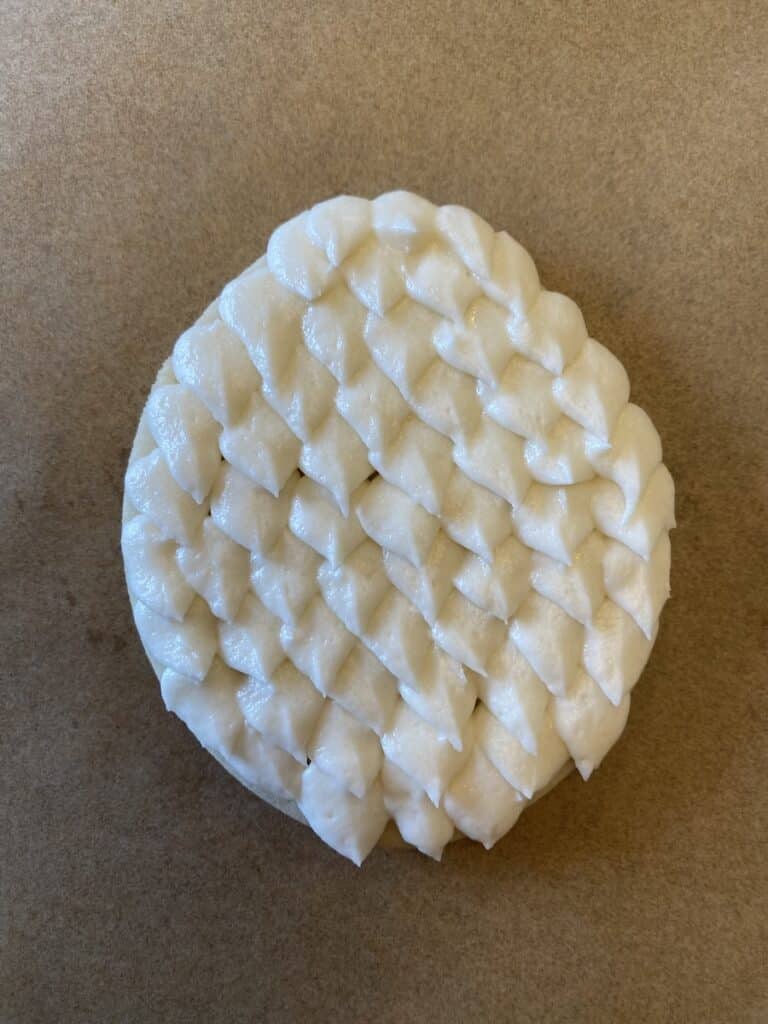
- Layer more scales/leaves onto each other as you work your way up the cookie.
- Once your cookie is filled with scales, you can pick up the cookie and GENTLY drop it back onto the table to flatten the scales so they lay on each other better. Only pick the cookie up a quarter inch from the table before dropping it back to the table.
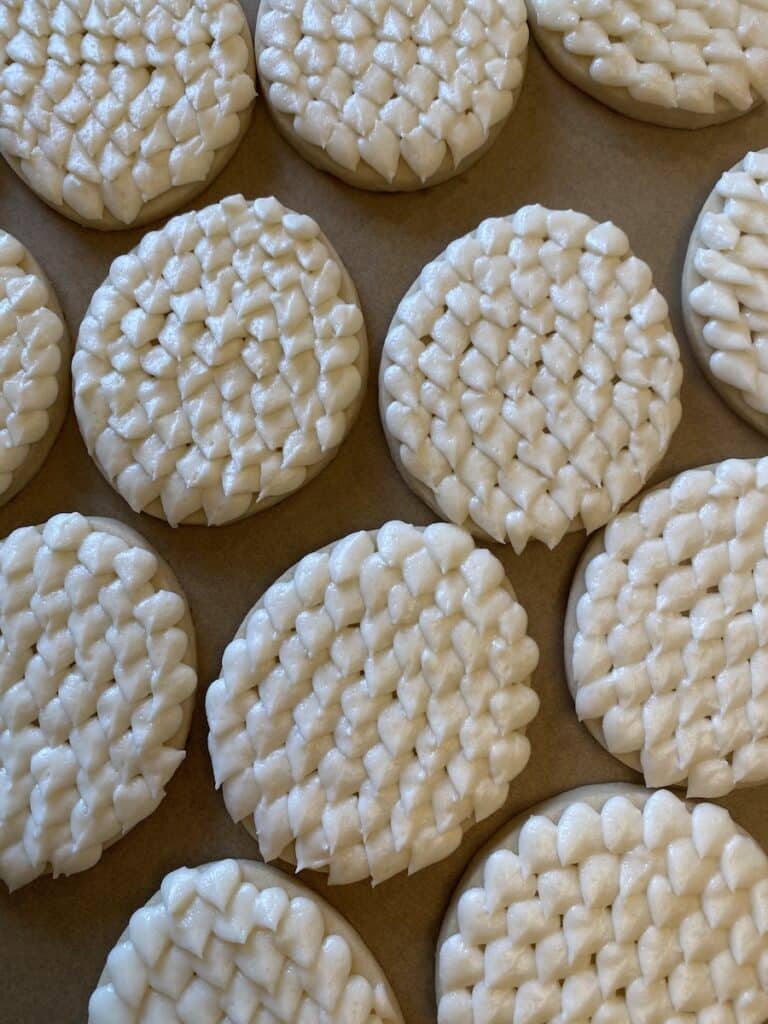
- Repeat for all of the cookies and then let them dry for at least 8 hours or overnight.
- Once they are dry – the top should harden just enough that it doesn’t loose shape with a light touch and it should not be sticky – you can start to add the luster powder.
- With a small food safe paint brush, apply the dry luster powder to the cookie. You don’t need a lot! I used two paint brushes – one for the cool tones and one for the warm tones. I kept a paper towel nearby to wipe off excess before dipping into the other luster powder color but I also found it didn’t transfer too much if I forgot to wipe off any excess.


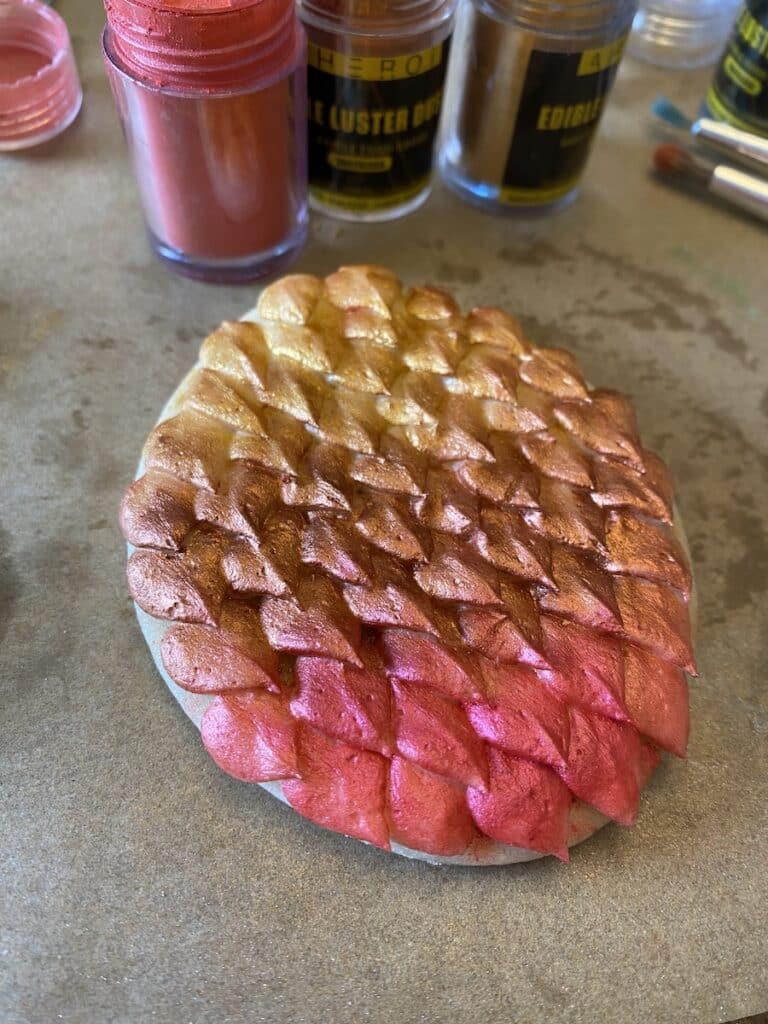
Once all of the cookies have the luster powder applied, they are ready to serve!
Typically with buttercream cookie decorating, you decorate your cookies completely but then need to wait for them to crust before eating. Since we did the waiting the day before, they are ready to be enjoyed right away.
If you have decorated your cookies in advance of your event, you can freeze them. Here is a detailed post on freezing buttercream sugar cookies if you want to go this route.
Keep in mind that buttercream frosting melts at hot summer temperatures! If serving outside, keep in a shaded spot and only bring out for the dessert time.
For tips on keeping buttercream cool, check out my post on how to keep buttercream cool during the summer months.
Save the Tutorial for These Dragon Egg Cookies
Use the image below to pin this tutorial for buttercream dragon cookies to your cookie party board on Pinterest. Alternatively, use any of the social share icons on the top of the page to share it to your favorite social media site.