Easy Mario Kart Cake for Beginners – Full Detailed Tutorial
Got a Mario fan in the house? For my son’s birthday, I wanted to make something extra fun—and what better way to celebrate than with a Mario Kart cake!
My son loves Mario Kart and since I grew up with a Nintendo 64 I decided to go a bit retro for the cake.
The Mario Kart cake was a total hit, and now I’m sharing exactly how I made it so you can wow your own party crew.
In this post, you’ll find step-by-step photo instructions to help you decorate your own game-inspired masterpiece.
Don’t worry if you’re not a pro decorator (I’m NEW to cakes!)—if you can follow a map on Rainbow Road, you’ve got this, even if you’ve never touched buttercream or fired a red shell!
Whether you’re baking for a kid or a kid-at-heart, this cake is guaranteed to bring smiles, high-fives, and maybe a banana peel or two.
Let’s race into the fun!
This post may contain affiliate links to Amazon and Etsy, which means I may receive a commission, at no extra cost to you, if you make a purchase through a link. Please see my full disclosure for further information.*
Skip to
Part 1: Gathering the Supplies for the Mario Kart Cake
To decorate this Mario cake, you will want to gather:
- Your favorite cake recipe or box cake – for the race track part of the cake
- Small batch cake recipe – for the mini cake with clouds
- 8″ or 9″ round cake pan
- 4″ round cake pan
- 8″ or 9″ cake board – I find this to be optional as I just decorate straight onto my cake stand & place a turntable under the cake stand. But it’s up to you!
- Vanilla buttercream and chocolate buttercream (I simply added black cocoa powder to some of the vanilla I mixed up to create a black buttercream) – recipe in recipe box
- Cake decorating kit which is more cost effective or these specific items (instructions will include directions for both options):
- 6 Icing bags
- Two small round tips (#2-#5 by Wilton are good sizes), one star tip (such as a #18 or 21), one large round tip such as a #10 tip, one #44 tip, and one #1M tip – find these at your local craft store for the best price. If you can’t find a #44, get a basketweave tip that has one flat side
- Turntable – this is optional but makes cake decorating way easier and looks more professional
- Angled flat spatula or cake comb with smooth edge – I like this 9″ flat spatula for cakes (and cookies!)
- 1M piping tip (this is not included in the kit linked above but makes the large blue border at the bottom of the cake – find it at grocery stores or craft stores for the best price)
- Dye free star sprinkles
- DecoPac Mario Kart cake accessories
- Mario birthday candle
- Red, yellow, green, and blue gel food dye such as Wilton or Americolor, etc. (I use natural dyes)


Part 2: Baking the Cake and Setting up the Icing Bags
Use the recipe card below for the buttercream frosting recipe.

Mario Kart Cake with Buttercream Frosting
Equipment
- Stand Mixer with Paddle Attachment
- Measuring Spoons & Bowls
Ingredients
Buttercream Frosting
- 4 cups room temperature unsalted butter
- 4 lbs. powdered sugar
- 2 tbsp. vanilla extract
- 4-8 tbsp. give or take room temperature whole milk
- black cocoa powder & gel food dye
Cake
- your favorite cake recipe or boxed cake, needs to make 2 8"-9" cake pans
- small batch cupcake recipe to bake in a 4" cake pan, recommendation is in Part 1 of this post. You can also make a smaller batch of your favorite recipe.
Instructions
Cake
- Prepare & bake your favorite cake recipe that makes 2 8" or 9" cakes. Make sure to place parchment paper on the bottom of your pans to prevent sticking as you want a smooth surface to work on.
- Prepare and bake a small batch cupcake recipe in a 4" cake pan, again lined with parchment paper. I have a recommended recipe in Part 1 of this post. You can make either one or two cakes this size, depending on if you want a layered top cake.
Buttercream Frosting
- In your electric mixer, use the paddle attachment to cream the softened butter.
- Slowly mix in the powdered sugar, only adding as much as your electric mixer can handle at a time.
- Mix in the vanilla extract and 4 tbsp. of milk. If the mixture is too stiff, add more milk. I prefer a consistency of smooth peanut butter.
- Refer to the instructions under this recipe card with how to divide up, color, and bag the frosting.
Make your buttercream icing according to the recipe and separate it into 6 bowls in this way:
-
-
- Remove about a cup of the frosting from the stand mixer and mix in the black cocoa powder until a dark shade of brown is achieved. It will dry black. If you accidentally add too much and the frosting is too thick, slowly mix in a bit more milk.
- Remove two cups of frosting from the stand mixer and dye this green.
- Remove about a cup of frosting from the stand mixer and color this light blue.
- Remove another cup from the stand mixer and dye this dark blue.
- Remove about an eighth of a cup from the stand mixer and dye this red.
- Remove another eighth of a cup from the stand mixer and dye this yellow.
- Keep the remaining frosting in the stand mixer white/undyed.
-
For tips on working with TruColor natural dyes, check out my TruColor review and process for making the colors.
You can still get vibrant colors dye free, for example here is the red I got for the cake!

To set up the piping bags:
- Place the 1M tip into an icing bag and place the dark blue frosting into it. If you don’t know how to set up icing bags, check out my post here.
- Place the tip 44 or basket weave tip into a bag and put the red frosting into it.
- Place a small round tip (such as a 2, 3, 4, or 5) into an icing bag and put the yellow frosting into it.
- You should have three extra piping bags – these will be used for the leftover light blue, white, and green frostings (after covering the cake to pipe detail work)
Part 3: Decorating the Mario Kart Cake
- After baking and cooling your cakes, flip one of the larger cakes over onto your cake stand or turntable. Don’t forget to peel off the parchment paper which should now be on the top of your flipped over cake. Add a layer of white buttercream to the top of the cake and then flip over the second larger cake and place it on the white buttercream.

- Put your black cocoa powder buttercream on top of this next layer of cake.
- Frost your mini cake in the same manner but with vanilla buttercream only. If you have two layers to your mini cake, then frost a middle layer between the two. If you only have one layer, just frost the top and the sides in a thin layer. This is called a crumb coat. MAKE SURE TO LEAVE ABOUT 1/3 CUP OF FROSTING LEFT FOR YOUR PIPING BAG TO PIPE THE CLOUDS AND WHITE/RED STRIPE.
- Place the mini cake into the freezer for at least 10 minutes. Then, remove the cake and add most of the light blue frosting to the cake. MAKE SURE TO SAVE ABOUT 1/4 CUP TO PUT INTO YOUR PIPING BAG TO PIPE THE BORDER.
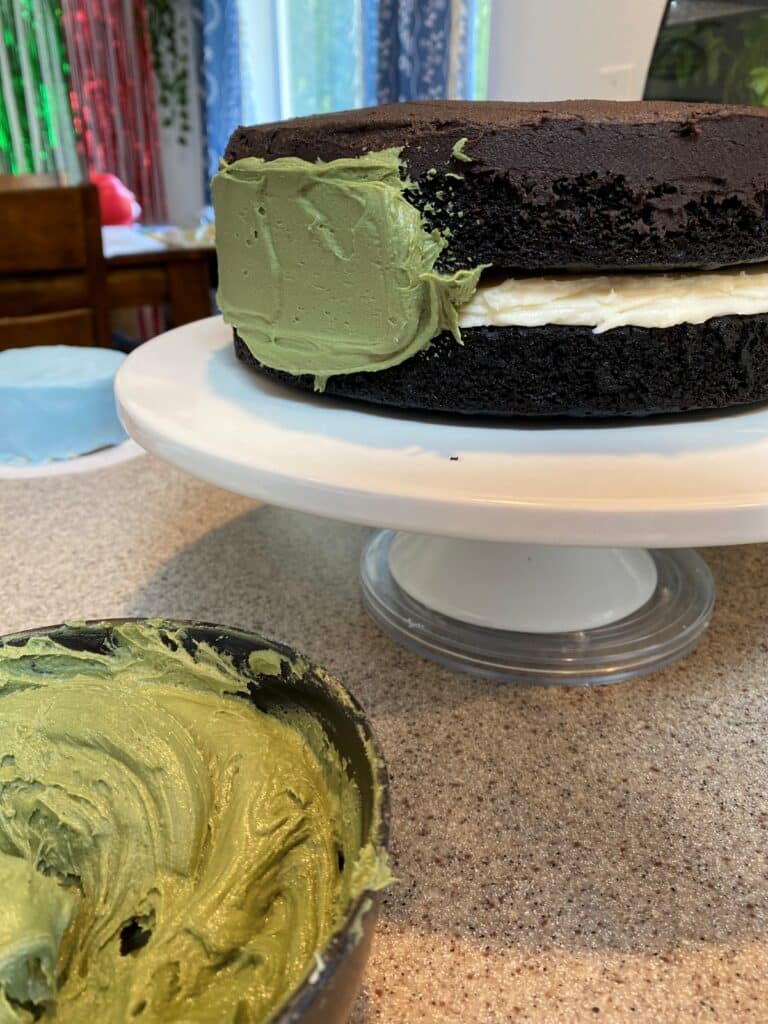
- Add a thin layer of green frosting onto the outside of the big cake to create the crumb coat. MAKE SURE TO SAVE ABOUT 1/3 CUP OF GREEN FROSTING FOR PIPING THE GRASS ALONG THE TOP BORDER. Then, place the cake into the freezer for at least 10 minutes for the crumb coat to harden.
- After you’ve frozen the cake, add another thin layer of frosting if crumbs are noticeable on the cake. Otherwise, smooth any rough spots. It doesn’t need to be perfect!
- Place the mini cake on the big cake close to the edge. Place the remaining light blue frosting into an icing bag with the small star tip. Pipe a border along the bottom of the mini cake. You can do different types of borders. I chose to pipe small upside down soft U shapes to make it a bit wavy.
- Add the reserved 1/3 cup of green buttercream to an icing bag with a small round tip in the bag. Pipe up and down lines for a top border.
- Place the leftover white frosting into an icing bag with the large round tip and pipe blobs of frosting to create clouds on the mini cake.
- Use the icing bag with the 1M tip and dark blue buttercream in it to pipe a border along the edge. I did the same type of upside down U piping but you can do sideways S shape swirls or anything you prefer.
- Once your bottom border is piped, add the star sprinkles right away, before the frosting has a chance to form an outer crust.
- Use the white bag of icing with the round tip in it to pipe along the edge of the green cake. When piping, keep the tip close to the cake so that you pipe a flat line as opposed to a round log.
- Use the red bag of icing with the tip #44 or basketweave tip, pipe flat lines along the white border. If using the basketweave tip, make sure to position the smooth side of the tip up and the side with the teeth down.
- Use the yellow icing bag with a small round tip in it to draw a border along the inside of the white and red striped border.
- Last touches! Add your DecoPac Mario Kart pieces & your candle(s)!


I also made cookies to go with this Mario Kart cake for my son’s birthday. If you are into cookie decorating (or want to start!) check out my step-by-step plus video tutorial here!

Save the Tutorial for This Mario Kart Cake
Use the image below to pin this tutorial for this Mario Kart cake to your party board on Pinterest. Alternatively, use any of the social share icons on the top of the page to share it to your favorite social media site.