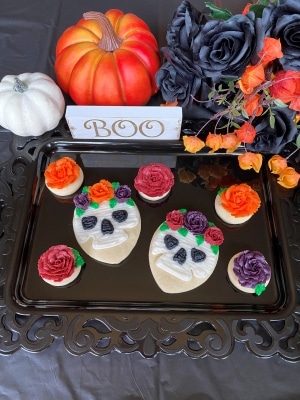
Easy & Cute Halloween Skull Buttercream Sugar Cookies
Skulls have always been pretty fascinating to me. I am not sure if it’s because I have a Bachelor of Science in Psychology or if it’s because I went through a weird “emo” phase in my teens and loved to wear skull printed shirts.
But, either way, I just HAD to include some skull cookies into my Halloween cookie tutorials.
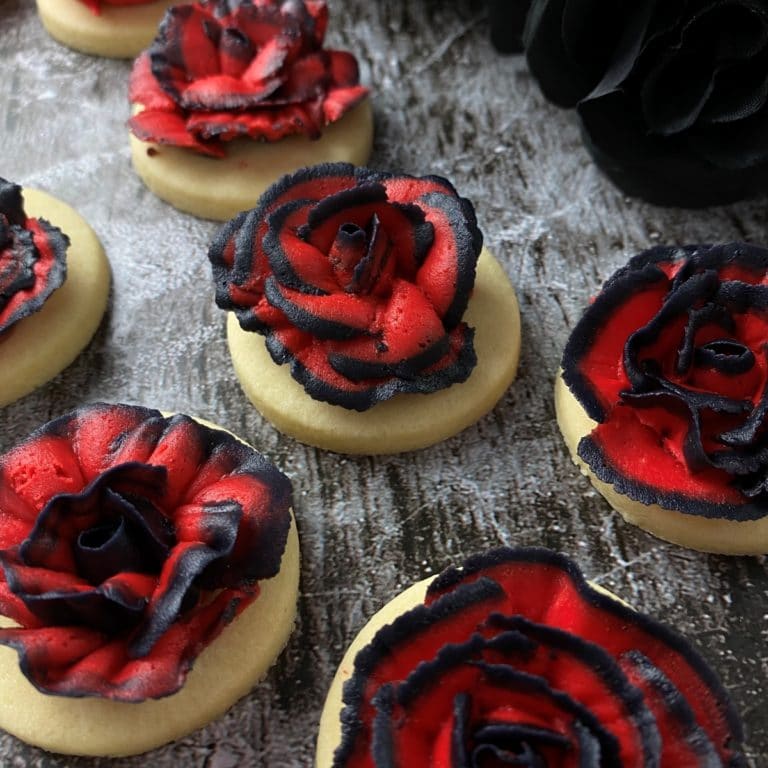
These cute Halloween skull buttercream sugar cookies are also complete with a rose flower crown. Now don’t run away, I know that a lot of people find buttercream roses to be advanced. A fun little fact about my buttercream learning journey – after first learning how to pipe a simple line, I went straight to the rose and was able to master it.
Yes, it took me several tries, but it was so satisfying when I looked down at my work and actually saw a rose! To put your mind at even more ease, I have included both step-by-step photos of the process and a video!
*This post may contain affiliate links, which means I may receive a commission, at no extra cost to you, if you make a purchase through a link. Please see my full disclosure for further information.*

Part 1: Preparing – Gathering your Supplies, Baking the Cookies, & Setting up your Frosting
To decorate these Halloween skull buttercream sugar cookies, you will want:
- 6 icing bags
- 2 Wilton #5 tips, 1 Wilton #66 tip, and 3 Wilton “petal” tips: #102, #103, and/or #104, I used one of each for a variety of rose sizes
- 1 Wilton flower nail, if you don’t know what this is or where to get one, you can purchase one here: Wilton Flower Nail
- Small circle cookie cutter
- Large Easter egg shaped cookie cutter – if you don’t have one, I used the one in this set: Ann Clark Every Season Cookie Cutter Set
- Wilton gel coloring to obtain green, orange, burgundy, dark purple, black, and white buttercream frosting, here’s my crusting buttercream recipe
- Your favorite sugar cookie dough recipe – if you don’t have a favorite, here’s mine
- Pointed knife to fix any errors
- Paper towel to wipe excess frosting off of the petal tips
- Parchment paper
Roll, cut out, and bake your sugar cookies according to your cookie dough recipe.
While they are cooling, whip up your frosting.
To set up your frosting bags, you will place your white frosting and your black frosting each into their own bags, each with a tip #5 attached. Set up your green frosting in a bag with a tip #66 attached. Put your burgundy/dark purple/orange frostings each into their own bags, each with a petal tip attached. For instructions on how to do this, visit my page Getting Started: Learn How to Decorate Buttercream Cookies.
Part 2: Creating the Buttercream Roses!
[embedyt] https://www.youtube.com/watch?v=4YnkrQJkW0A[/embedyt]
We will want to create the roses first so that they have time to crust. We will be creating them on our flower nail & then carefully transferring them over to parchment paper until they crust/dry. I suggest having everything ready before you start piping – a piece of parchment paper laying out (maybe even taped down to your counter), a paper towel nearby to wipe off the excess frosting from the tip between rose petals, your flower nail, and of course your frosting.
I suggest watching the video above first so that you can get an overall idea of what is about to happen! You can reference the photo series as a slowed down version.
The biggest thing to remember is to take your time. If it makes you feel any better, this video is sped up to be twice as fast so that you didn’t have to watch a long video, you’re welcome!
First, squeeze out a thin line of frosting onto your flower nail. This helps the rose to not fall off or slide around when you’re creating the layers.
Then, hold your tip perpendicular to the flower nail, with the fat side of the tip down on the nail and the skinny side up towards you. Squeeze the frosting out while turning the flower nail with your fingers that are holding the nail. The shape you create should look like this:


Next, we will be building the bud part of the rose. For all of these steps, you will hold the fat side of the tip down toward the flower nail and the skinny side up. Holding it this way allows for the wispy edges of a real rose.
To build the bud, start at the bottom of one side of the rose and, while squeezing, draw a curved upside down “U” shape over the top of the shape you first created. You will create three or four of these layers. It’s probably easier to see in the photo below than for me to explain it:

Continue building the layers in this same fashion, making it so that the petals spread out & “open up” more. This is done by first creating fairly vertical upside down “U” curved shapes, then making them more and more horizontal with each layer.
Make sure to wipe off the tip with a paper towel every so often so that the buildup doesn’t add unwanted texture to your rose.


See that in the last photo, the curved upside down “U” is peeling out a bit at the top. This is due to holding the tip slightly less vertical with each new layer of rose petals.

When you are happy with the size of your rose, carefully move it from the flower nail to your piece of parchment paper. I do this by taking a knife and sliding it under the rose, carefully, and then, making sure the rose is centered on the knife, transfer it to the parchment paper. If it falls apart at all during transfer, you can usually fix it up a bit with your knife or even a finger.
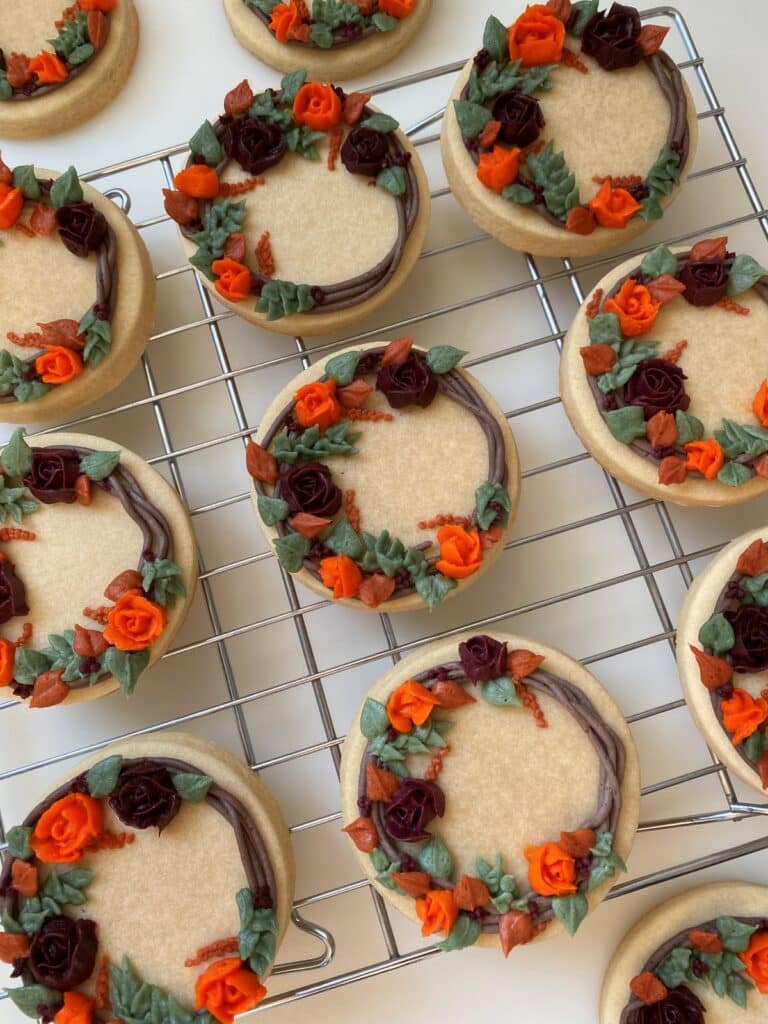
I created different sizes in each of the colors. These will be used to create our rose flower crowns on the skull.
Once you are happy with the size, shape, and amount of roses that are crusting on the parchment paper, we can create these roses onto our small circle cookies.
By now, you are probably getting the handle of how to create these buttercream roses. Even if you are still struggling, if you mess up on your cookie, take your knife, wipe it all off, and start over! Practice makes perfect. And, remember, every rose looks different!

Now is when you will want to add some leaves to some (or all, if you want!) of your rose cookies. Take your green frosting with tip #66. You will be holding this tip so that the wider part of the tip is facing up toward you:

Squeeze out the frosting while pulling the tip out, away from the rose. Sometimes the frosting will want to stay attached to your tip and won’t let your leaf “go.” Just use your fingers and pinch off the end.


Part 3: Decorating the Halloween Skull Cookies & Putting it All Together
To really create our Halloween skull buttercream sugar cookies, you will need to create your skull design. This is super easy and not overly detailed. That way, if you lack in the drawing department like I do, you can still make these cookies – especially if you just mastered the rose!
Go ahead and gather your white frosting and your black frosting. Remember, both of these bags have a tip #5 attached.
First, outline the shape of your skull with the white frosting.

Next, outline the shape of the eyes and nose with your black frosting. If you can’t get a symmetrical face, you can use your knife to manipulate the frosting by pushing it around a bit until it looks right. Alternatively, pick up all the frosting that is a mistake and “erase” it from the cookie & start over again!

Now, fill in the black areas and your white areas of the skull.


By now, your buttercream roses that have been sitting aside on the parchment paper are probably crusted enough to move them. You can test this by slightly touching one. If it has formed a bit of a crust, it is safe to transport.
Still be careful, though.
This is where you can really play around with what arrangement you want for the flower crown. The flowers should end up drying onto the skull, as your white frosting on the skull likely hasn’t had a chance to crust yet and will act as glue.


Part 4: Decorate Your Skull Halloween Party
Here are some great finds for a sugar skull themed Halloween party!


Part 5: Save the Tutorial for These Decorated Skull Sugar Cookies
And there you have it! If these aren’t the cutest Halloween skull buttercream sugar cookies, I don’t know what are! If you create these cookies for your Halloween party, let me know! Comment below, add your photo to my pins on Pinterest, or tag me on Instagram @buttercreamparties!
Make sure to check out my other decorated Halloween sugar cookies, too.
To pin this for later, select a pin image here:

F
Great tutorial on how to do the flowers.
Thank you! Buttercream flowers are a lot of fun!
The step by step decoration pictures to make these delicious cookies are really helpful! Cute and scary , perfect for Halloween.
Thank you! I try to be as thorough as possible for any learning stage when it comes to decorating buttercream sugar cookies.
Can this buttercream be stored if you don’t use it all
Yes, store in an air tight container in the refrigerator for a week or in the freezer for three months.
These are so cute! Looking at the first pic, I thought, no I’m never gonna be able to make these. But after watching your video and reading your detailed guide, I know I can do it! Thanks for such fun ideas!
Thank you! I’m glad you found the tutorial and video helpful.
These are stunning! And I just love that you broke it all down for me! I will have to give these a go soon.
Thank you! I need all the details I can get when I’m learning something new so I try to put as much info in there as possible. I’d love to see how your cookies turn out if you make them!
What a delicious cookies. Can’t wait to make this coming Halloween.
Thank you! I’d love to see how they turn out! Have a Happy Halloween!
Fantastic looking day of the dead cookies. Thanks also for the tutorial on how to make flowers.
Thank you so much and you are welcome!
OMG! They are so awesome, I showed to my kids and they want me to make it for them!
Sounds like a lot of fun and thank you!
These cookies are absolutely adorable!!
Thanks so much!
I could watch you make the flowers over and over. I’ve made roses from plant leaves and from ribbon, i should be able to do this – I just need to get some tools. Such fun designs!
Wow, that sounds really cool! I’d love to see how you made those. And thank you!
The skull cookies look awesome. Perfect for Halloween.
Thank you! I think they are so cute!