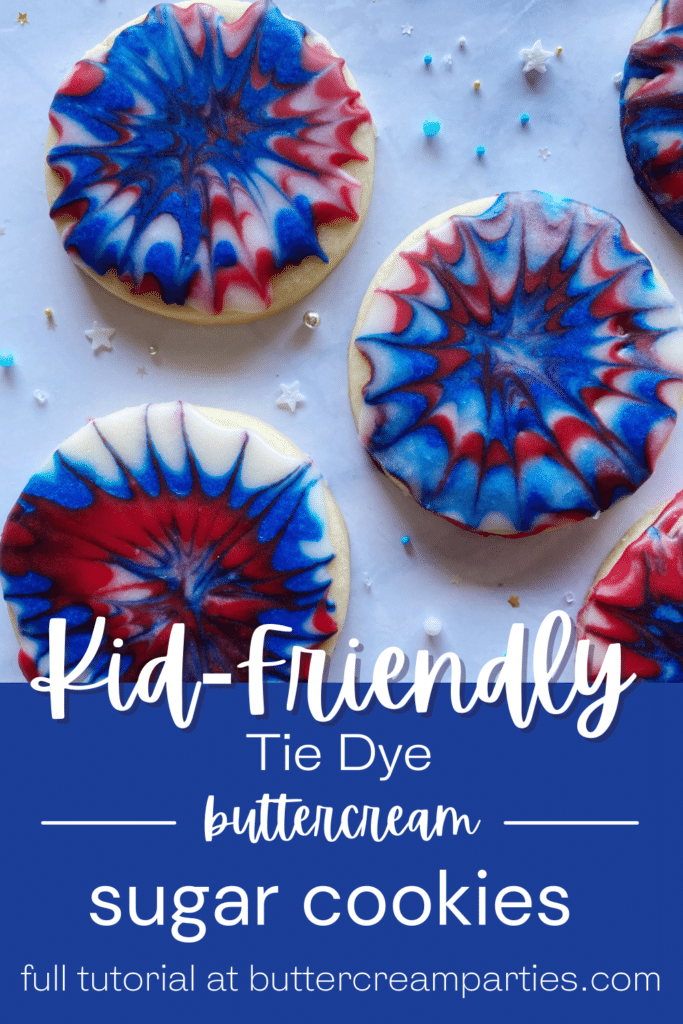
How to Make Buttercream Glaze Tie Dye Cookies
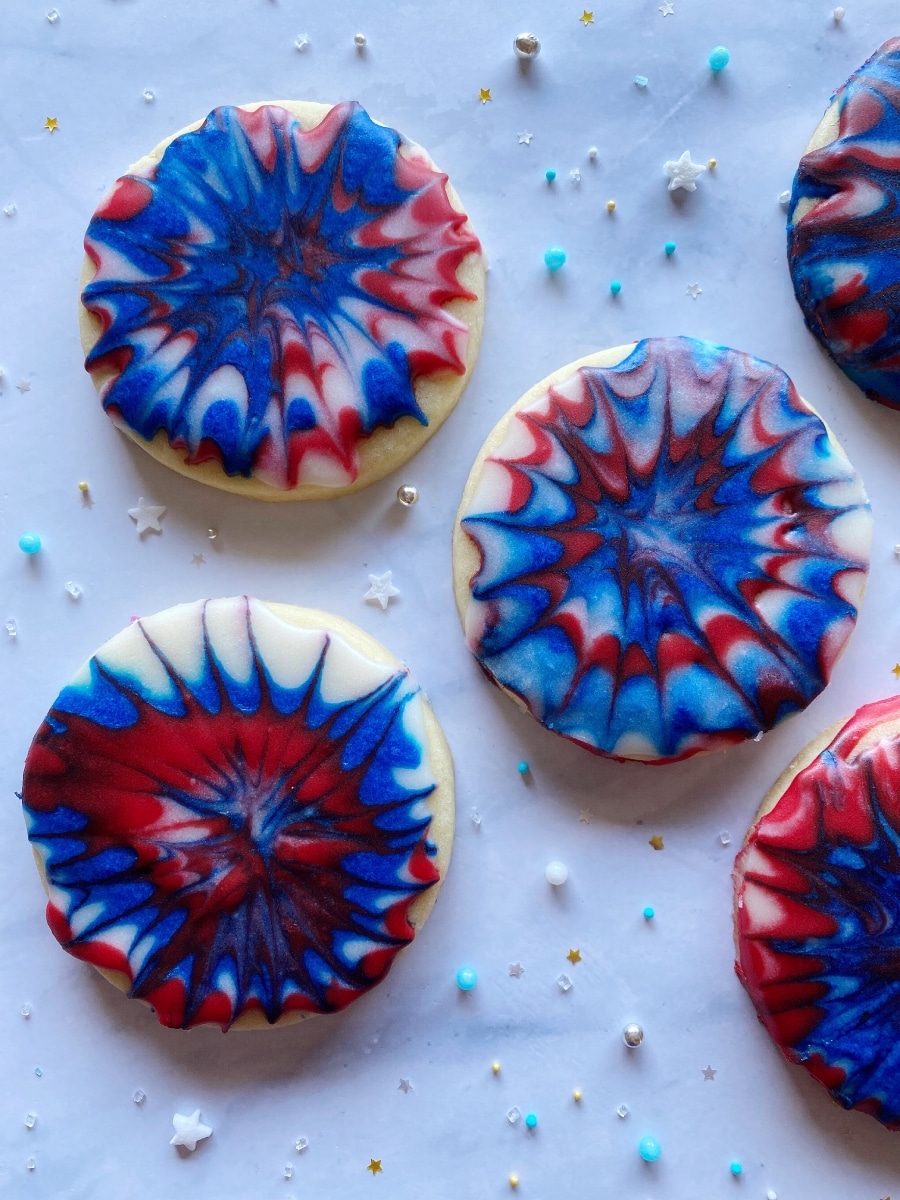
It’s always nice to have some kid friendly sugar cookies to decorate – no fancy tools needed! These buttercream glaze tie dye cookies are the perfect activity for the 4th of July. They resemble fireworks to me but I suppose you can decorate them in any pattern. The kids are the ones with all the creativity, right? Simply melt the buttercream frosting to create a glaze and let the kids pour it onto the cookies. Just don’t forget to place some parchment paper under the cookies first!
Follow along for the simple step-by-step tutorial for these patriotic tie dye cookies!
*This post may contain affiliate links, which means I may receive a commission, at no extra cost to you, if you make a purchase through a link. Please see my full disclosure for further information.*
Skip to
- Part 1: Gathering your Supplies for your Buttercream Glaze Tie Dye Cookies
- Part 2: Baking the Cookies and Instructions for How to Make Buttercream Glaze
- Easy No Chill No Spread Sugar Cookie Dough
- All American Crusting Buttercream Frosting Recipe
- Part 3: How to Decorate the Buttercream Glaze Cookies
- Part 4: Frequently Asked Questions About Buttercream Glaze
- Part 5: Save this Tutorial for Later
Part 1: Gathering your Supplies for your Buttercream Glaze Tie Dye Cookies
To create these fun glazed sugar cookies, you will want to gather:
- Circle cookie cutters – I used the middle sized circle cutter in this essential set by Wilton
- Red and blue gel food dye
- Buttercream frosting (see recipe below) PLUS an additional 3 tablespoons give or take of milk
- Delicious sugar cookie dough – find my recipe below
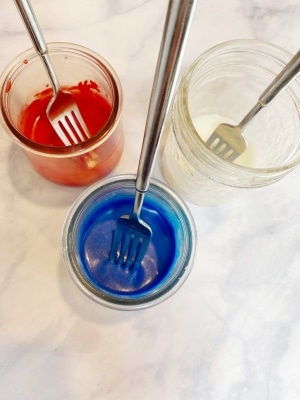
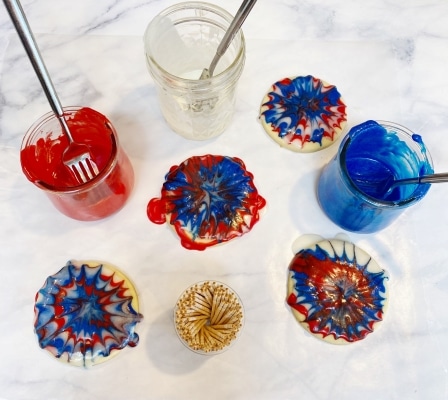
- Parchment paper, toothpicks, three microwave safe cups that are easy to pour from, and three forks
Part 2: Baking the Cookies and Instructions for How to Make Buttercream Glaze
- Roll, cut out, and bake your sugar cookies according to the recipe below.
- Make your buttercream icing according to the recipe below and separate it into three bowls. Mix your blue gel dye in one bowl and red in another. Check out my tips on how to make buttercream whiter if yours is looking a bit yellow.
- Take out about a cup of each color of frosting and place it into microwave safe cups. Add a tablespoon or so of milk to each cup of frosting.
- Microwave each cup in 5-10 second intervals, stirring in between each microwave session. You want the buttercream to be completely melted but not too hot. The consistency should be like a thick corn syrup. If you over-melted, you can use the fork to add in the extra frosting that wasn’t microwaved. Once you work your way through one cup of melted buttercream while decorating your cookies, repeat this step for more glaze.
Easy No Chill No Spread Sugar Cookie Dough
Equipment
- Stand Mixer with Paddle Attachment
- Measuring Bowls & Spoons
Ingredients
- 1 cup cold salted butter cut into cubes
- 1 cup granulated white sugar
- 1 egg
- 3 cups all purpose flour
- 2 tsp baking powder
- 1.5 tsp vanilla extract
Instructions
- Preheat your oven to 350 degrees.
- In a large bowl, mix your flour and baking powder together. When measuring the flour, make sure to scoop up the flour with a spoon and add it to your measuring cup, one spoonful at a time. This helps obtain the correct amount of flour without needing to weigh it. Once you have a cup, level it out by running a knife across the top of the measuring cup. Then, add it to the large mixing bowl and repeat for the remaining flour. Set the mixture of flour and baking powder aside for a minute.
- In your electric mixer, combine the sugar and butter using the paddle attachment until they are creamed together.
- Add in your egg and vanilla extract and mix to combine.
- Slowly add in one cup (or whatever your mixer can handle) at a time of the flour mixture to the wet ingredients. The mixture should be slightly sticky but still form a nice ball.
- On a floured surface, roll out the dough to about a 1/4 of an inch thick & cut out your cookies. A great tip is to flour your rolling pin and any cookie cutters you may be using. Transfer the cut out cookies to a baking sheet lined with a silicone mat using a large flat spatula.
- Bake for about 10 minutes and let cool on the baking sheet. The dough will be done when the center of the dough doesn’t look wet and the edges are golden.
Notes

All American Crusting Buttercream Frosting Recipe
Equipment
- Stand Mixer with Paddle Attachment
- Measuring Spoons & Bowls
Ingredients
- 1 cup room temperature unsalted butter
- 1 cup vegetable shortening such as Crisco OR butter, see note
- 2 lbs. plus 1 cup powdered sugar
- 2 tsp. clear vanilla extract I use artificial
- 2-4 tbsp. give or take room temperature whole milk
Instructions
- In your electric mixer, use the paddle attachment to mix the butter and vegetable shortening together.
- Slowly mix in the powdered sugar, only adding as much as your electric mixer can handle at a time.
- Mix in the vanilla extract and 2 tbsp. of milk. If the mixture is too stiff, add more milk. I prefer a consistency of smooth peanut butter for cookies that have a lot of line work and a slightly stiffer consistency for piping flowers.
Notes
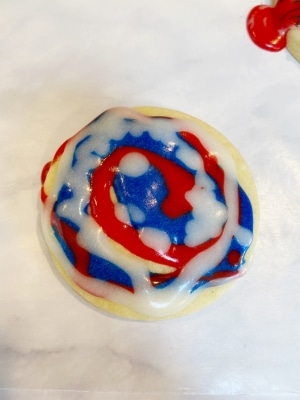
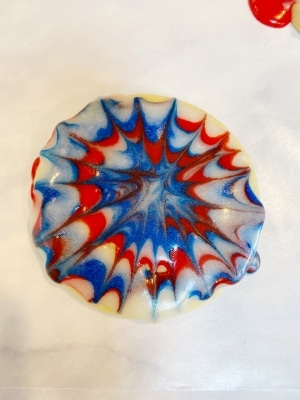
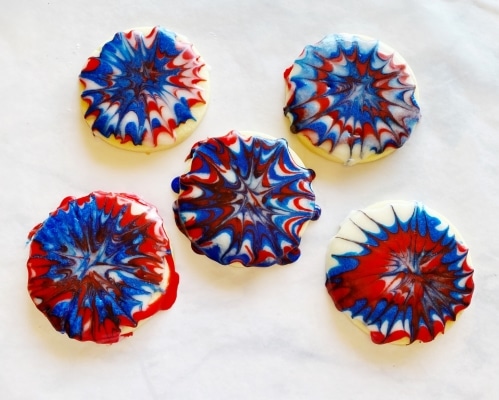
Part 3: How to Decorate the Buttercream Glaze Cookies
Check out this quick video I made to see how easy these buttercream glaze tie dye cookies really are! You can pour these any way you want.
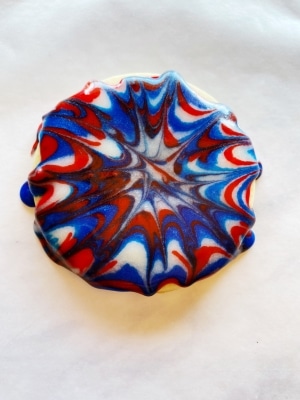
- Place all of the cookies onto parchment paper.
- Pick a color of glaze to swirl onto the cookie and then repeat with the other two colors. I like to keep the fork in the cup so I can test the consistency before pouring, as it will thicken with time. If it starts getting too thick, pop it into the microwave for 10 seconds again.

- Use a toothpick to blend the red, white, and blue buttercream glaze all together.
- Lastly, let these cookies dry for a couple hours on the parchment paper – if you can wait to eat them that is!


Part 4: Frequently Asked Questions About Buttercream Glaze
For these cookies, even though we used a crusting buttercream recipe, it’s probably best not to individually package them. This is because we changed the consistency of the buttercream recipe by adding that tablespoon or so of milk. You can omit the milk and go straight to microwaving; I just like the added shine I get by mixing in some milk first.
If you omit the added milk, allow these cookies to completely dry overnight before packaging.
If you omit the additional milk before microwaving the cookies, you should be able to stack the cookies once they are completely dry. I would wait a full 8 hours or even longer before doing so.
We still used a high sugar-to-fat ratio for our buttercream recipe, so you do not need to refrigerate these cookies. I leave my cookies out for several days on the counter and they taste great. You can package them up in large Tupperware or Rubbermaid containers to keep them fresh. Lay parchment paper between each layer to avoid accidental transfer of icing if your house gets hot in the summer like mine does.
If you feel better refrigerating them, I’d encourage you to instead freeze them. Sometimes the refrigerator adds too much moisture.
Is buttercream glaze just melted buttercream?
Yes and no. It certainly can be just melted buttercream if you want. The cookies will still resemble glaze and be delicious. I like to add a bit of milk before microwaving the buttercream, though, as it seems to give the cookies more shine.
Part 5: Save this Tutorial for Later
Save The Tutorial for These Tie Dye Glaze Cookies for Later
To save the tutorial for these buttercream glaze cookies for later, simply click on any of the social share icons on the top or side of this page. Alternatively, hover over the image below to pin the image to your Pinterest page! As always, thank you for learning how to decorate sugar cookies with me. Have a Happy 4th of July!