Super Easy Preschool Cookie Decorating with Cookie Paint
It’s that time of year where we all want to decorate Christmas sugar cookies! I have the easiest way to do a preschool cookie decorating event that you are going to love!
Decorating cookies with toddlers can be a bit of a challenge and the adults typically need to be pretty hands-on. However, this preschool cookie decorating method gives a bit more freedom to be creative for the little ones.
I can’t even take credit for this method to be honest. My mom mentor, Sharon, at my MOPs table this year shared this method with me and I was amazed at how perfect it is for preschoolers.
Here’s why you’ll love it:
- low mess
- super-easy 3 ingredient recipe
- easy for kids to frost the cookies
- less hands-on needed from the parents
- tastes good
- dries quick
- cheaper than store bought cookie icing
What more can I say? This will be your new go-to method for cookie decorating with the little ones from here on out.
Let’s get started!
By the way, are you interested in learning cookie decorating? Like real, professional style buttercream sugar cookie decorating and not kid-decorating?
Make sure to check out my online class! Hundreds of students have trusted me to teach them the art of buttercream sugar cookie decorating.

Find out more here:
*This post may contain affiliate links, which means I may receive a commission, at no extra cost to you, if you make a purchase through a link. Please see my full disclosure for further information.*
Skip to
Preschool Cookie Decorating Supplies

This frosting recipe couldn’t be easier. Here’s what you need:
- powdered sugar
- water
- food dye (you can use natural dyes as well – here’s my post going over my favorite brand)
You probably already have these ingredients at home which makes it even more convenient for a last-minute Christmas or Valentine’s Day activity for toddlers.
Besides the frosting, you will need some sugar cookies. I have the recipe attached below. You will also want some food safe paintbrushes and cups to store the frosting/cookie paint.
Kids love decorating with sprinkles so that’s not a bad idea to include as well!


How to Make the Cookie Paint
Sharon, my mom mentor in MOPs who shared this recipe with me, calls it cookie paint which is brilliant since that’s exactly what the frosting looks like. And, it’s painted on the cookies, of course.
To make the cookie paint, you will:
- Add about three tablespoons of powdered sugar to a cup.
- Mix in about a teaspoon of water.
- Add in food dye.
I told you it was easy!

The consistency you want is up to you but I prefer it to be a bit on the thick side. One, the “paint” will be more opaque, and two, if the cup spills, there’s more reaction time to pick it back up before the “paint” spills out.
Add more water and/or powdered sugar to get the consistency you prefer.
Setting up the Preschool Cookie Decorating

Place the cut out cookies onto plates, set out sprinkles, and add paint brushes to the frosting cups.
Some tips for success:
- pour sprinkles into cups to help control how many sprinkles are poured onto the cookies
- have a paint brush for each color of frosting so that the colors don’t get mixed up
- keep a paper towel next to each child to wipe off the paint brush if they are mixing frosting colors together on the cookie
Allow the kids to paint their cookies and decorate as they wish!
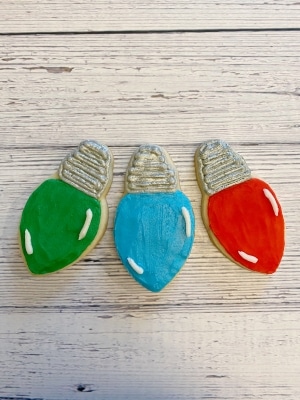
Here are some designs that my 3-year-old and 5-year-old decorated:


Preschool Cookie Decorating
Equipment
- Stand Mixer with a Paddle Attachment
- Rubber Spatula
- Medium Sized Mixing Bowl
- Measuring Cups & Spoons
- Cookie Sheet with Silicone Baking Mat
- Rolling Pin
- Cookie Cutters
- Cups
- Food Dye
- Sprinkles
Ingredients
Soft Sugar Cookies
- 3 cups all purpose flour, plus more for rolling scoop & level method
- 2 tsp. baking powder
- 1 cup cold salted butter cut into cubes
- 1 cup granulated white sugar
- 1 egg duck egg is highly recommended if possible
- 1 tbsp. vanilla extract
Cookie Paint
- 3 tbsp. powdered sugar confectioner's sugar
- 1 tsp. water
- gel food dye optional
Instructions
Soft Sugar Cookies
- Preheat the oven to 350 degrees Fahrenheit.
- In a medium sized mixing bowl, add in the flour and baking powder. Stir the ingredients to combine them.
- In the stand mixer, cream the salted butter and sugar together until all of the butter lumps are gone.
- Add in the egg and vanilla extract and mix until just combined.
- Slowly add the flour and baking powder mixture into the wet ingredients until the dough forms a ball. If the ball is very sticky, add another tablespoon of flour.
- Roll the dough onto a floured surface and use the round cookie cutter to cut out the cookies.
- Place six cut out cookies onto a cookie sheet lined with a silicone mat. Bake for 7-9 minutes or until the center of the cookies do not appear wet.
- Allow the cookies to cool for 5 minutes on the baking sheet before transferring them to a piece of parchment paper. Repeat the cookie baking process for all remaining cookies.
Cookie Paint (makes one color, repeat for each color needed)
- Add the powdered sugar to small cup.
- Add the water to the powdered sugar and stir until combined. The mixture should be thick like an acrylic paint or thicker. Adjust water and powdered sugar until you have the right consistency.
- Stir in food dye.
Decorating with the Cookie Paint
- Add a paint brush into each cup of cookie paint.
- Paint the cookies as desired. Top with sprinkles.
Notes
Save the Tutorial for the Easiest Preschool Cookie Decorating Day
If you are planning on a preschool cookie decorating day, make sure to save this image to your toddler or holiday board on Pinterest. Alternately, use any of the social sharing buttons at the top of the post to share to your favorite site.