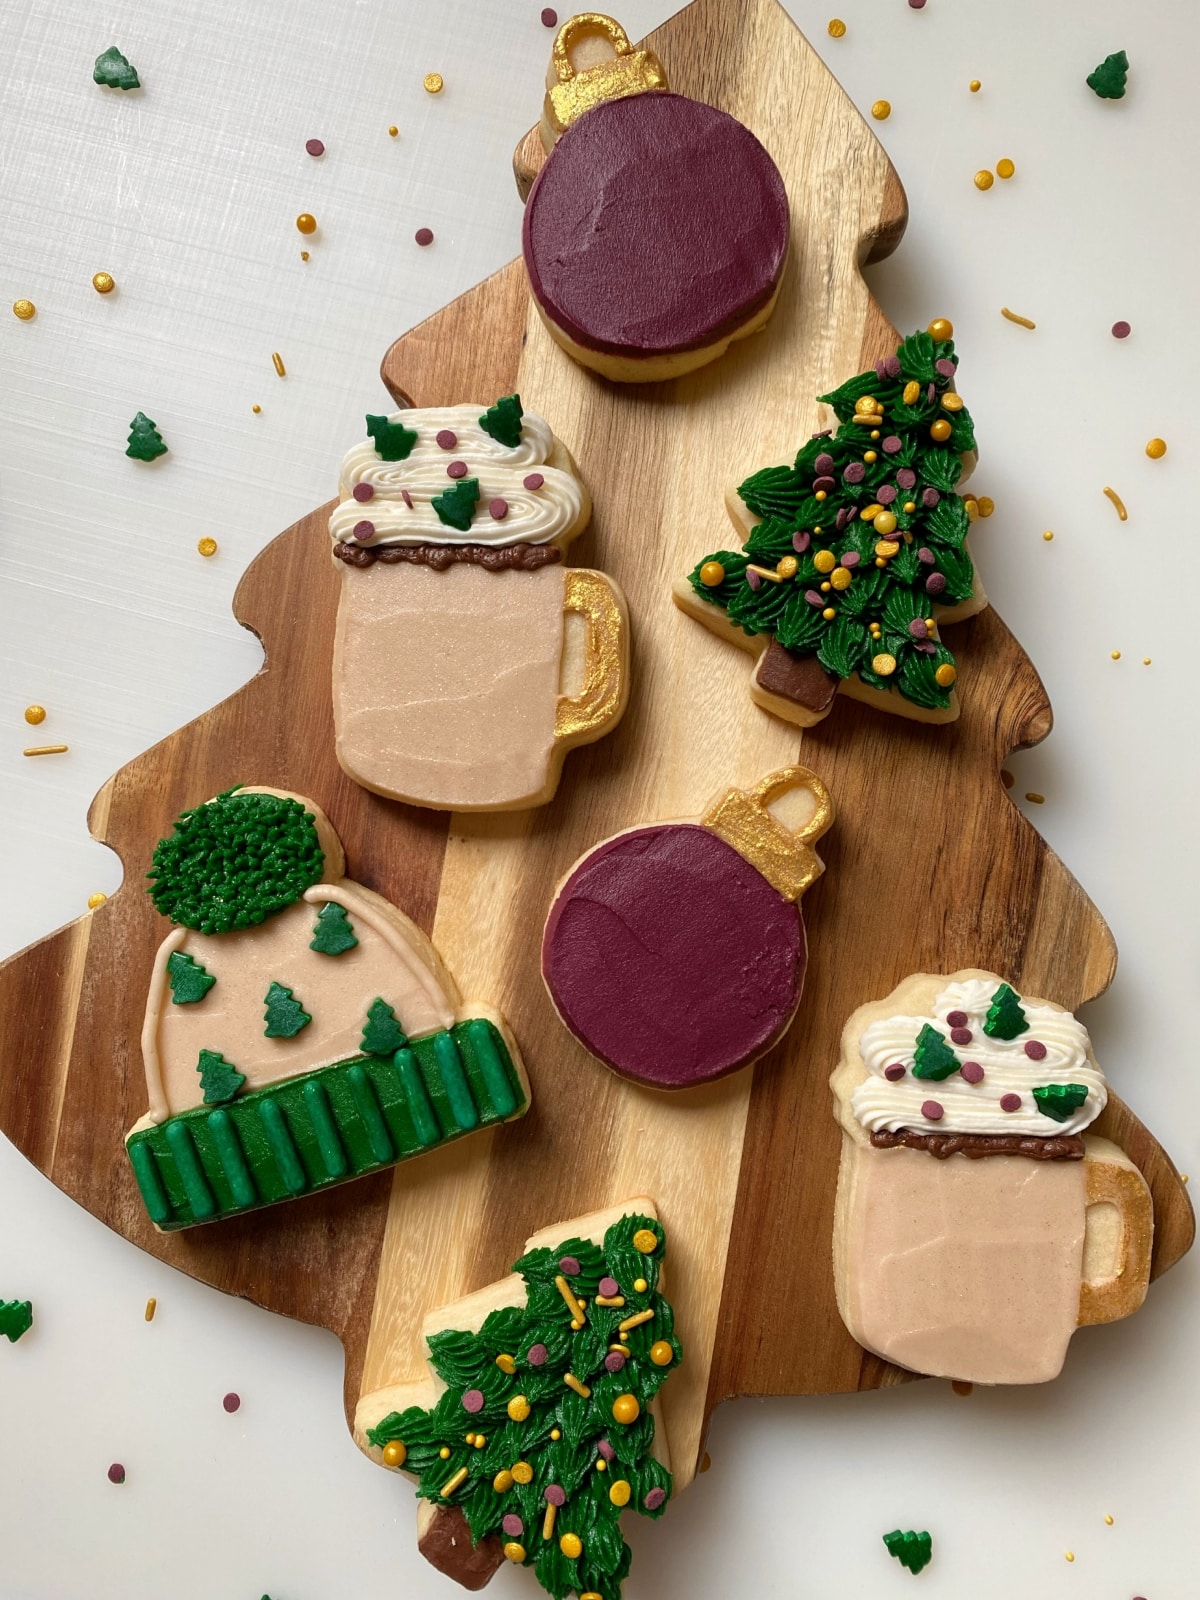
Dazzling Burgundy & Gold Christmas Sugar Cookies with Foliay Sprinkles
Who doesn’t love some sparkly Christmas desserts? These burgundy and gold Christmas sugar cookies are topped with a delicious vanilla buttercream and gorgeous Foliay sprinkles.
I love the burgundy and gold Christmas decorating style. It is so classy.
These sugar cookies have an amazingly soft bite, perfect for both kids and adults. We don’t like rock hard cookie icing for our Christmas sugar cookies.
I decided to keep the designs simple for this Christmas sugar cookie set: a Christmas tree, a winter hat, an ornament, and some hot chocolate. The glam comes in from Foliay sprinkles.

Disclosure of Material Connection: I was gifted five samples of my choice from Foliay for free in the hope that I would mention it on my blog. Please know, I only recommend products I believe will be good for my readers. I am disclosing this in accordance with the Federal Trade Commission.
Follow along to see the full step-by-step video and photo series tutorials for these sparkly Christmas sugar cookies.
This post may contain affiliate links to Amazon, which means I may receive a commission, at no extra cost to you, if you make a purchase through a link. None of the links to Foliay are affiliate links. Please see my full disclosure for further information.*
Skip to
- Part 1: Gathering the Supplies for the Burgundy & Gold Christmas Sugar Cookies
- Part 2: Baking the Cookies, Setting up the Icing Bags, & Preparing the Glitter Paint
- Burgundy and Gold Christmas Sugar Cookies with Buttercream Frosting
- Part 3: Decorating the Burgundy & Gold Christmas Sugar Cookies
- Part 4: My Review of Foliay Sprinkles
- Save the Tutorial for These Decorated Christmas Sugar Cookies
Part 1: Gathering the Supplies for the Burgundy & Gold Christmas Sugar Cookies
To decorate these soft Christmas cookies with buttercream frosting, you will want to gather:
- 5 Icing bags
- One Wilton #5 tip, one #32 tip (or any of Wilton’s other star tips would work), and one #233 tip
- 5 couplers
- Christmas tree cookie cutter, ornament cookie cutter, hot cocoa cookie cutter, and winter hat cookie cutter
- Burgundy, brown, and green gel food dye
- Foliay sprinkles and edible gold glitter
- Palette knife (I love this one!)
- Small dish, food safe paint brushes, and additional vanilla extract for the glitter paint
- Ingredients for a crusting buttercream & sugar cookie dough – found below in recipe card
Part 2: Baking the Cookies, Setting up the Icing Bags, & Preparing the Glitter Paint
Use the recipe card below for the basic recipe.
Burgundy and Gold Christmas Sugar Cookies with Buttercream Frosting
Equipment
- Stand Mixer with Paddle Attachment
- Rubber Spatula
- Measuring cups and spoons
- Medium Sized Mixing Bowl
- Lined aluminum cookie sheet parchment paper or silicone lined baking sheet
- Rolling Pin
- Cookie cutters and tools see part 1 on this post for the specific tools needed
Ingredients
Buttercream Frosting
- ½ cup room temperature unsalted butter 4 ounces
- ½ cup room temperature salted butter 4 ounces
- 4 cups powdered sugar
- 1 tbsp. vanilla extract
- 1-3 tbsp. whole milk
Sugar Cookies
- 1 cup cold salted butter cubed
- 1 cup granulated sugar
- 3 cups all purpose flour measured with the scoop & level method
- 2 tsp. baking powder
- 1 egg
- 1.5 tsp. vanilla extract
Instructions
- Remove all of the butter from the refrigerator. You will make the sugar cookies first but the butter for the frosting needs to come to room temperature before mixing.
Sugar Cookies
- Preheat the oven to 350℉ and prepare an aluminum cookie sheet by placing either parchment paper or a silicone baking mat on it.
- In a medium sized mixing bowl, combine the flour and baking powder and mix together. Set this aside.
- Cube a cup of salted butter and then, in a stand mixer with the paddle attachment, combine the cubed butter with the granulated sugar. Mix until creamed together well.
- To the stand mixer, add in the egg and vanilla extract and mix until combined.
- Slowly add in the dry ingredients in the mixing bowl to the stand mixer.
- Roll the dough out to 3/8" thick and use the cookie cutters to cut out the cookies. Place the cookies onto the prepared baking sheet and bake for 9-11 minutes or until the tops of the cookies no longer look wet. When baking the cookies, only bake 6-8 cookies at a time to leave proper space between each cookie to cook without spreading. Overcrowding the cookie sheet will cause spread.
Buttercream Frosting
- In a stand mixer with the paddle attachment, add the room temperature salted and unsalted butter and mix on high until light and fluffy.
- Mix in the powdered sugar little by little. Add in the vanilla extract and milk about halfway through adding the sugar to help the frosting come together. Start with one tablespoon of milk and work up to three if needed, depending on the consistency you want. I like to aim for a peanut butter consistency or thinner.
- Follow the directions in Part 2 for the specific way you will divide the buttercream and set up the icing bags.
How to Decorate the Christmas Sugar Cookies
- Please refer to Part 3 of this blog post for all four cookie decorating tutorials.
Notes
-
- Roll, cut out, and bake your sugar cookies according to the recipe.
- Make your buttercream icing according to the recipe and separate it into five bowls:
- All bowls should be of equal size except for the bowl that will become the brown frosting. You only need about a quarter cup of frosting to be brown, otherwise divvy up the remaining four equally.
- Dye the four remaining bowls as such: one burgundy, one tan (a touch of brown), one green, and leave one undyed or use white liquid food coloring.
- Place a coupler into each icing bag and fill each bag with a frosting color. You can leave the decorating tips off of the couplers/bags for now.
- To prepare the gold glitter paint, pour some of the edible gold glitter into a small dish along with a few drops of vanilla extract. Alternatively, you can use Everclear vodka. Mix up the glitter into the extract/vodka and, if needed, add more glitter or liquid until an acrylic paint like consistency is achieved.
Part 3: Decorating the Burgundy & Gold Christmas Sugar Cookies

Check out the video tutorial showing all four decorated Christmas sugar cookies then follow the step-by-step photo series tutorials below.
How to Decorate the Burgundy Ornament Cookies

- Attach the tip #5 to the burgundy bag of frosting and outline and fill in the circular part of the ornament sugar cookie.

- Use the palette knife to smooth the burgundy frosting and to clean up the edges. Complete steps 1 & 2 for all of the ornament cookies before going to step 3.
- Remove/rinse/dry the tip #5 from the burgundy bag of buttercream and attach it the tan buttercream. Outline and fill in the top of the ornament & then smooth it out.
- Use the glitter paint to paint the top of the ornament a sparkly gold. So beautiful!


How to Decorate the Christmas Tree Sugar Cookies

- Attach the tip #5 to the brown bag of frosting. Outline and fill in a rectangle shape for the tree trunk.
- Smooth out the tree trunk with the palette knife.
- Attach the tip #32 to the green frosting and begin to pipe rows of tree branches. You can watch the video above to see the exact technique, as it is hard to describe in words.
- Top the trees with pretty sprinkles. I used Foliay’s Burgundy Mini Confetti and Stay Golden Sprinkle Mix.


How to Decorate the Hot Cocoa Sugar Cookies

- Attach the tip #5 to the tan bag of buttercream and outline and fill in the shape of the mug. Smooth the frosting with the palette knife. Do this step on all of the hot cocoa cookies before proceeding to the next steps.
- Dip a food safe paint brush into the edible gold glitter and flick it onto the tan buttercream. I prefer to use a fan brush put any fluffy brush will work well.
- Use the glitter paint you used for the ornament cookies to paint the mug handle. Then, remove/rinse/dry the tip #5 from the tan buttercream and attach it to the brown buttercream. Pipe out some brown frosting for the hot cocoa.
- Attach the tip #32 to the white frosting and pipe out some whipped cream. I like to rotate the cookie 180 degrees when piping, as it is easier than right-side up.
- Place some of the sprinkles onto the whipped cream for a festive look. I used Foliay’s Christmas Tree Candy Sprinkles and the Burgundy Confetti.


How to Decorate the Winter Hat Cookies

- Attach the tip #5 to the tan bag of buttercream and outline and fill in the center part of the hat. Then, smooth it out. Do this step on all of the hat cookies before moving to the next step.
- Remove/rinse/dry the tip #5 from the tan buttercream and place it onto the green buttercream. Outline and fill in the rectangular shape at the bottom of the hat and the circle at the top, then smooth the bottom rectangle.
- Place green rod sprinkles (I used Foliay’s Dark Green Matte Rods) onto the bottom of the hat to represent the knitted hat. Then, replace the tip #5 on the green frosting with the tip #233 and pipe a furry top to the top of the hat.
- Use a fluffy brush or a fan brush to flick some of the edible glitter onto the hat cookie.
- Remove/rinse/dry the tip #5 from the green buttercream and place it back onto the tan to outline the hat. Then, complete the hat sugar cookie by placing some of Foliay’s cute Christmas Tree Candy Sprinkles onto the tan part of the hat.


I’m just loving this color scheme for these Christmas sugar cookies, what about you? If you are traveling with your decorated Christmas sugar cookies this year, check out my post on how to package and transport buttercream sugar cookies.
Part 4: My Review of Foliay Sprinkles
You will probably find it no surprise here but I am loving the Foliay products I was gifted. The products I used in this tutorial are as follows:
- Burgundy Mini Confetti
- Stay Golden Sprinkle Mix
- Dark Green Matte Rods
- Christmas Tree Candy Sprinkles
- Gold Edible Glitter

I will start by saying that the gold, both in the Stay Golden mix and the edible glitter, is a beautiful shade of gold. It is HARD to find the right shade of gold for some reason but Foliay nails it.
Speaking of the edible glitter, I was so happy that I was able to make the glitter paint. Usually, I purchase luster powder to make gold paint. So, I was pleasantly surprised to find that the glitter was so fine I was able to make a paint with it. It was also stunning on it’s own when placed onto the hot cocoa and hat cookies.
The Christmas tree sprinkles are a candy and taste so good. I love that sprinkle companies are selling these mini candies because they taste amazing on buttercream.
The burgundy confetti was the perfect shade of burgundy. Burgundy can be hard to get right but it worked so well for these Christmas sugar cookies.
Lastly, the matte green rods were the PERFECT size for my winter hat cookies to make a knitted design. I will say, I didn’t realize the rods were as large as they were and would probably do better on cakes/cupcakes than cookies. That being said, I was obviously able to make it work pretty well!

All in all, I am sure I will be ordering from Foliay in the near future. The taste and appearance of everything I used was perfect.
Save the Tutorial for These Decorated Christmas Sugar Cookies
Use the image below to pin this tutorial for decorated Christmas sugar cookies to your holiday board on Pinterest. Alternatively, use any of the social share icons on the top of the page to share it to your favorite social media site.


Hi Leah! Would it be okay to let the buttercream crust a little before painting the gold glitter onto those sections or do you feel it’s easier to work with the buttercream as soon as it’s been applied?