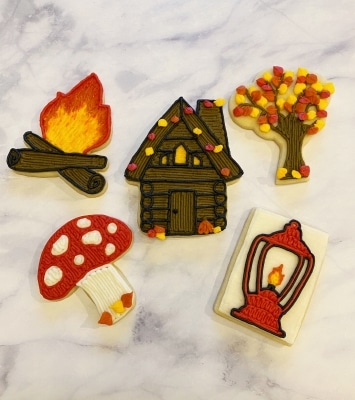
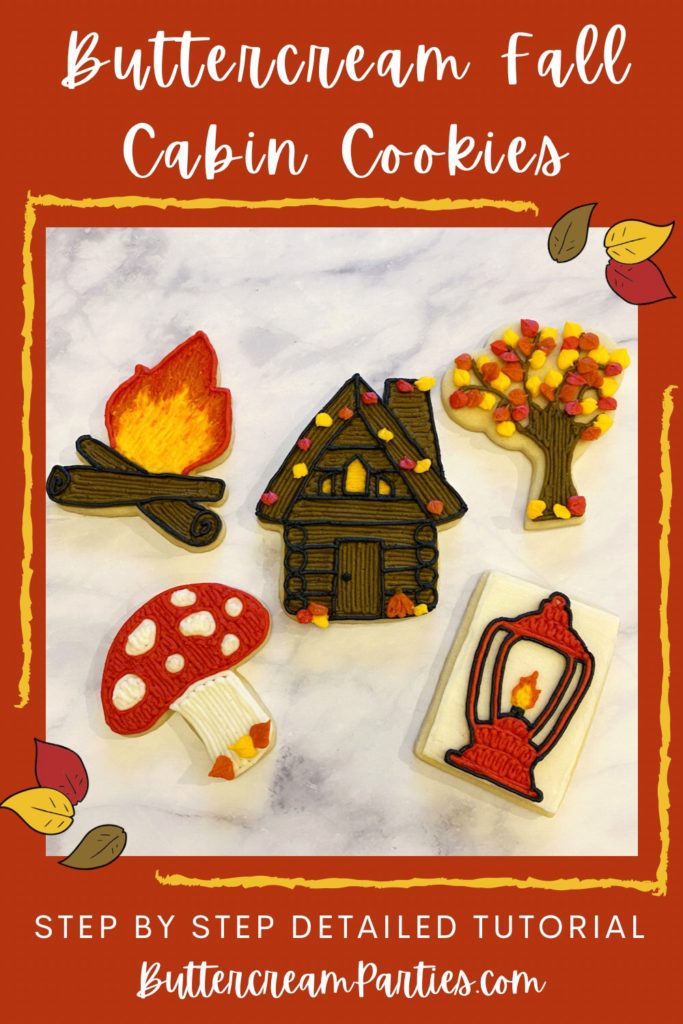
Beautiful Fall Cabin Buttercream Cookies
I love these beautiful fall cabin buttercream cookies so much! I was inspired by looking out my back window. I am so fortunate to live in the woods of the Pacific Northwest. Although I dislike the frequent rainfall we get here in Western Washington, I do love the beautiful fall colors. Now, some of these designs may look a little not-so-beginner-friendly, and, you’re right. Some of these fall cabin buttercream cookies are lengthy in steps. However, I explain them step-by-step with a ton of pictures. I promise that they only appear to not be easy. Follow along for the detailed tutorial so you can recreate these fall cabin buttercream cookies yourself!
Since you may not want to create all five of these designs in the fall cabin buttercream cookies set, I will be breaking up the needed supplies. If you are only after one (or a few) of the cookies, scroll down to that cookie and you will see the supplies needed for that specific cookie. If you would like to create the whole fall cabin buttercream cookies set, then check out the list directly under this paragraph so you know you have all the needed supplies.
*This post may contain affiliate links, which means I may receive a commission, at no extra cost to you, if you make a purchase through a link. Please see my full disclosure for further information.*
Part 1: Gathering Your Supplies For the Full Set of Fall Cabin Buttercream Cookies
To create the full set of these beautiful fall cabin buttercream cookies, you will want to gather:
- 6 Icing bags
- 6 Couplers
- 1 Wilton #2 tip, 1 Wilton #3 tip, 1 Wilton #4 tip, and 1 Wilton #352 tip
- Fire cookie cutter – I purchased this one: Campfire Cookie Cutter
- Mushroom cookie cutter – I purchased this one: Ann Clark Cookie Cutters Mushroom
- Rectangle cookie cutter
- Tree cookie cutter – I purchased mine here: JB Cookie Cutters Tree
- Cabin cookie cutter – I used this gingerbread cutter for my cabin shape: Ann Clark Cookie Cutters Gingerbread House
- White, black, orange, red, golden yellow, and brown buttercream frosting*
- Your favorite sugar cookie dough recipe
- Flat spatula – this 9″ one by Wilton is the perfect size for cookies: Wilton 9″ Angled Flat Spatula
- Pointed knife
*Your buttercream frosting should, ideally, be a frosting that “crusts.” This means that the frosting will form an outer crust to protect it while traveling. I use the Jenny Cookies recipe that you can find on her blog here: Jenny Cookies Buttercream Frosting. I prefer to use the Wilton gel food dye since gel is more vibrant (i.e. more cost effective because you use less) than liquid and doesn’t change the consistency of your frosting. You can get that here: Wilton Gel Coloring 12 Count.
You may be asking, “What are couplers?” Couplers allow you to change your tips on your icing bags. Check out my page, Getting Started: Learn How to Decorate Buttercream Cookies, to learn how to do this. Essentially, you will attach a coupler to each icing bag. When you need to attach a tip, just make sure to rinse out the previous color from the tip with hot water. Purchasing a set of couplers is pretty affordable on Amazon: 4 Count Wilton Coupler Set.
Part 2: Baking the Cookies and Setting up Your Icing Bags
- Roll, cut out, and bake your sugar cookies according to your cookie dough recipe.
- Make your buttercream icing and separate it into six bowls. Keep one bowl undyed but use the other five to mix in your orange, red, golden yellow, black, and brown frostings.
- Set up your icing bags as follows: Place each color of frosting into their own icing bags, each with a coupler in it. If you aren’t sure how to do this, no worries, just hop over to my Getting Started: Learn How to Decorate Buttercream Cookies page. You do not need to add the tips to the couplers yet.
Part 3: The Fun Part! Frosting Your Fall Cabin Buttercream Cookies!
*Special Note – make sure to complete each step on all of your fall cabin buttercream cookies before moving onto the next step. This saves time and energy since most of the colors will be sharing the same tip and you will need to rinse/dry the tip between color changes.
Tree Buttercream Cookies
Note – To create just the tree cookies in the fall cabin buttercream cookies set, you will only need:
- Tree shaped cookies, again, you can grab the exact one I used here: JB Cookie Cutters Tree
- Brown, golden yellow, red, and orange frosting
- 4 icing bags, 3 couplers, and tips #3 and #352 – place the yellow/red/orange frosting each into their own icing bags with a coupler and place the brown icing into a bag with the tip #3 in it.
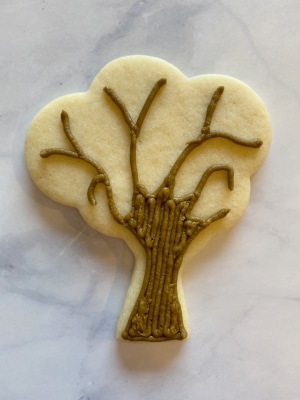
- Your first step will be to outline and fill in the shape of the tree. Use the brown frosting with tip #3 attached to draw and fill in the trunk. Then, add small branches.

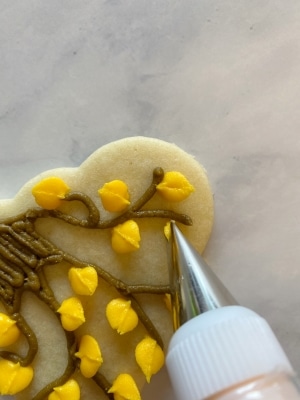
- Attach the tip #352 to the golden yellow frosting. Squeeze out small leaf shapes along the tree branches. Make sure that the tip is positioned the correct way to the cookie. Check out the photo below.
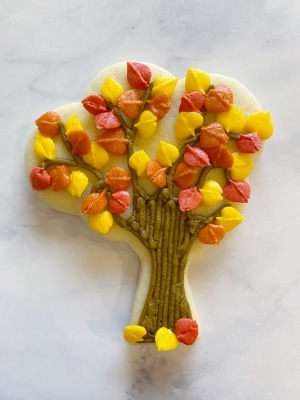
- Once all of the yellow leaves are done, remove/rinse/dry the tip and attach it to the orange frosting. Pipe out the orange leaves and then repeat the same steps to pipe out your red leaves. I also decided to pipe some fallen leaves out on the bottom of the tree.
Mushroom Buttercream Cookies
Note – To create just the mushroom cookies in the fall cabin buttercream cookies set, you will only need:
- Mushroom shaped cookies, again, you can grab the exact one I used here: Ann Clark Cookie Cutters Mushroom
- Red, white, orange, and golden yellow buttercream frosting
- 4 icing bags, 4 couplers, and tips #3 and #352 – place each color into it’s own icing bag with a coupler.
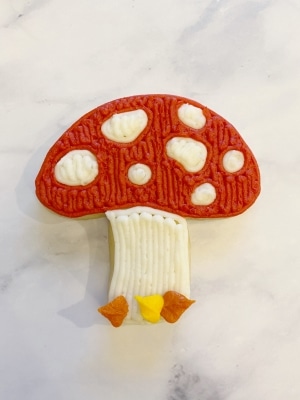
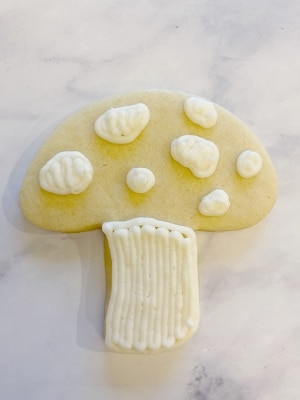
- Your first step will be to outline and fill in the shape of the mushroom stalk. Attach tip #3 to the white icing for this step. Then, outline and fill in the white spots on the mushroom with the same tip. 2. Remove/rinse/dry the tip #3 from the white frosting and attach it to the red frosting. Outline and fill in the top of the mushroom. To do this, outline the outer edge of the mushroom plus each of the white dots. To fill in odd shaped spaces, fill in as much as you can with vertical lines, going around the spots. Check out the photo series below to see what I mean. 3. If you are only making the mushrooms in this set, you may not want to add the leaves at the bottom. But, if you are making the full set, I encourage you to place some leaves on the bottom of the mushroom stem to help tie in the fall cabin buttercream cookies set. Attach the tip #352 to the golden yellow frosting and pipe out leaves. Make sure that the tip is positioned correctly to obtain the right shape. Check out step step 2 in the tree tutorial for reference. Once the golden yellow leaves are piped out, remove/rinse/dry the tip and attach it to the orange frosting. Repeat the same steps.
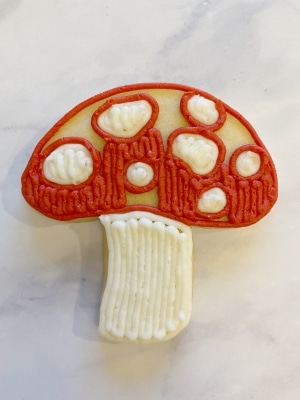
 2. Remove/rinse/dry the tip #3 from the white frosting and attach it to the red frosting. Outline and fill in the top of the mushroom. To do this, outline the outer edge of the mushroom plus each of the white dots. To fill in odd shaped spaces, fill in as much as you can with vertical lines, going around the spots. Check out the photo series below to see what I mean.
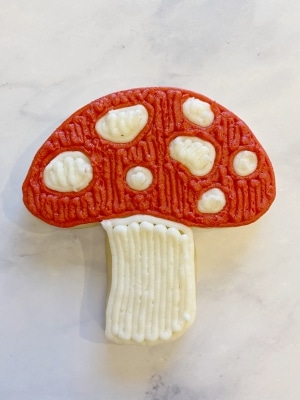 3. If you are only making the mushrooms in this set, you may not want to add the leaves at the bottom. But, if you are making the full set, I encourage you to place some leaves on the bottom of the mushroom stem to help tie in the fall cabin buttercream cookies set. Attach the tip #352 to the golden yellow frosting and pipe out leaves. Make sure that the tip is positioned correctly to obtain the right shape. Check out step step 2 in the tree tutorial for reference. Once the golden yellow leaves are piped out, remove/rinse/dry the tip and attach it to the orange frosting. Repeat the same steps.
Campfire Buttercream Cookies
Note – To create just the campfire cookies in the fall cabin buttercream cookies set, you will only need:
- Campfire shaped cookies, again, you can grab the exact one I used here: Campfire Cookie Cutter
- Brown, black, golden yellow, red, and orange frosting
- 5 icing bags, 4 couplers, and tips #3 and #2 – place the black frosting into an icing bag with the tip #2 in it. Place the yellow/red/orange/brown frosting each into their own icing bags with a coupler in them.
- Pointed knife
-
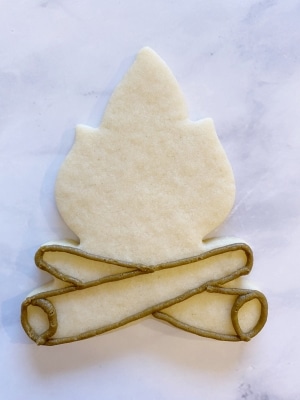
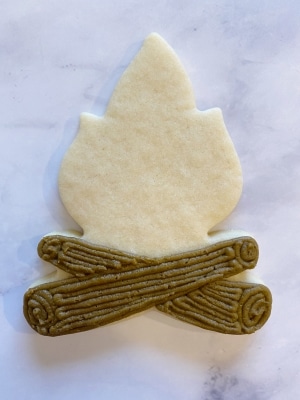
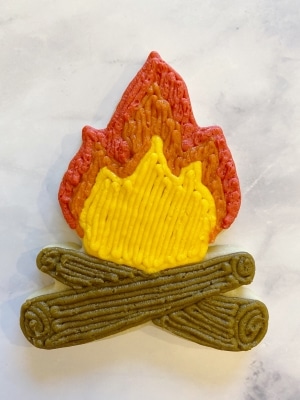
- Your first step will be to outline and fill in the shape of the logs. Attach tip #3 to the brown icing for this step. Check out the photo series below for how I did this. Note that I filled in the smaller sides of the logs (those closest the fire) in a swirl pattern like I did the front sides of the logs. You will only want to fill in swirls for the front side of the logs, as the back sides wouldn’t be seen! If you repeat my mistake, no worries, but figured I’d correct it for your instructions.
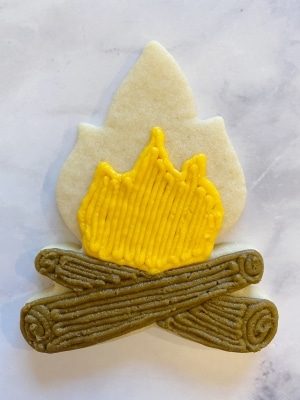
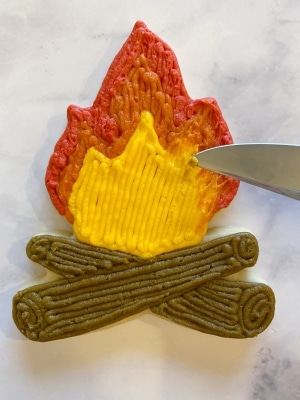
- Remove/rinse/dry the tip #3 from the brown icing and add it to the yellow icing. Outline and fill in the golden yellow flames. Remove/rinse/dry the tip #3 from the golden yellow frosting and attach it to the orange to create those flames, then repeat for the red flames.
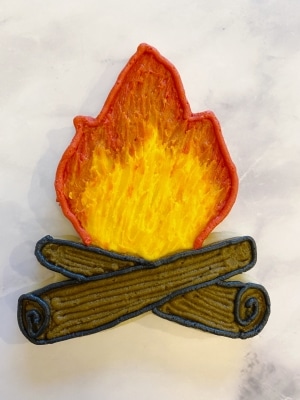
- Use the pointed knife to mix together the red, orange, and golden yellow colors together. Then, use the black frosting with tip #2 to outline the logs and add in a more pronounced swirl to the log faces closest to you.
- Your first step will be to outline and fill in the shape of the logs. Attach tip #3 to the brown icing for this step. Check out the photo series below for how I did this. Note that I filled in the smaller sides of the logs (those closest the fire) in a swirl pattern like I did the front sides of the logs. You will only want to fill in swirls for the front side of the logs, as the back sides wouldn’t be seen! If you repeat my mistake, no worries, but figured I’d correct it for your instructions.
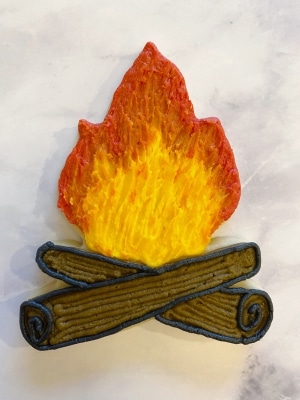
4. Use the red frosting with tip #3 to outline the edges of the flame.
Lantern Buttercream Cookies
Note – To create just the camping lantern cookies in the fall cabin buttercream cookies set, you will only need:
- Rectangle shaped cookies
- Red, black, orange, golden yellow, and white buttercream frosting
- 5 icing bags, 3 couplers, and tips #2, #3, and #4 – place the red frosting into an icing bag with the tip #3 in it. Place the white frosting into a bag with the tip #4 in it. Place the remaining colors into their own icing bags with a coupler in the bags.
- Flat spatula and pointed knife
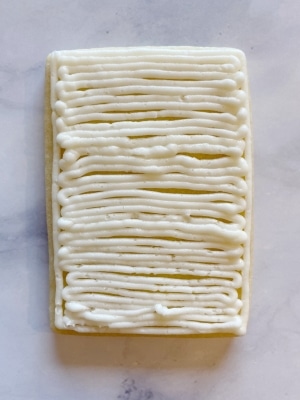
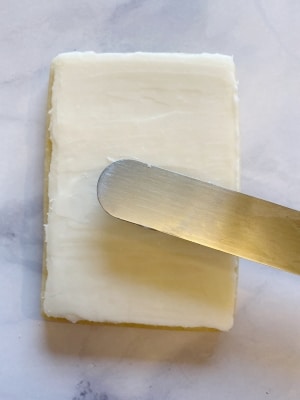
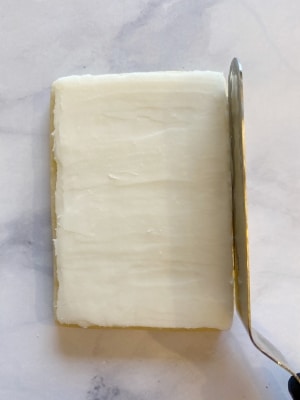
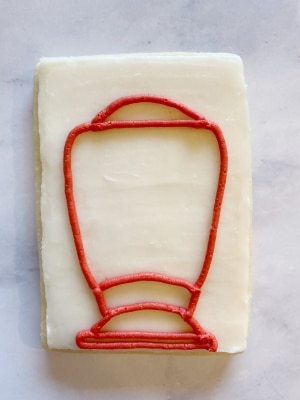
- Your first step will be to outline and fill in the white background. Use tip #4 to complete this step. Then, place the cookies into the freezer and allow them to crust for 5-10 minutes. Use the flat spatula to smooth out the frosting. You will also use the flat spatula to clean up the edges. To do this, simply hold the spatula part perpendicular to the edge of the frosting and pull the spatula toward you.
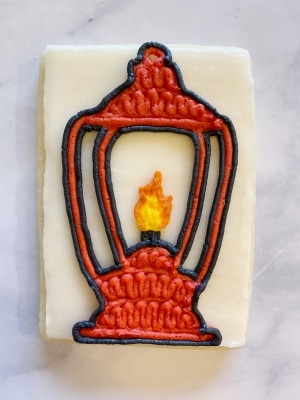
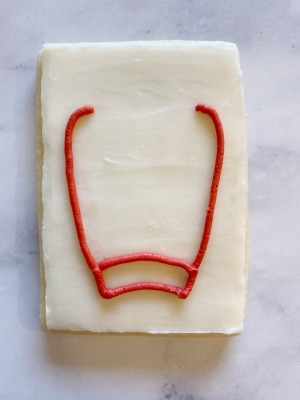
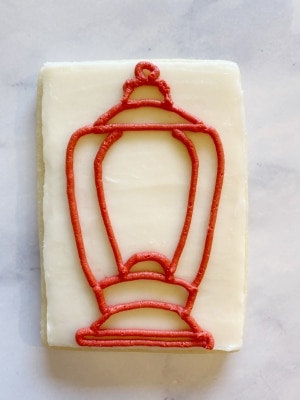
- Attach the tip #3 to the red frosting and draw the camping lantern shape. If you are worried about this step, check out my photo series below so that each part of the drawing is taken just a few lines at a time.
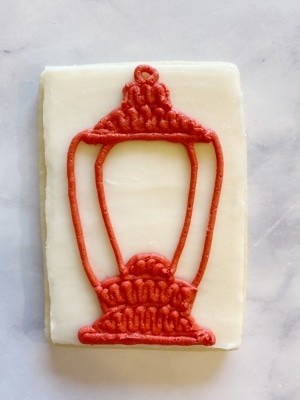
- Use the red frosting with the same tip to fill in the lantern.
- Use the black frosting with tip #2 to create a place for the flame to sit on top of as well as outlining the edges of the lantern. To outline the edges, go over the red outer edges of the lantern EXCEPT for the sides of the lantern. For those spaces, outline each side of the red strands as opposed to drawing directly over them.
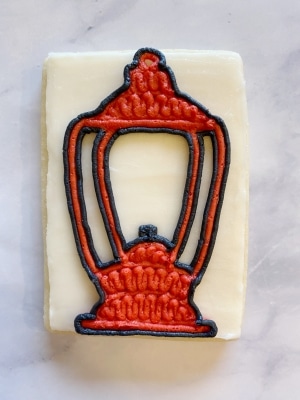
5. Remove/rinse/dry the tip #2 from the black frosting and attach it to the golden yellow frosting. Outline and fill in the center part of the flame. Remove/rinse/dry the tip #2 from the golden yellow frosting and attach it to the orange frosting, outline the golden yellow part of the flame. Use the pointed knife to mix the flame colors together a bit and to pull the orange frosting out to create sharper points. 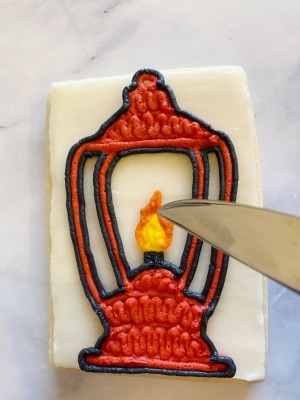
Fall Cabin Buttercream Cookies
Note – To create just the cabin cookies in the fall cabin buttercream cookies set, you will only need:
- Cabin shaped cookies, again, you can grab the exact one I used here: Ann Clark Cookie Cutters Gingerbread House
- Brown, black, golden yellow, red, and orange frosting
- 5 icing bags, 4 couplers, and tips #2, #3, and #352 – place the brown frosting into an icing bag with the tip #3 in it. Place the remaining colors each into their own icing bags with a coupler in them.
-
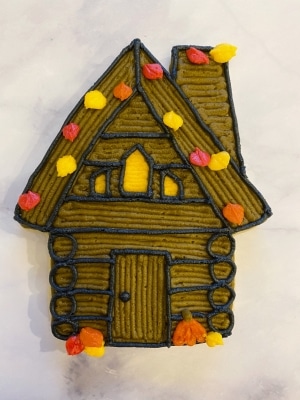
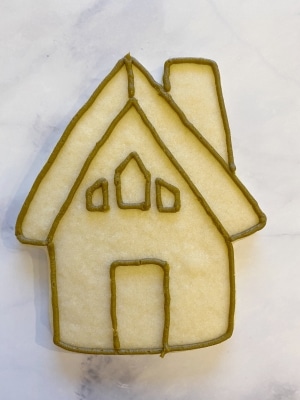
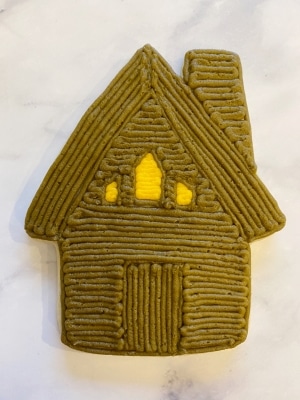
- Your first step will be to outline the shape of the cabin, which includes the outer walls, roof, chimney, door, and windows. Use the brown frosting with tip #3 to complete this step.
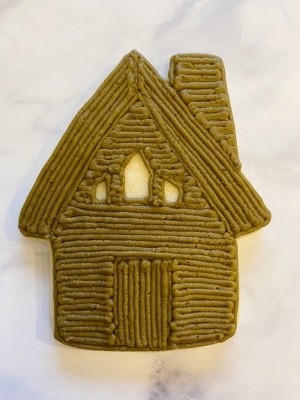
- Fill in the cabin with the same frosting and tip. Pay attention to the direction of the lines for this one in particular, it will help you keep track of what is what in your all brown cookie.
- Attach tip #2 to the golden yellow frosting and fill in the windows.
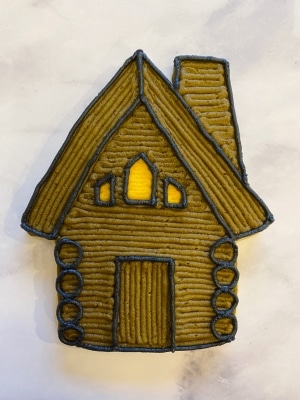
- Remove/rinse/dry the tip #2 from the golden yellow frosting and attach it to the black frosting. Outline the door, windows, roof, and chimney. Also, add four circles vertically on each side of the house to represent the log faces from the logs on the sides of the cabin.
- Use the same black frosting and tip to squeeze out a small dot for the door handle. Draw horizontal lines across the cabin to represent the logs. It is easiest to start at the bottom so you can connect the circles.
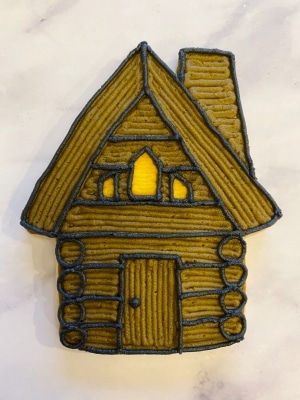
- Remove/rinse/dry the tip #2 from the black frosting and attach it to the orange frosting. Draw three long oval shapes on top of each other to create a pumpkin in front of the cabin. Use the brown frosting with tip #3 to squeeze out a dot for the pumpkin’s stem.
- Attach tip #352 to the golden yellow frosting and squeeze out small leaf shapes at the bottom of the cabin and along the roof. Reference step #2 in the tree tutorial for how to position the tip on your cookie to get the right shape. Remove/rinse/dry the tip #352 from the golden yellow frosting and attach it to the red frosting to pipe out those leaf colors. Repeat the same step for the orange leaves.
- Your first step will be to outline the shape of the cabin, which includes the outer walls, roof, chimney, door, and windows. Use the brown frosting with tip #3 to complete this step.

Aren’t these fall cabin buttercream cookies so beautiful! I just love how the colors pair so well together. Truly representative of what is seen in nature!
To save the tutorial for these fall cabin buttercream cookies for later, use any of the social share icons to save it to your favorite social media site. Or, use the image below to pin it to your Pinterest page!
Thank you for reading my blog and don’t forget to subscribe to get a list of my 12 tips & tricks for beginner buttercream “cookiers!” Happy Fall!
These cookies turned out amazing. So much talent.
Thank you!!
These cookies are absolutely adorable! Such a steady hand.
Thank you so much! I definitely use a pointed knife to fix my lines because I actually have quite shaky hands!