Anthropologie Inspired Vintage Santa Sugar Cookies – Cookie Decorating Tutorial
I don’t know what it is but this year I have been obsessed with vintage Santa. So, of course, I had to make some vintage Santa sugar cookies.
This year was the first year we’ve added ornaments to our Christmas tree in quite some time. For one, ornaments are just expensive. And two, our toddlers are now 4 and almost-3 and are understanding how to be gentle more.
With the ornaments I bought at Anthropologie (and some at Amazon of course) I decided to add velvet bows. I am fully in love and can’t see myself ever not putting velvet bows onto the tree.
My vintage Santa admiration has probably grown thanks to the Anthropologie Christmas trend. I am all about it.
For these vintage Santa sugar cookies, I have a tutorial for five Christmas sugar cookie designs.
You’ll also find the soft cut out sugar cookie recipe and vanilla buttercream recipe.
Speaking of Christmas sugar cookies, you don’t want to miss out on my online Christmas sugar cookie class.
This class is so popular this time of year for a reason! You’ll get recipes, professional tips, and tutorials for over 27 Christmas sugar cookies. Find out more about this jam-packed Christmas sugar cookie class here.

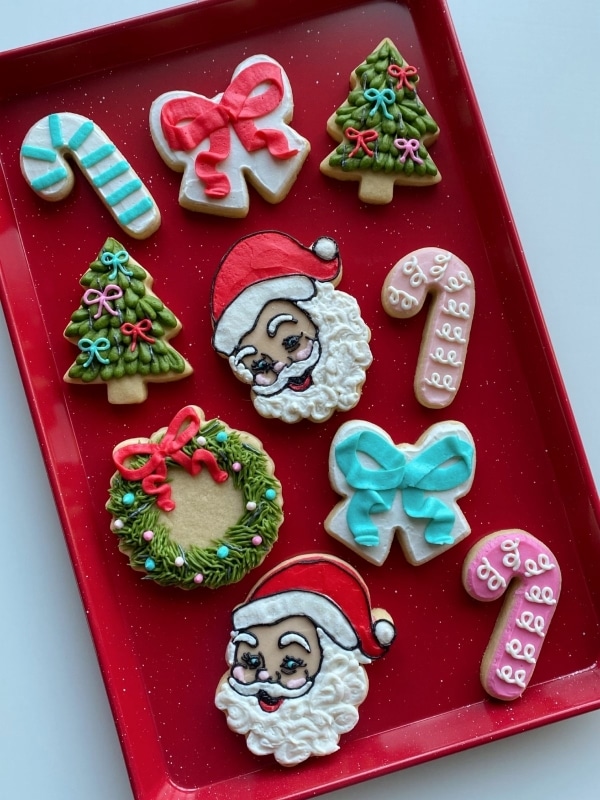
Follow along to see the full step-by-step video and photo series tutorials for these five vintage Christmas sugar cookies:
- vintage Santa sugar cookie
- candy cane sugar cookie
- velvet bow sugar cookie
- Christmas tree sugar cookie with bows
- Christmas wreath sugar cookie
Let’s dive into this tutorial because it’s a long one!
This post may contain affiliate links to Amazon, which means I may receive a commission, at no extra cost to you, if you make a purchase through a link. Please see my full disclosure for further information.*
Skip to
- Part 1: Gathering the Supplies for the Vintage Santa Sugar Cookies
- Part 2: Baking the Cookies, Setting up the Icing Bags, & Making the Luster Paint
- Vintage Santa Sugar Cookies with Buttercream Frosting
- Part 3: Decorating the Vintage Santa Sugar Cookies
- Save the Tutorial for These Vintage Santa Sugar Cookies
Part 1: Gathering the Supplies for the Vintage Santa Sugar Cookies

To decorate these vintage Santa sugar cookies with buttercream frosting, you will want to gather:
- 7 Icing bags
- One Wilton #1 tip, one Wilton #2 tip, one Wilton #5 tip, one PME 1.5 tip, one Wilton #44 tip, one Wilton #104 tip, one Wilton #150 tip, and one Wilton #233 tip
- 6 couplers
- Christmas tree cookie cutter, candy cane cookie cutter, vintage Santa cookie cutter, wreath cookie cutter, and bow cookie cutter
- Red, pink, teal, green, black, and brown gel food dye & small bowls to mix the colors
- Projector, projector stand, and vintage Santa image
- Palette knife (I love this one for cookies!)
- Silver luster dust, fine point food-safe paint brush, and small dish
- Ingredients for a crusting buttercream & sugar cookie dough – found below in recipe card
- Extra granulated sugar & a small spoon – optional for adding shimmer to Santa’s hat
Part 2: Baking the Cookies, Setting up the Icing Bags, & Making the Luster Paint

Use the recipe card below for the sugar cookie and buttercream frosting recipes.

Vintage Santa Sugar Cookies with Buttercream Frosting
Equipment
- Stand Mixer with Paddle Attachment
- Rubber Spatula
- Measuring cups and spoons
- Medium Sized Mixing Bowl
- Lined aluminum cookie sheet parchment paper or silicone lined baking sheet
- Rolling Pin
- Cookie cutters and tools see part 1 on this post for the specific tools needed
- Projector optional but recommended if not strong in drawing skills
- Projector stand optional
Ingredients
Buttercream Frosting
- ½ cup room temperature unsalted butter 4 ounces
- ½ cup room temperature salted butter 4 ounces
- 4 cups powdered sugar
- 1 tbsp. vanilla extract
- 1-3 tbsp. whole milk
Sugar Cookies
- 1 cup cold salted butter cubed
- 1 cup granulated sugar plus more if you want to sprinkle some granulated sugar to the white part of Santa's hat for texture and sparkle
- 3 cups all purpose flour measured with the scoop & level method
- 2 tsp. baking powder
- 1 egg
- 1.5 tsp. vanilla extract
Instructions
- Remove all of the butter from the refrigerator. You will make the sugar cookies first but the butter for the frosting needs to come to room temperature before mixing.
Sugar Cookies
- Preheat the oven to 350℉ and prepare an aluminum cookie sheet by placing either parchment paper or a silicone baking mat on it.
- In a medium sized mixing bowl, combine the flour and baking powder and mix together. Set this aside.
- Cube a cup of salted butter and then, in a stand mixer with the paddle attachment, combine the cubed butter with the granulated sugar. Mix until creamed together well.
- To the stand mixer, add in the egg and vanilla extract and mix until combined.
- Slowly add in the dry ingredients in the mixing bowl to the stand mixer.
- Roll the dough out to 3/8" thick and use the cookie cutters to cut out the cookies. Place the cookies onto the prepared baking sheet and bake for 9-11 minutes or until the tops of the cookies no longer look wet. When baking the cookies, only bake 6-8 cookies at a time to leave proper space between each cookie to cook without spreading. Overcrowding the cookie sheet will cause spread.
Buttercream Frosting
- In a stand mixer with the paddle attachment, add the room temperature salted and unsalted butter and mix on high until light and fluffy.
- Mix in the powdered sugar little by little. Add in the vanilla extract and milk about halfway through adding the sugar to help the frosting come together. Start with one tablespoon of milk and work up to three if needed, depending on the consistency you want. I like to aim for a peanut butter consistency or thinner.
- Follow the directions in Part 2 for the specific way you will divide the buttercream and set up the icing bags.
How to Decorate the Christmas Sugar Cookies
- Please refer to Part 3 of this blog post for all of the cookie decorating tutorials.
Notes
Make your buttercream icing according to the recipe and separate it into eight bowls:
-
-
- One bowl will only contain about 1/4 cup – dye this bowl black.
- One bowl will only contain about 2-3 tablespoons of frosting – dye this skin tone color (use brown and/or pink)
- The remaining six bowls will contain about the same amount of frosting, dye the bowls light pink, dark pink, teal, red, green, and then one undyed.
-
You will have eight bowls but only need seven icing bags. You will keep the skin tone frosting in the bowl so just make sure to cover it with plastic wrap or foil.
Add the PME 1.5 tip to an icing bag and place the black buttercream into it.
Place a coupler into each of the remaining 6 icing bags and fill each bag with a frosting color. You can leave the decorating tips off of the couplers/bags for now.
To make the silver luster powder paint:
Add 1/8 teaspoon of vanilla extract and 1/2 tablespoon of silver luster powder to a small dish. Mix together with the fine point paint brush.
The perfect consistency is that of an acrylic paint. Add more extract or luster powder until you get the perfect consistency.
Keep in mind that the extract will evaporate the longer it sits out so you can also wait it out until you’re ready to use it and see if you need to adjust it.
Part 3: Decorating the Vintage Santa Sugar Cookies
Check out the video tutorial showing all five decorated vintage Anthropologie Christmas sugar cookies then follow the step-by-step photo series tutorials below.
How to Decorate the Buttercream Vintage Santa Sugar Cookies

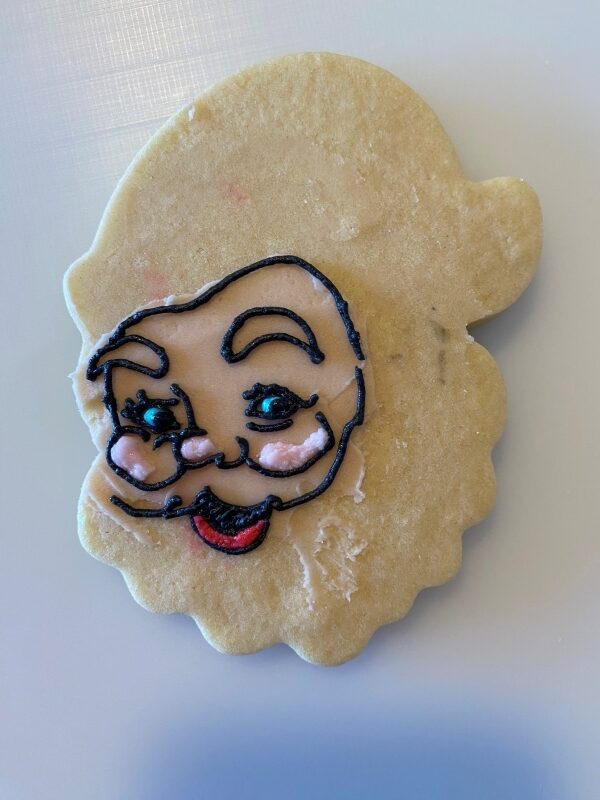
- If using a projector, set up the projector and align the image onto the cookie. Use the palette knife to spread the skin tone frosting in a thin layer onto the cookie where Santa’s face will be.

- Use the black frosting with the PME 1.5 tip to outline (or draw) Santa’s facial features, including his eyebrows and mustache, as well has the outline of his face.
- Attach the tip #2 to the teal frosting to pipe Santa’s eye color, then pipe the pupil with the black frosting.
- Attach the tip #4 to the red frosting to fill in Santa’s lower lip. Then, remove/rinse/dry the tip #4 from the red, attach it to the light pink, and add height to Santa’s nose & cheeks.
- Remove/rinse/dry the tip #4 from the light pink and add it to the white/undyed frosting. Fill in Santa’s eyebrows.
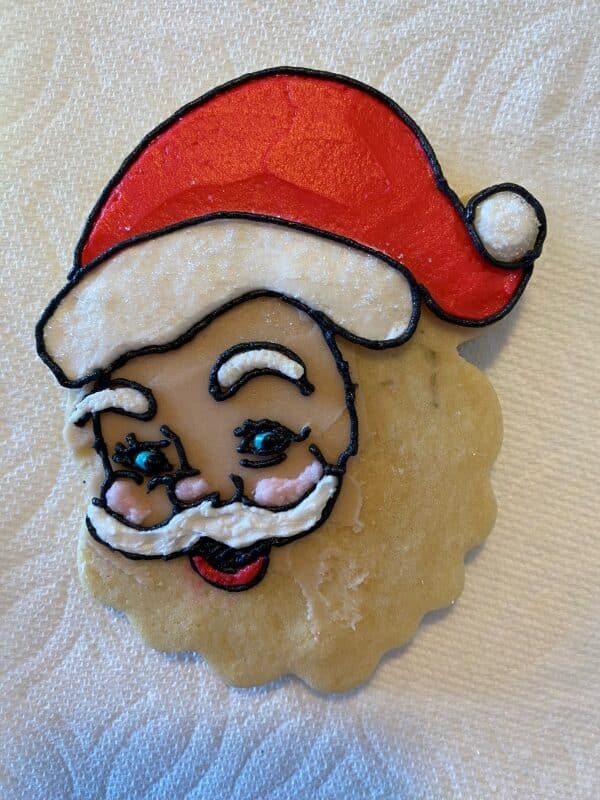
- Outline and fill in the white part of Santa’s hat, just the rim not the poof yet, with the same tip #4 on the white frosting. Smooth the frosting with the palette knife.
- Remove/rinse/dry the tip #4 from the white frosting & attach it to the red frosting. Outline, fill in, and smooth the rest of the hat, except for the white poof.
- Remove/rinse/dry the tip #4 from the red and move it back to the white frosting. Pipe a dot for the poof & fill in his eyebrows. Optionally, sprinkle granulated sugar (or clear sanding sugar) over the white on the hat.
- Use the black frosting, with tip #1.5, to outline Santa’s hat.
- Use the white frosting, still with tip #4, to pipe Santa’s beard. I found this easiest to first outline Santa’s face/bottom of hat and then make swirls of frosting for the beard.

 Remove/rinse/dry the tip #4 from the red and move it back to the white frosting. Pipe a dot for the poof & fill in his eyebrows. Optionally, sprinkle granulated sugar (or clear sanding sugar) over the white on the hat.

How to Decorate the Buttercream Candy Cane Sugar Cookies

- Attach the tip #4 to the color of icing you want the candy cane to be; I’m using the white. Outline and fill in the candy cane shape, then smooth with the palette knife.
- Attach the tip #44 to the next color of icing you want; I’m using the dark pink. Pipe lines along the candy cane. You can also use the tip #2 to pipe swirls or any other fun design you want on your candy canes.


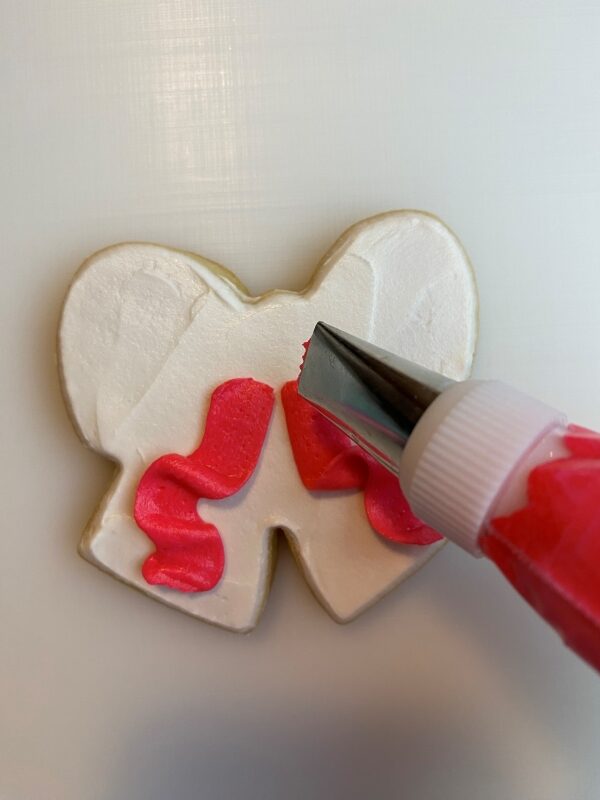
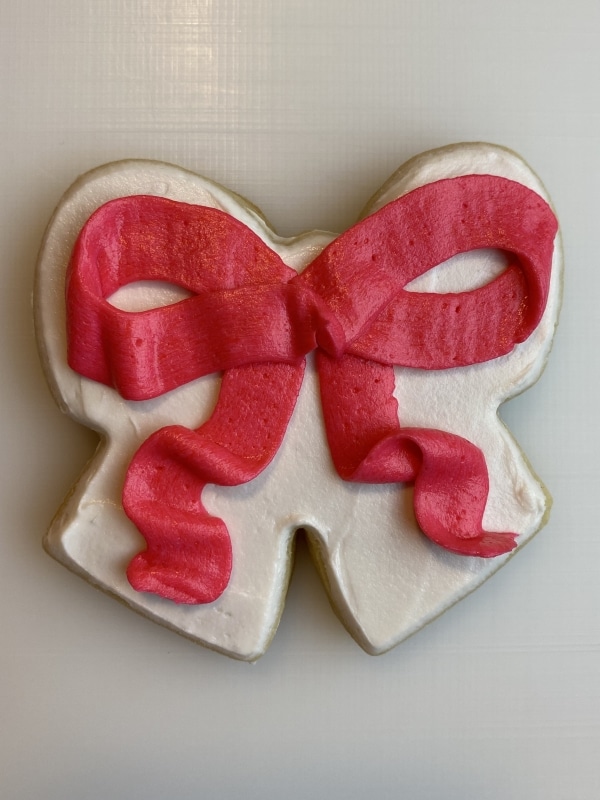
How to Decorate the Velvet Bow Sugar Cookies

- Use the tip #4 on the white frosting to outline and fill in the bow. Then, smooth it with the palette knife.
- Attach the tip #150 to your preferred icing bag and pipe the bow. I found it easiest to pipe the bottom ribbons first, then pipe the figure-8 bow at the top.


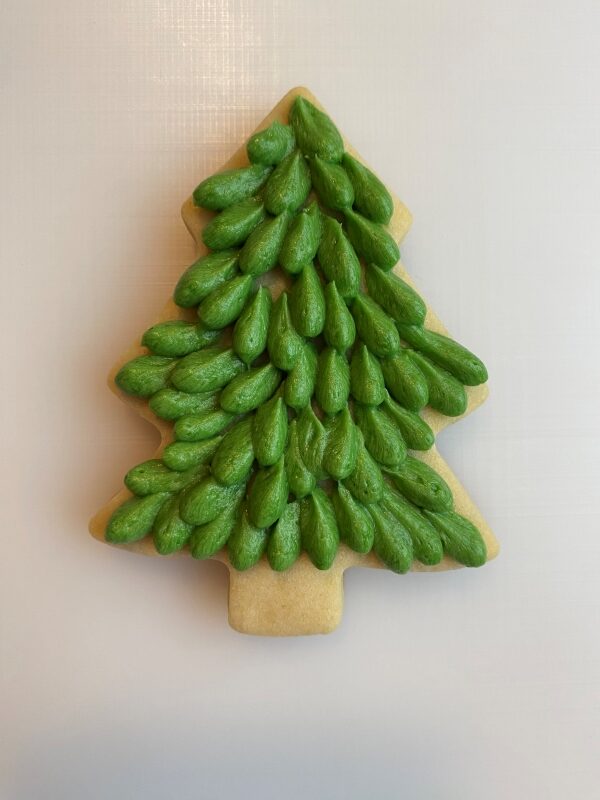
How to Decorate the Anthropologie Christmas Tree Sugar Cookies

- Attach the tip #104 to the green frosting. Rotate the Christmas tree about 300 degrees and begin piping the greenery in the corner. You will have the wide side of the tip up and the thin side toward you.
- Continue piping the greenery all the way up the tree. Once you are at the very top, make sure the thin side of the piping tip points up at the top of the tree as straight as possible.
- Attach the tip #1 to the light pink frosting and pipe straight lines onto the tree to mimic tinsel.
- Paint the tinsel with the silver luster dust paint.
- Attach the tip #2 to the teal frosting and pipe a small bow onto the tree. Then, repeat with the light and dark pink icing colors.


How to Decorate the Buttercream Wreath Sugar Cookies
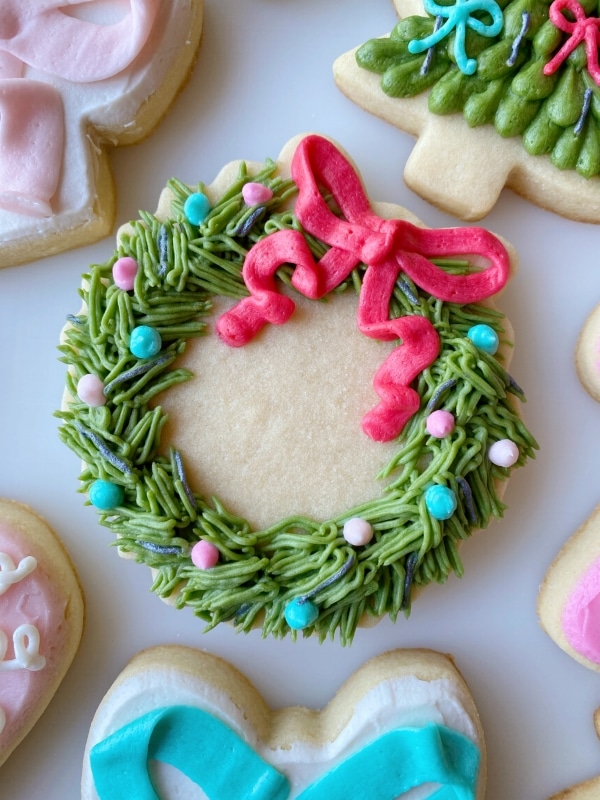
- Attach the tip #233 to the green frosting and pipe the greenery around the edges of the cookie. Pipe from the center outward and then do the opposite, pipe from the outer edge to the inside.
- Attach the tip #44 to the red frosting and pipe a bow at the top of the wreath.
- Attach the tip #4 to the teal frosting and pipe dots for ornaments onto the wreath. Then repeat with the light and dark pink colors.
- Paint some of the greenery with the silver luster powder paint to add some tinsel.


That’s all of them! I really love how these Anthropologie-inspired vintage Santa sugar cookies turned out.

I’d love to know in the comments below, are you a fan of vintage or Anthropologie-inspired Christmas?
Save the Tutorial for These Vintage Santa Sugar Cookies
Use the image below to pin this tutorial for decorated Christmas sugar cookies to your holiday board on Pinterest. Alternatively, use any of the social share icons on the top of the page to share it to your favorite social media site.