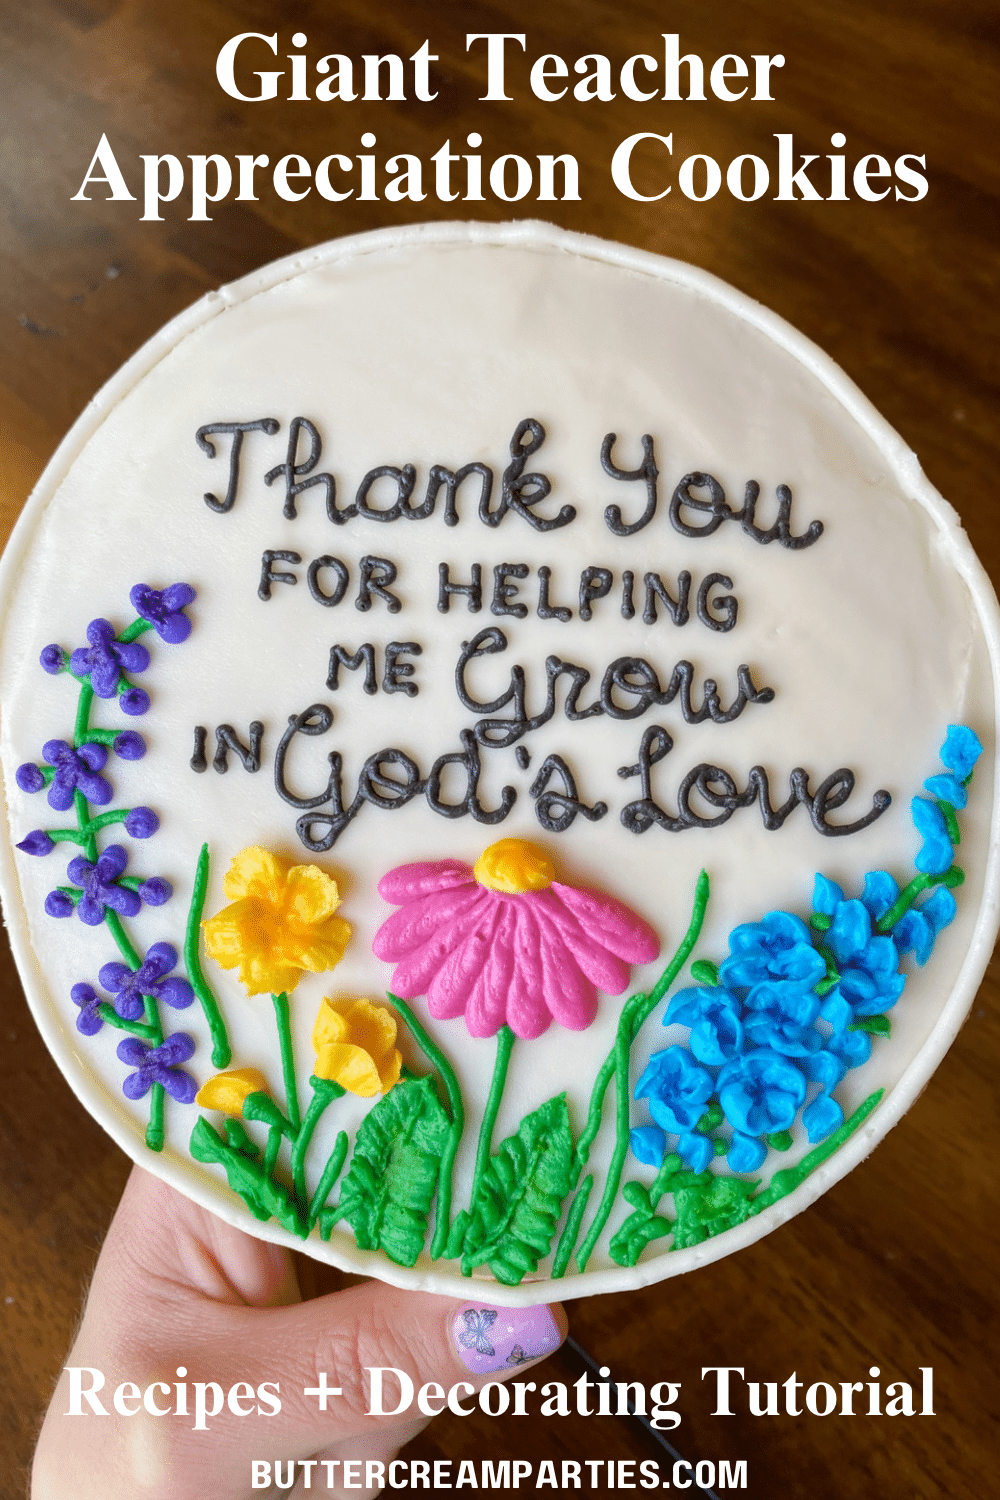
Giant Teacher Appreciation Cookies with Buttercream
If you have kids in school or are a teacher yourself, you may be familiar with Teacher Appreciation Week. With my son in preschool this year, I wanted to make these fun teacher appreciation cookies.
Teacher Appreciation Day is always the first Tuesday in the month of May. Teachers are so important and don’t hear “thank you” as much as they deserve.
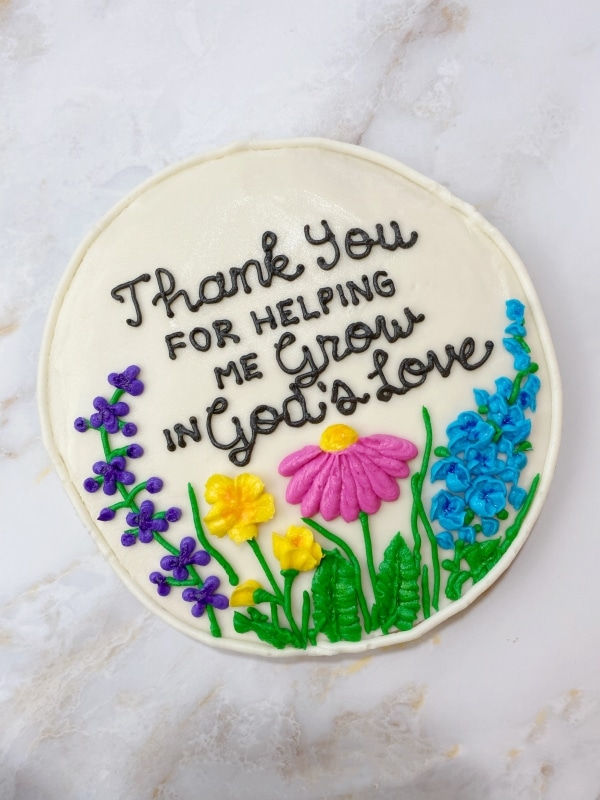
Baking and decorating a giant sugar cookie is an easy and thoughtful gift for Teacher Appreciation Day.
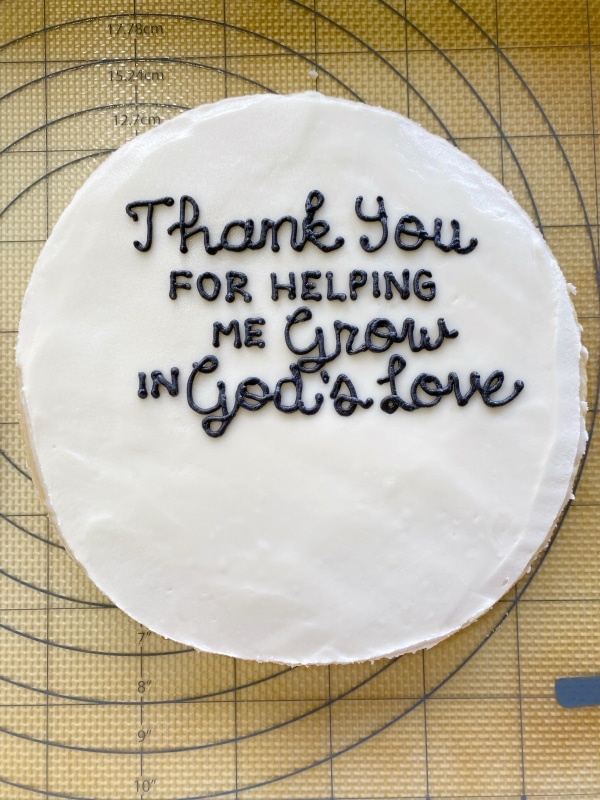
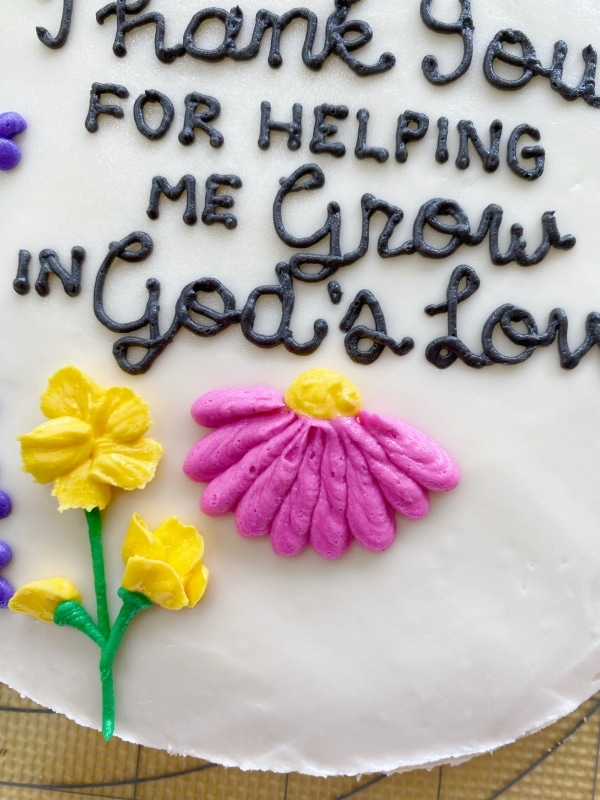
My son attends a private Christian preschool so using the phrase “Thank you for helping me grow in God’s love” is perfect for the cookies.
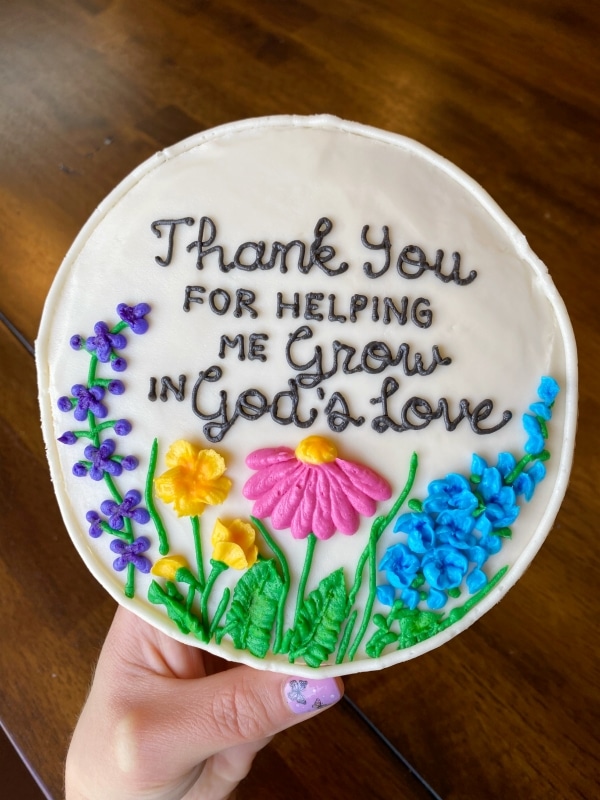
If your children do not attend a Christian school you can always just go with “Thank you for helping me grow.” It’s less to write in buttercream as well!
You will also find the sugar cookie recipe for giant cookies and the perfect vanilla crusting buttercream recipe.
Since you will need to transport this giant sugar cookie to your child’s school, I will also include a fool-proof way to safely get it to school in one piece.
Follow along for the full tutorial in baking and decorating these giant teacher appreciation cookies with buttercream frosting.
*This post may contain affiliate links, which means I may receive a commission, at no extra cost to you, if you make a purchase through a link. Please see my full disclosure for further information.*
Skip to
How to Make The Best Teacher Appreciation Cookies
The Soft Sugar Cookie Recipe
To embark on this delicious journey, your first step is to make the soft sugar cookies. Guess what? This is a no-chill sugar cookie dough recipe so there is no need to sit around waiting for your cookies to get cold.
Let’s get started. Go ahead and preheat the oven to 350 degrees Fahrenheit. Also, take out one cup of unsalted butter from the refrigerator and set this aside for the buttercream frosting recipe.
DO NOT USE THE SOFT UNSALTED BUTTER FOR THE COOKIES. IT IS FOR THE FROSTING. I just wanted to make that clear.
Grab a medium sized mixing bowl and add in 3 cups of flour. Remember, when measuring flour, do the spoon & scrape method.
What’s the spoon & scrape method? Simply use a spoon to spoon flour into your measuring cup. Once you have a mound at the top, take a knife and scrape it over the top of the measuring cup. Obviously don’t scrape the excess into your mixing bowl.
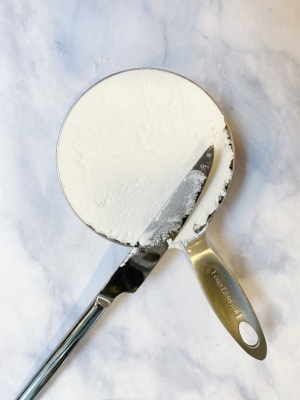
Alternatively, use a kitchen scale and measure out 384 grams of flour.
Next, add in two teaspoons of baking powder into the mixing bowl. Make sure to use baking powder and not baking soda. The baking soda will cause the cookies to puff up and spread. Likely still delicious but not as pretty.
Stir the baking powder into the flour and set this bowl aside.
Grab your stand mixer and attach the paddle attachment. When I was first starting on my baking journey (I was in my 20s) I used the whisk. Whoops. I’ll just say we had to throw away that whisk attachment.
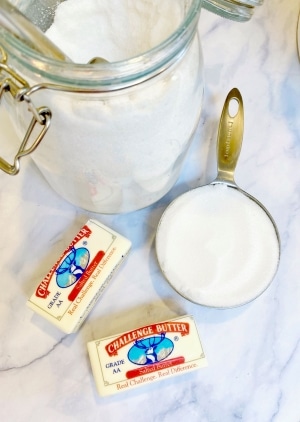
In the stand mixer, add in one cup (or two sticks) of COLD salted butter. By cold, I mean refrigerated and not at room temperature.
You can chop the butter up into cubes before adding it into the stand if you want to speed up the process and reduce the chance of your mixer kicking the butter out onto the floor.
To the butter, cubed or not, add in one cup of granulated white sugar. You don’t need to do the scoop & scrape method for the sugar.
Now, cream the butter and sugar together on medium speed. You will know it’s done when you can’t see any butter lumps. Try not to overmix, as this just adds heat into the butter and increases the chance of spread.
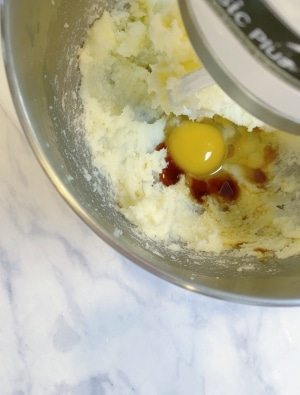
Next up is adding one egg to the mixer. If you have access to duck eggs, I HIGHLY recommend using a duck egg. We have about 20 ducks, so I always use a duck egg.
Baking with duck eggs has a richer taste due to the larger yolk. We all know that the yolk is the yummier part of the egg, too.
If you don’t have a duck egg, use a chicken egg and the buttercream cookies will still be delish.
Before turning on the mixer, go ahead and add in at least one and a half teaspoons of vanilla extract. I’ve been known to add up to a tablespoon.
If you love almond extract in your cookie, go ahead and reduce the vanilla extract amount and add in some almond to make up the difference. I just prefer an all vanilla cookie.
Now, go ahead and mix the egg and extract in the stand mixer until the egg is just combined. Again, we don’t want to introduce too much heat.
Lastly, spoon in some of the flour & baking powder mixture and mix until it’s not a powdery mess. Continue adding in the dry ingredients until it’s all been added.
The dough will pull away from the sides when it is ready. If it is too sticky, add in a tablespoon of flour. It’s better to go with more than less flour here.
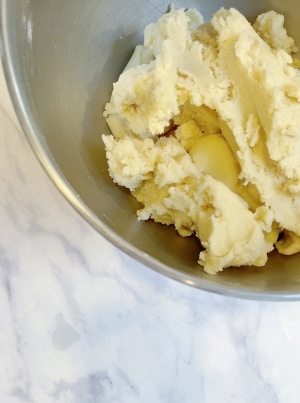
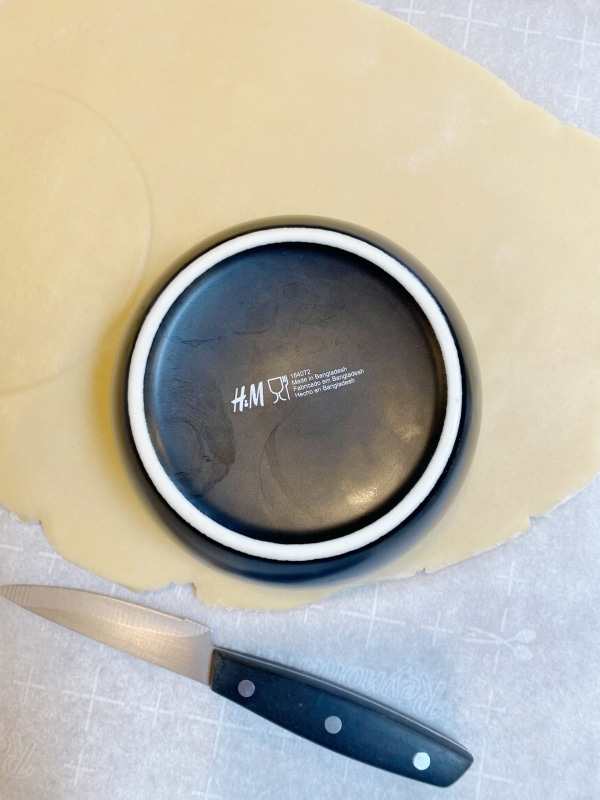
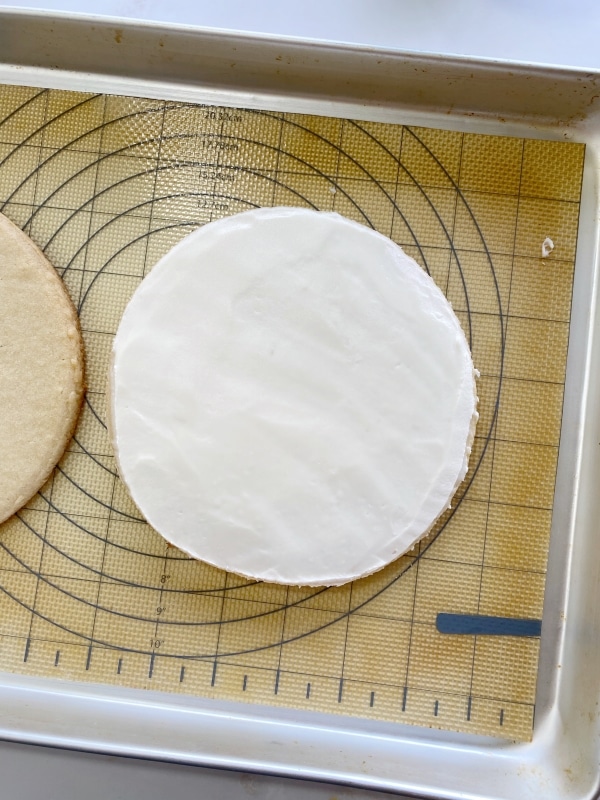
Roll out the cookie dough on a floured surface to 3/8″ thick. I prefer a thicker cookie because buttercream frosting can be overpowering if the cookie is too thin.
I use this Joseph-Joseph rolling pin to ensure my cookies are even and 3/8″ thick. I highly recommend it! It’s one of my favorite kitchen tools.
You can use a large cookie cutter, 5″ and up, or find a round object in your house to trace. I found a bowl that was about 5.5″ wide that worked perfectly for these cookies.
It’s best to bake each cookie one at a time to avoid too much spread. If you need to bake more than one at a time, don’t place more than two on one cookie sheet.
I find this cookie dough recipe works wonders on this cookie sheet and a silicone mat.

You should be able to get about four giant, about 6″, sugar cookies with this recipe.
Bake for 12-17 minutes at 350 degrees Fahrenheit, or until the middle of the cookie doesn’t look wet. Sometimes it forms a bit of a bump on the top of the cookie which also means they are done.
I always err on underbaking than overbaking. The cookies will continue to cook a bit as they cool on the baking sheet. The egg & flour should be cooked enough for safe eating, assuming the cookies didn’t look wet in appearance anymore.
Allow the cookies to cool on the sheet for at least 15 minutes, then use a thin spatula to move them to a piece of parchment paper.
The Delicious Frosting for the Buttercream Cookies
Remember the cup of unsalted butter you took out at the beginning of this? Check to see if it is at room temperature yet. To do this, simply press your finger into the butter. If it creates an indentation easily, the butter is ready.
Wash & dry the bowl from the stand mixer since you just made the cookies in it. Now, add in the cup of room temperature unsalted butter.
Using the paddle attachment (make sure it’s clean from the cookie dough), cream the butter on medium-high until it is lighter in color. Make sure all of the lumps are gone, too.
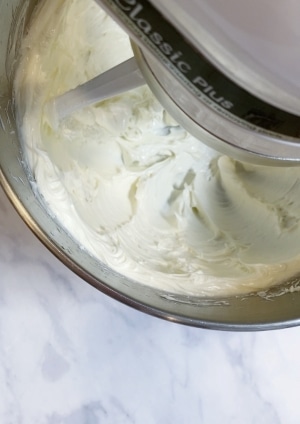
Turn off the stand mixer and add in four cups of powdered confectioner’s sugar. Four cups is a lot, yes. However, I promise the flavors will all balance out. And remember? We made thick sugar cookies.
We use four cups of powdered sugar in order for the frosting to form a slight crust. All that means is that the outer layer of frosting will dry to the touch. This helps keep fingers cleaned when picking up the cookies & it acts as a tasty cement if you want to add sprinkles.
The frosting will get nowhere near as hard as royal icing so don’t worry about losing your softest sugar cookie award.
With the four cups of powdered sugar, add in at least one and a half teaspoons of vanilla extract. Just like the cookies, I tend to measure the vanilla extract from the heart and it may be around a tablespoon sometimes.
Add in one tablespoon of milk.
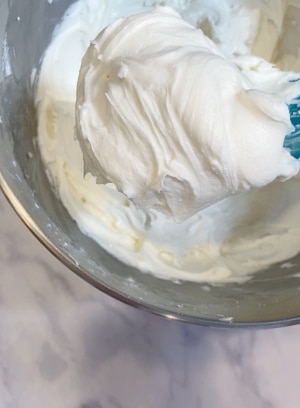
Cover the stand mixer with a clean towel or a paper towel and mix on low/stir. Once the frosting is coming together, remove the towel. Add in one more tablespoon of milk, still keeping the mixer on low speed.
If the frosting is thicker than a creamy peanut butter consistency, add in one more tablespoon of milk.
Do not turn the mixer higher than low. If needed, use a rubber spatula to stir the frosting. Overmixing buttercream can cause air bubbles. If you do overmix, here’s a post on how to fix it. I promise it’s not terribly hard to fix, but, as always, prevention is better.
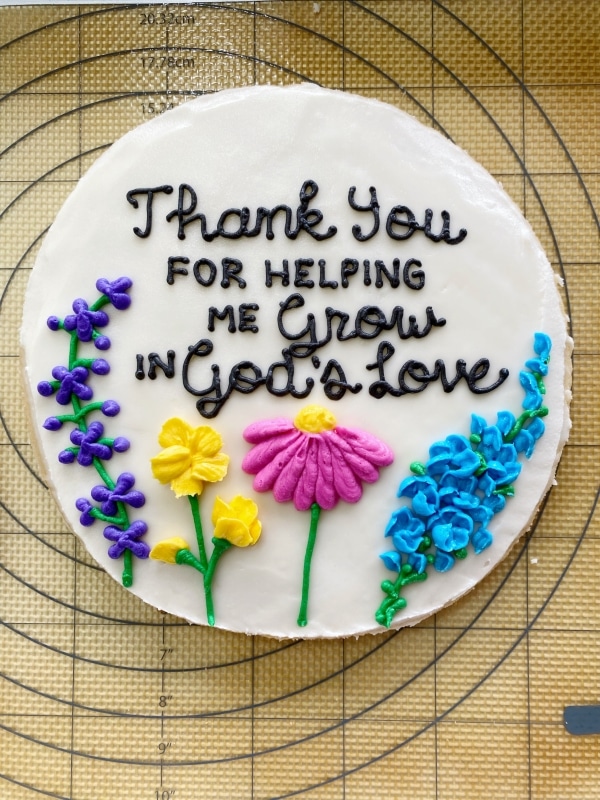
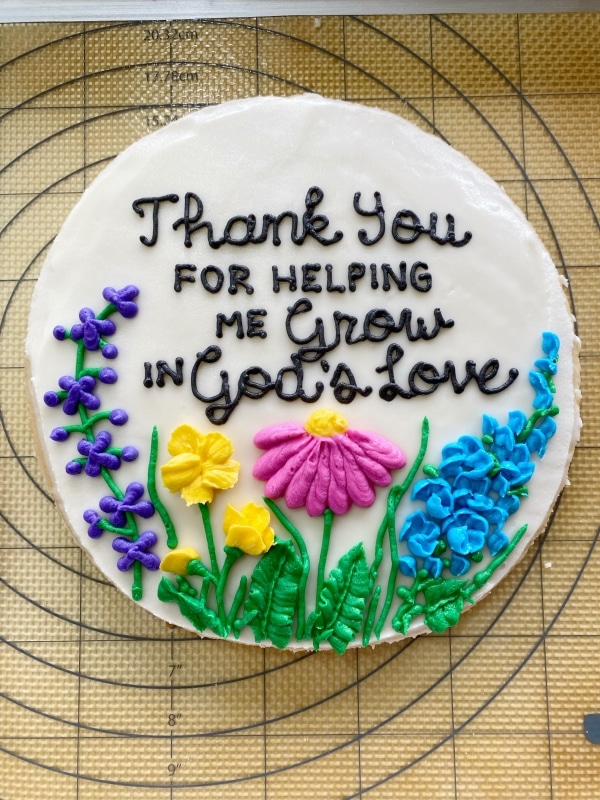
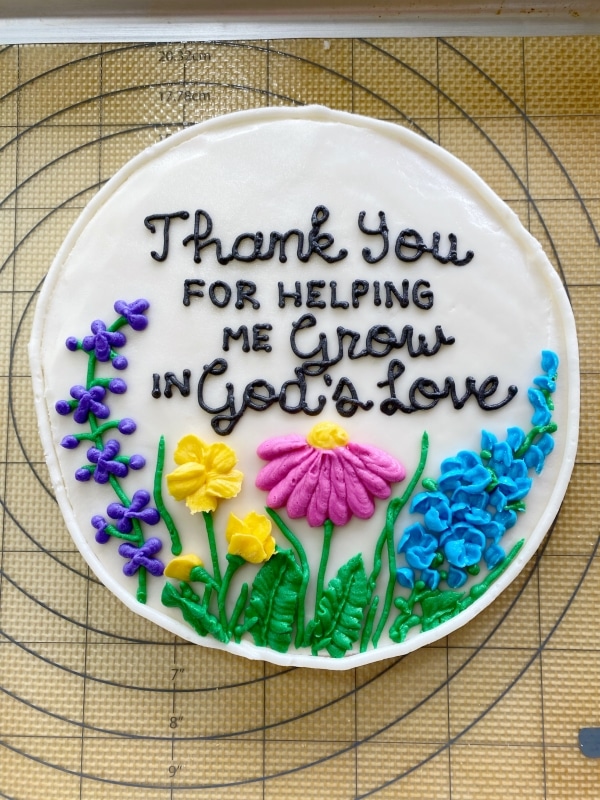
You will want to keep about 60% of the frosting white to fill the background of the cookie. The remaining buttercream can be dyed using gel food dye in your colors of choice.
Liquid dye will not be strong enough for thick buttercream frosting. Here is my favorite gel food dye brand.
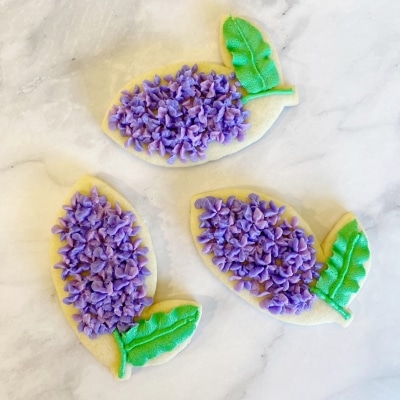
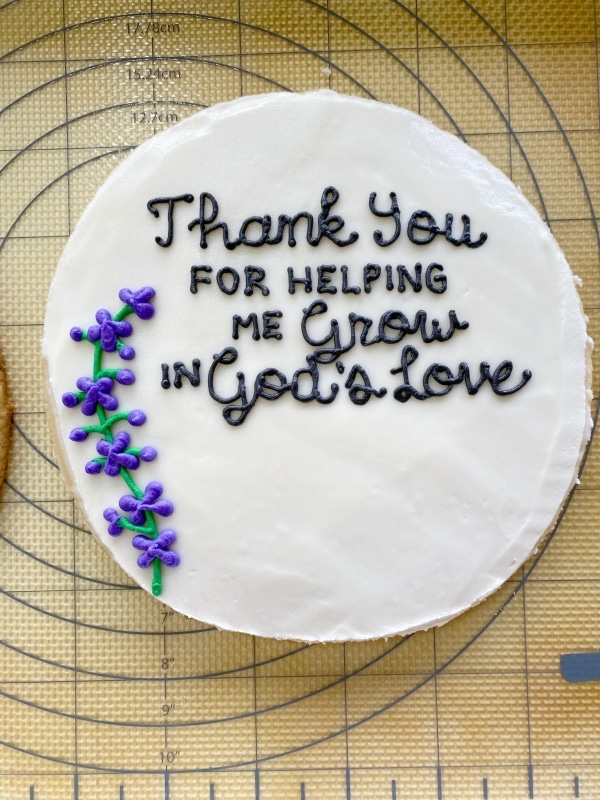
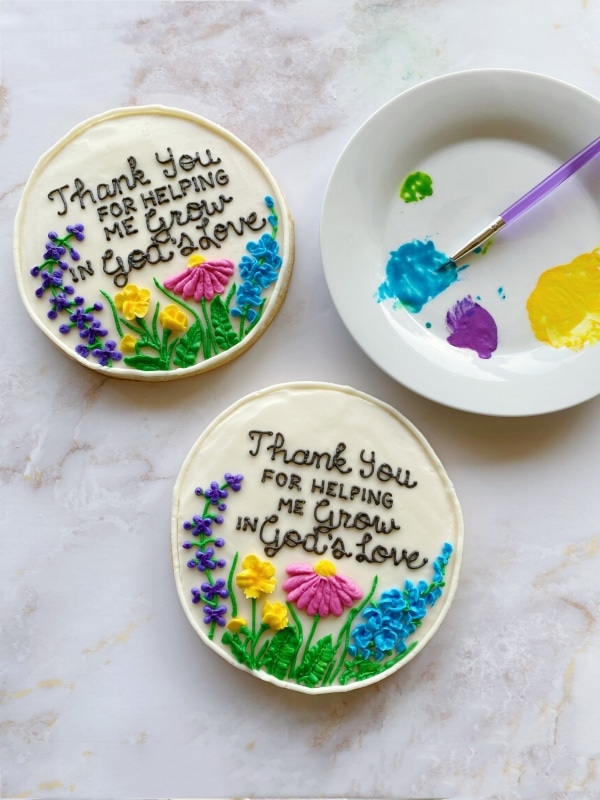
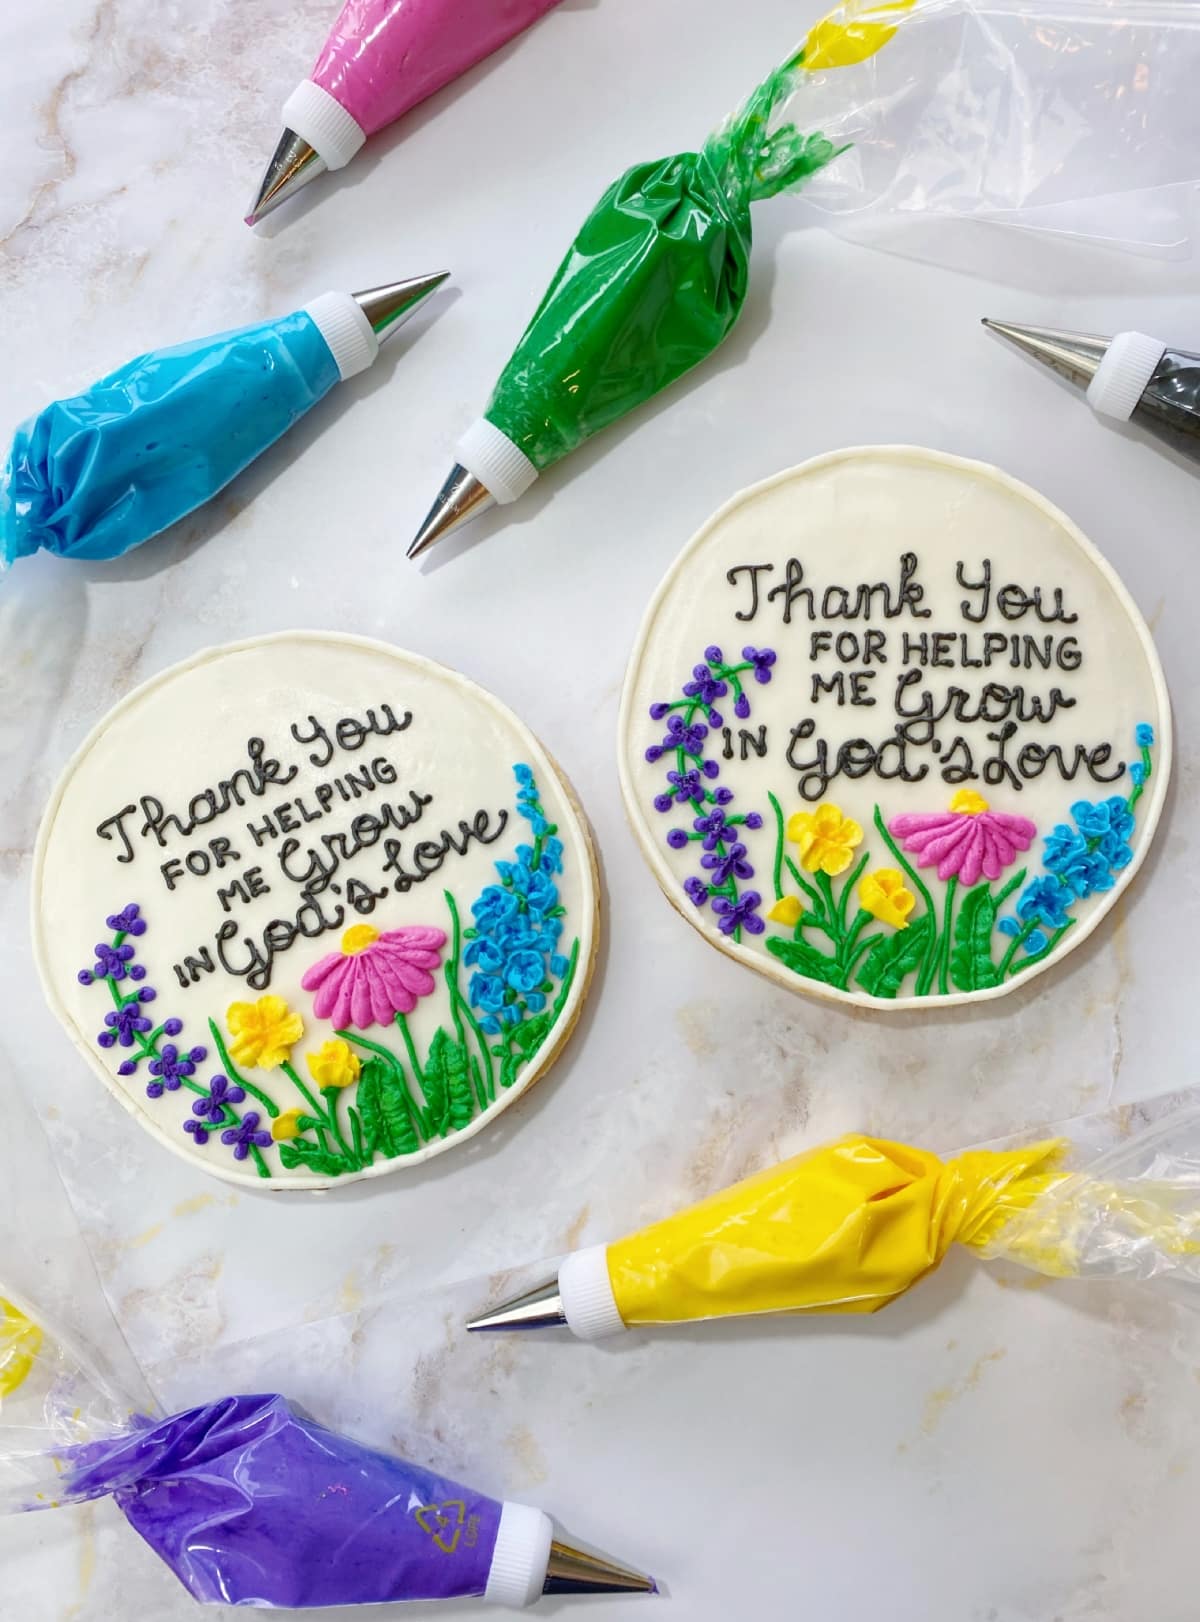
I recommend using a dark color such as black, navy, or purple for the writing and then making sure to have green for the flower stems and leaves. Then, choose whatever colors you want for your flowers.
How to Decorate These Teacher Appreciation Cookies
Gather these items to create these flower cookies:
- prepared buttercream in various colors
- disposable piping bags
- couplers
- Wilton tip #2, #5, #59, #68, and #101
- PME tip #1.5
- 9″ angled flat spatula
- paint brush and powdered food coloring (optional)
Once you have your decorating tools, it’s time to decorate these teacher appreciation cookies. Follow the steps below to create a similar look to my design.
- Add the prepared white/undyed buttercream frosting into a piping bag with a coupler (no decorating tip yet), only about a cup of frosting at a time.
- Add the colored buttercream to their own individual piping bags and add couplers into each of them. I ended up making black, pink, green, yellow, purple, and blue buttercream.
- Using the white buttercream without a piping tip, squeeze some frosting onto the sugar cookies and spread the frosting out with an angled flat spatula. If you struggle with smoothing buttercream, try heating the spatula up in hot water, wiping the water off, and then smoothing the buttercream.

- Add the PME 1.5 tip to the black buttercream frosting and write your chosen saying for your teacher appreciation cookies.
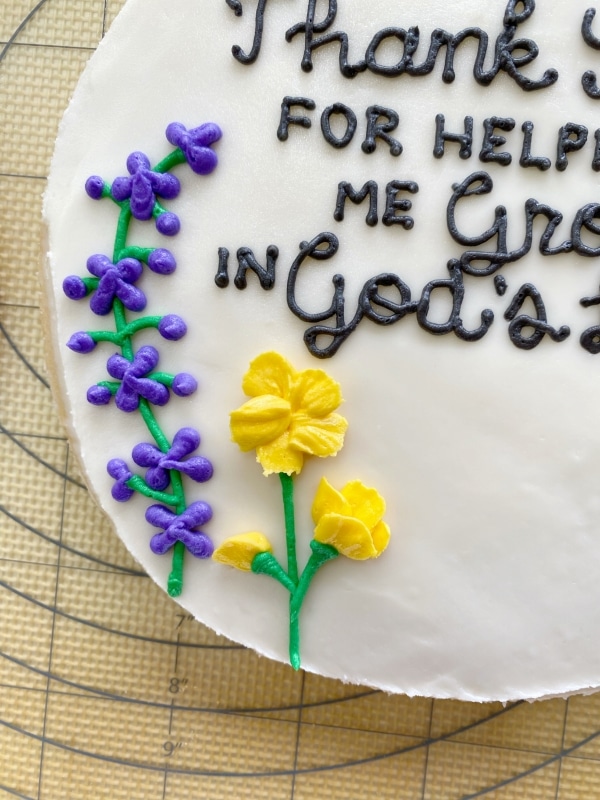
- Attach the Wilton tip #2 onto the green frosting and pipe out the stem of the first flower. Then, remove/rinse/dry the tip #2 from the green frosting and attach it to the purple to pipe the purple flower.
- Attach the Wilton tip #101 to the yellow frosting to pipe the yellow flowers. Then use the green frosting with the tip #2 to pipe the stem.
- Attach the Wilton tip #5 to the yellow frosting and pipe the stamen of the pink flower. Then attach the tip #101 to the pink frosting to pipe the pink flower. Use the green frosting with the tip #2 to pipe the stem.
- Attach the Wilton tip #59 to the blue frosting and pipe the blue flowers. Use the green frosting with the tip #2 to pipe the stem.
- Add some grass and leaves using the green frosting. I used the tip #2 and the tip #68.
- Add the Wilton tip #5 to the white frosting to outline the edge of the cookie.
- *Optional: use powdered food coloring, water, and a paint brush to paint on the flowers to add another layer of dimension.

How to Transport These Teacher Appreciation Cookies
Since you will be bringing these cookies to your child’s teacher(s), you will need to transport them carefully. I found 6″ bakery boxes that worked perfectly.
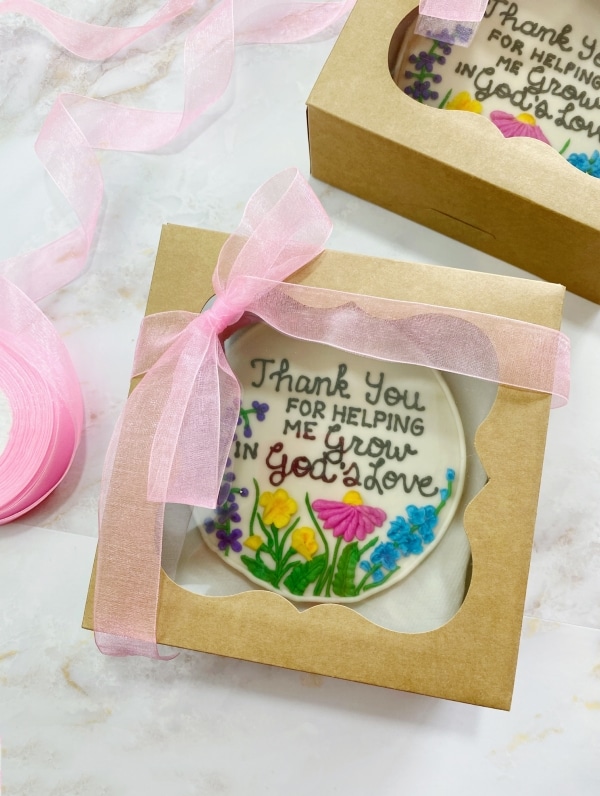
The bakery boxes have a window so you can still see the pretty cookie inside.
I like to add a layer or two of paper towel under the cookie on the bottom of the box. This helps to keep the cookie in place and it absorbs any butter that may leak from the cookie.
Attach some ribbon and you have the most beautiful teacher appreciation cookies to bring to school.
In order to get the cookies to school, think of these cookie boxes like boxes of cupcakes. Keep them upright and try to avoid squishing them.
These cookies are shelf-stable and can stay out at room temperature for about a week.
Enjoy!
Giant Teacher Appreciation Cookies with Buttercream Frosting
Equipment
- Medium Sized Mixing Bowl
- Stand Mixer with Paddle Attachment
- Measuring cups and spoons
- Rubber Spatula
- Rolling Pin
- Large cookie cutter or bowl
- Piping bags & decorating tips
- Lined cookie sheet use a silicone baking mat or parchment paper
Ingredients
Soft Sugar Cookies
- 3 cups all purpose flour, plus more for rolling
- 2 tsp. baking powder
- 1 cup cold salted butter cut into cubes
- 1 cup granulated sugar
- 1 egg
- 1 tbsp. vanilla extract
Vanilla Buttercream Frosting
- 1 cup room temperature unsalted butter
- 4 cups powdered sugar
- 2-4 tbsp. whole milk, half & half, or cream
- 1 tbsp. vanilla extract
- gel food dye
Instructions
Giant Sugar Cookies
- Preheat the oven to 350℉ and prepare the cookie sheet by laying a silicone baking sheet or parchment paper on top.
- In a medium sized mixing bowl, combine the flour and baking powder. Set this bowl aside for now.
- In a stand mixer with the paddle attachment, cream the cold butter with the granulated sugar until well combined.
- Add the egg and vanilla extract to the mixer and mix until combined.
- Slowly add in the flour and baking powder mixture and mix until combined. The dough should come together to form a ball. If the dough is not resembling a ball, add in more flour one tablespoon at a time.
- Roll the dough out to 3/8" thick. Use a large circle cookie cutter or bowl to cut out a circle. Place the circle onto a lined baking sheet and bake for 15-17 minutes. Allow the cookie to cool on the baking sheet before moving to avoid breaking it.
Vanilla Buttercream Frosting
- In a stand mixer with the paddle attachment, cream the room temperature butter on medium high speed until light and fluffy.
- Slowly add in the powdered sugar, mixing on LOW speed until fully combined.
- Mix in the vanilla extract and two tablespoons of milk. Mix on low speed until combined. If the frosting is too thick, mix in up to two tablespoons of milk. I prefer the consistency of smooth peanut butter when decorating buttercream sugar cookies.
- Separate the frosting into various bowls, enough for the various colors you want to dye it. Dye the frosting and add it to the icing bags, using decorating tips.
- Decorate the sugar cookies with the buttercream frosting once the sugar cookies have completely cooled. The decorated sugar cookies can be stored on the counter at room temperature for several days or in the freezer for several months.
Save this Recipe for Giant Teacher Appreciation Cookies
Use the image below to pin this recipe for giant buttercream cookies to your baking board or sugar cookie board on Pinterest. Alternatively, use any of the social share icons on the top of the page to share it to your favorite social media site.